According to the UPS Pulse of the Online Shopper, over half of the shoppers are willing to pay for shipping if the total cost of their order is still a good deal. By setting reasonable shipping rates based on different scenarios, you can motivate your customers to add more items to their carts.
While WooCommerce offers basic shipping features for similar products, it falls short when it comes to more complex shipping rates based on weight, cart total, and other conditions.
On the other hand, you might be familiar with the plugin that only allows flexible or table rate shipping options, but in this blog, I want to share my experience with the YayPricing plugin. It’s an all-in-one WooCommerce dynamic product pricing and discounts plugin. I was pleasantly surprised that it also works great with flexible shipping!
So, I’ll show you how to set up flexible shipping with YayPricing and apply it to a popular weight-based shipping scenario. Stick with me till the end of the blog!
What is WooCommerce Flexible Shipping?
Flexible shipping is a shipping method that provides the option to customize shipping rates for different products. This enables businesses to charge varying rates based on the weight, size, or destination of each item.
This shipping method is highly beneficial for businesses seeking cost-effective shipping solutions. With flexible shipping, companies can save money on shipping expenses by tailoring rates to each product’s unique shipping requirements.
Set Up Flexible Shipping with WooCommerce Default Settings
WooCommerce provides default shipping features that allow you to customize flexible shipping rates and options for your e-commerce store. These features include:
1. Shipping Rates: By default, WooCommerce provides shipping rates from USPS. However, if you need more flexibility and are not US-based, you may require more complex shipping solutions such as Calcurates.
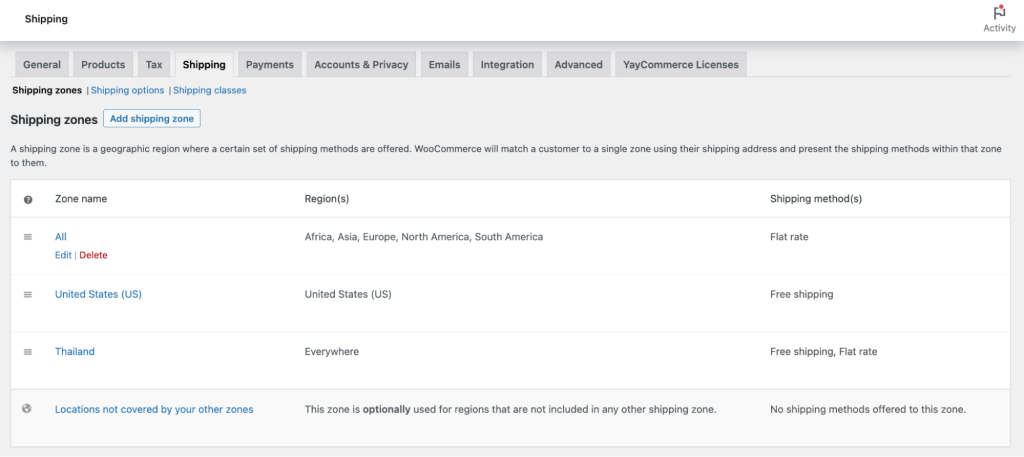
2. Shipping Options: You can choose from multiple shipping options such as flat rate shipping, free shipping, and local pickup. To set up shipping options for your e-commerce store, navigate to the shipping zones section within your WooCommerce settings.
3. Shipping Zones: WooCommerce shipping zones refer to the destination to which you are shipping, whether it is a country, region, city, or zip code. You can add three basic shipping options to each WooCommerce shipping zone, and you have the flexibility to create as many shipping zones as you need.
4. Shipping Classes: Shipping classes can be used to group products that are similar in nature. Some shipping methods, such as Flat Rate Shipping, use these classes to provide different shipping rates for different groups of products.
The Limitations
WooCommerce is designed to accommodate stores that primarily sell one type of product. For instance, stores that sell clothing generally have products with similar attributes and weights, and can therefore use flat-rate shipping as their only shipping option.
However, if your store has a diverse portfolio of products and you want to offer more shipping options, you will need to install an additional WooCommerce shipping plugin to expand your e-commerce capabilities.
Solutions for WooCommerce Flexible Shipping
You may already be acquainted with a plugin that only permits flexible or table rate shipping options, such as:
- Table Rate Shipping Method for WooCommerce by Flexible Shipping
- Flexible Checkout Fields for WooCommerce – WooCommerce Checkout Manager
- WooCommerce Weight Based Shipping
As you are likely aware, minimizing the number of plugins utilized on a website is crucial to avoid compatibility issues. By using YayPricing – all-in-one WooCommerce dynamic product pricing and discount plugin, you can easily customize all your pricing, discounts, and fees from a single location.
Moreover, its user-friendly interface makes it effortless to use. Especially, you can establish free shipping or flexible shipping options based on various conditions.
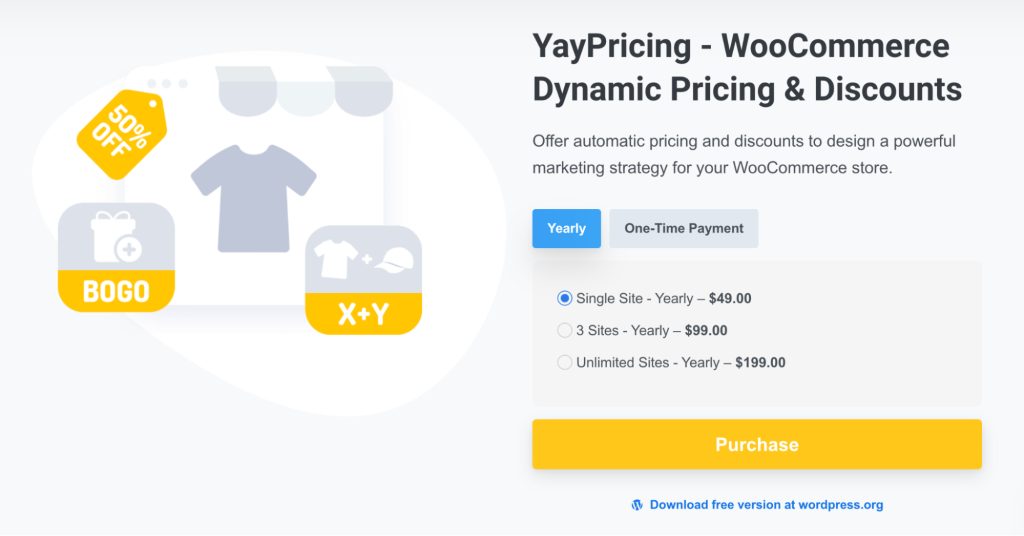
You can get started by downloading YayPricing Free or Pro to set up the WooCommerce shipping fee rate.
- Free version: YayPricing – WooCommerce Dynamic Pricing & Discounts. The free version enables you to adjust or reduce the shipping fee rates.
- Pro version: YayPricing Pro – WooCommerce Dynamic Pricing & Discounts. The pro version enables you to both reduce and add custom shipping fee rates.
4 Easy Steps to Set Up Flexible Shipping with YayPricing
Step 1: Create New Fee Rule
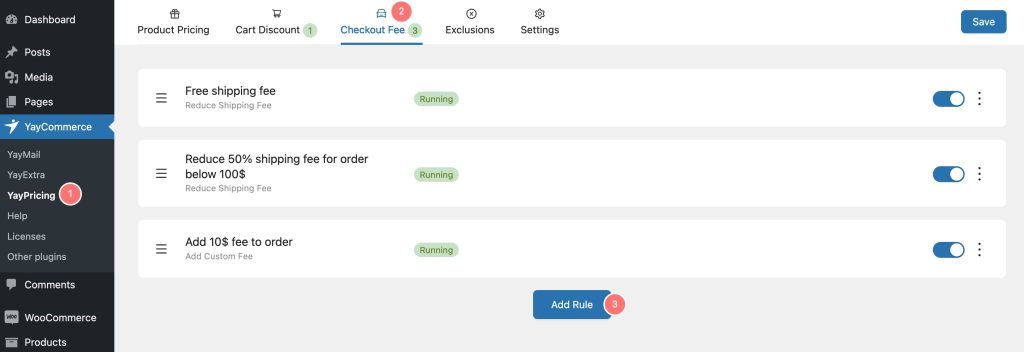
1. Go to YayPricing, then navigate to the Checkout Fee tab. Then, click on “Add Rule“.
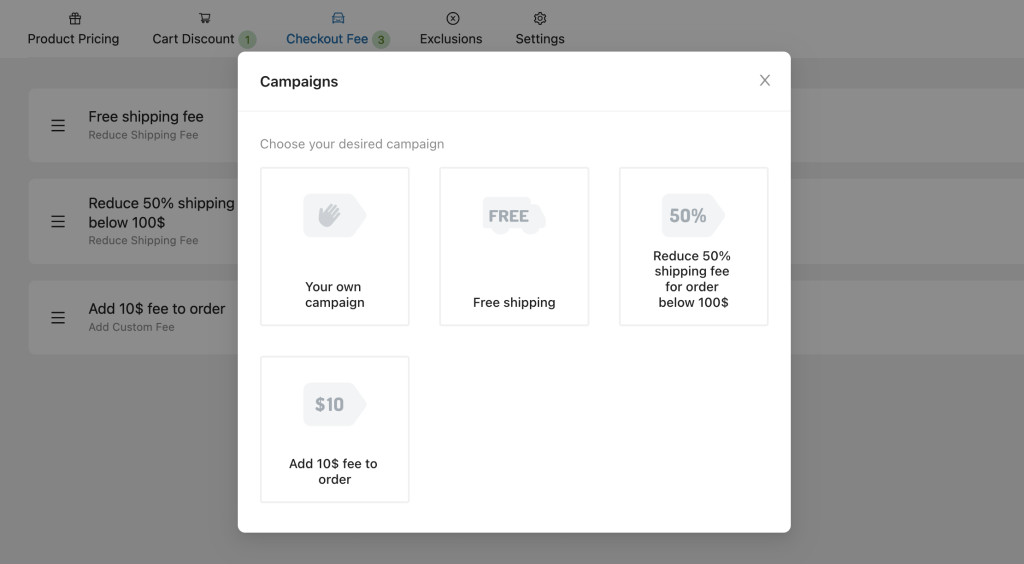
2. You can choose from customizable shipping campaign templates or create your own campaign.
Step 2: Fill Fee Rule Types
1. Give the Fee rule a Name.
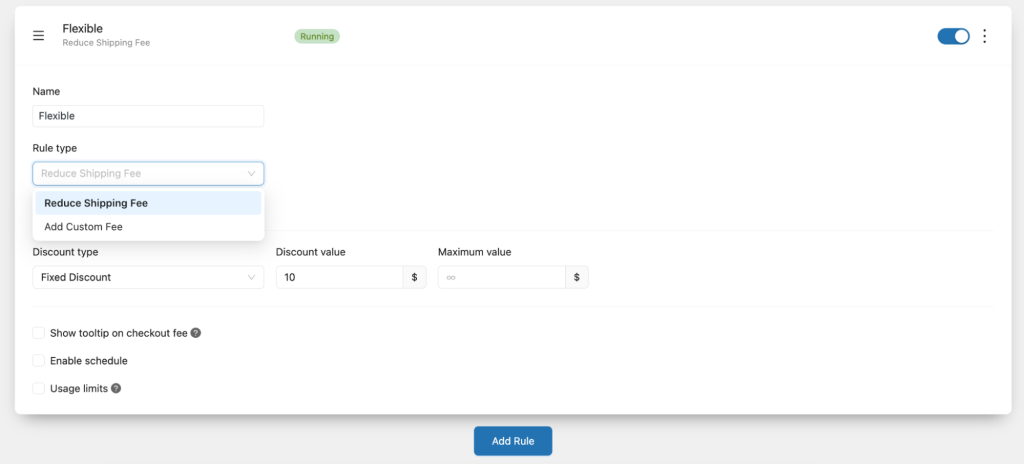
2. Choose the appropriate rule type
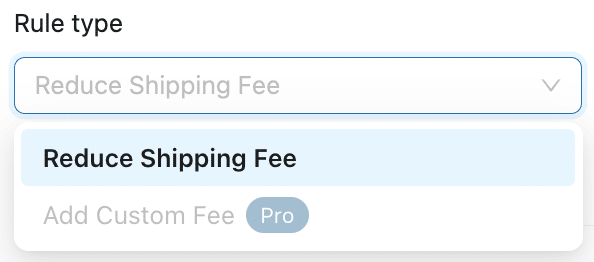
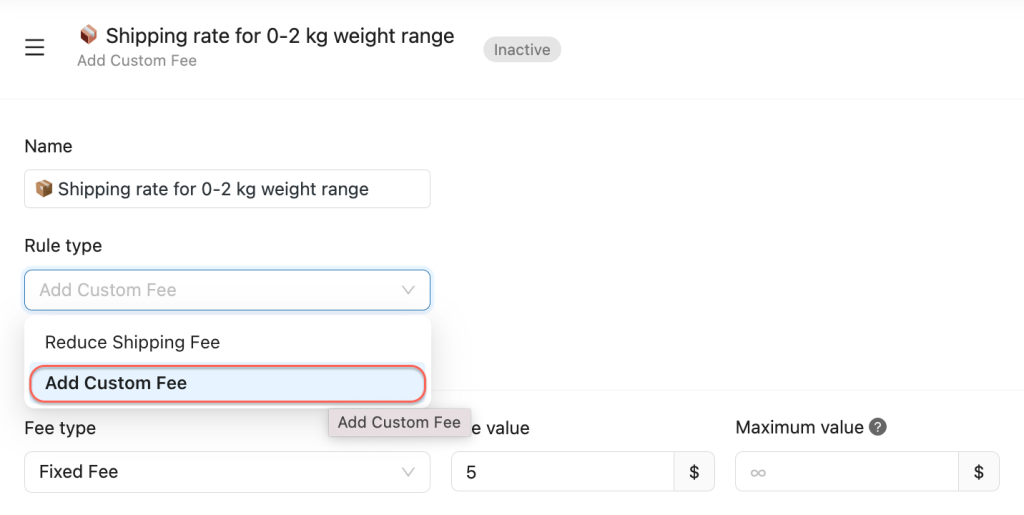
In the dropdown Rule type, you will find two options: “Reduce Shipping Fee” and “Add Custom Fee”.
- If you wish to decrease the flat rate for shipping that was previously established in either WooCommerce or YayPricing’s shipping fee settings, choose the “Reduce Shipping Fee” option.
- If you would like to add a custom fee, select the “Add Custom Fee” option.
Step 3: Set Shipping Fee Rate
Now, let’s set the shipping fee rates for products.
1. Choose Fee Type
The next step of choosing fee types is specified based on which rule type you have chosen in Step 2.
- If you opt to Reduce Shipping Fee, go to the Discount sub-tab to choose between Fixed Discount or Percentage Discount.
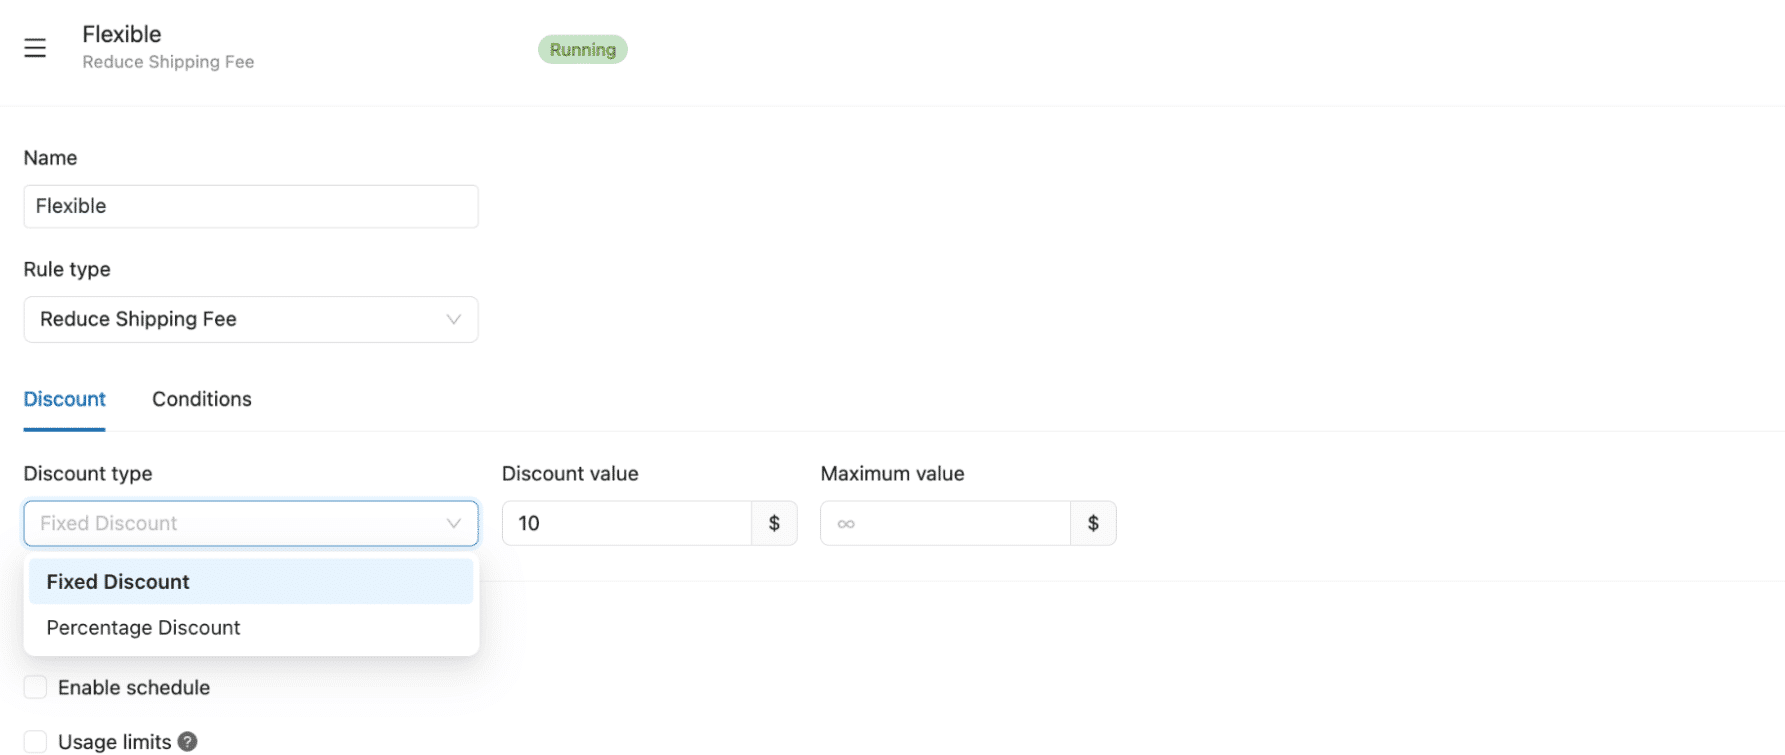
- If you opt to Add Custom Fee, go to the Custom Fee sub-tab to choose between Fixed Fee or Percentage Fee.
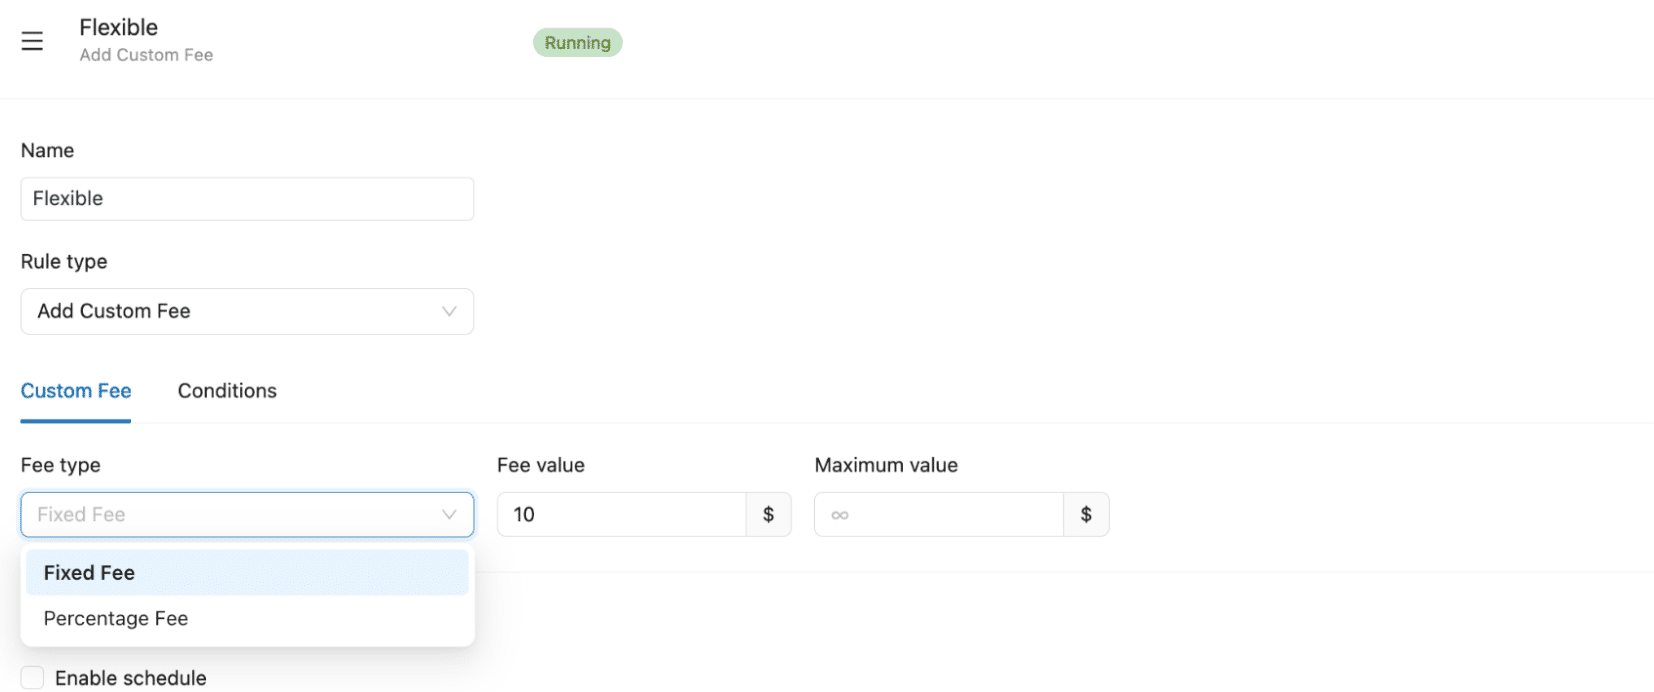
2. Set Discount/Fee Value
The table below gives an illustration of what the final fee looks like under the different types of fee types when the value “4” and contemporary fee “$5” are set as an example.
| Value | Contemporary Fee | Adjusted Fee | |
| Fixed Discount (Reduce Shipping Fee) | 4 | $5 | $5 – $4 = $1 |
| Percentage Discount (Reduce Shipping Fee) | 4 | $5 | $5 – $0.2 = $4.8 |
| Fixed Fee (Add Custom Fee) | 4 | $5 | $5 + $4 = $9 |
| Percentage Fee (Add Custom Fee) | 4 | $5 | $5 + $0.2 = $5.2 |
3. Customize How the Fee Rate Looks
In order to add a more personalized appearance to your shipping fee rate, you can utilize the following options:
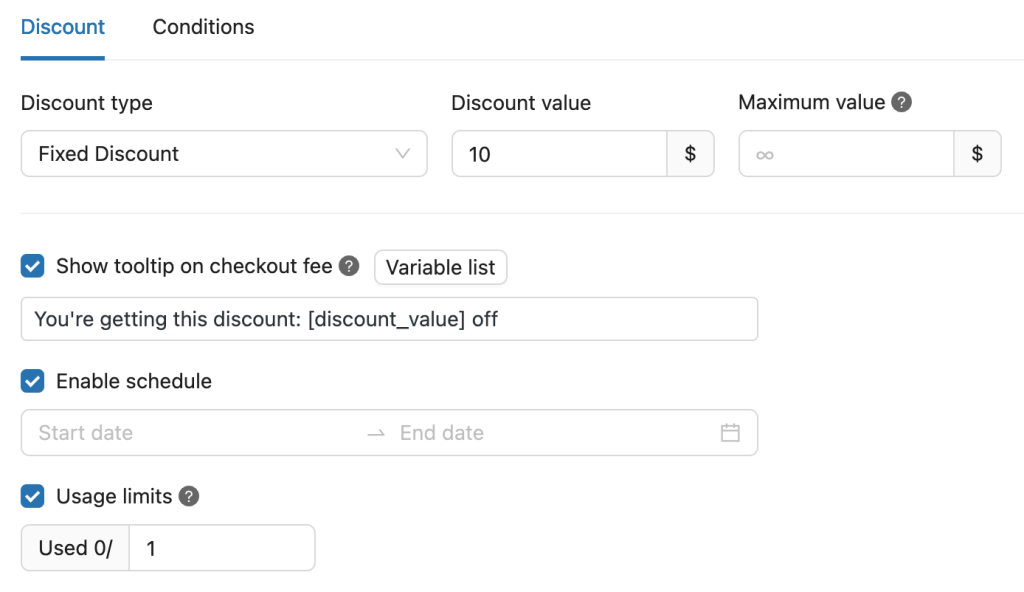
- Indicate whether or not you want to Show a tooltip on the checkout fee.
- Enable schedule for the flexible shipping application by defining the starting and ending times.
- Limit the number of times this fee rate can be used in total in Maximum Uses
With YayPricing, you have access to a range of variables that can be used to create personalized messages that resonate with your customers.
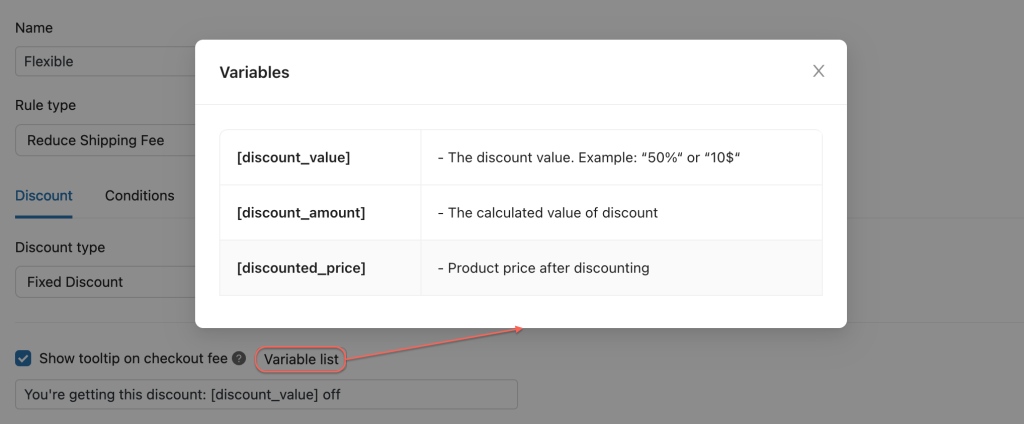
Click Save before going to the next step.
To activate this rule, switch on the button on the top right. Now shipping fee rule has been applied to the whole store.
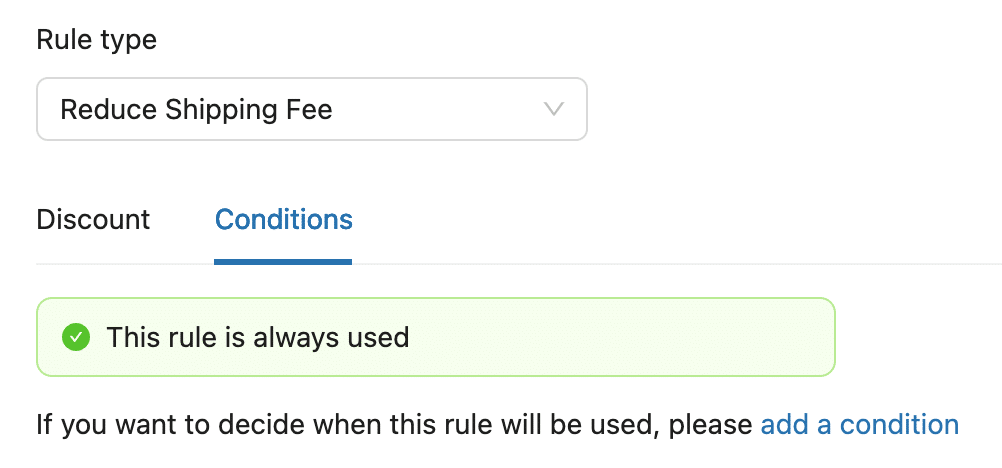
Step 4 (Optional): Add Conditions to Apply Rule
Now, turn to the Conditions sub-tab if you want to add conditions to apply the fee rule you have set before.
Here is where you can manage to apply flexible shipping rates based on conditions such as weights, shipping details, payment methods, specific products or customers, etc.
Then, click add a condition to create a condition rule for the flexible shipping application.
Now let’s start setting up the conditions when this shipping rate will be used.
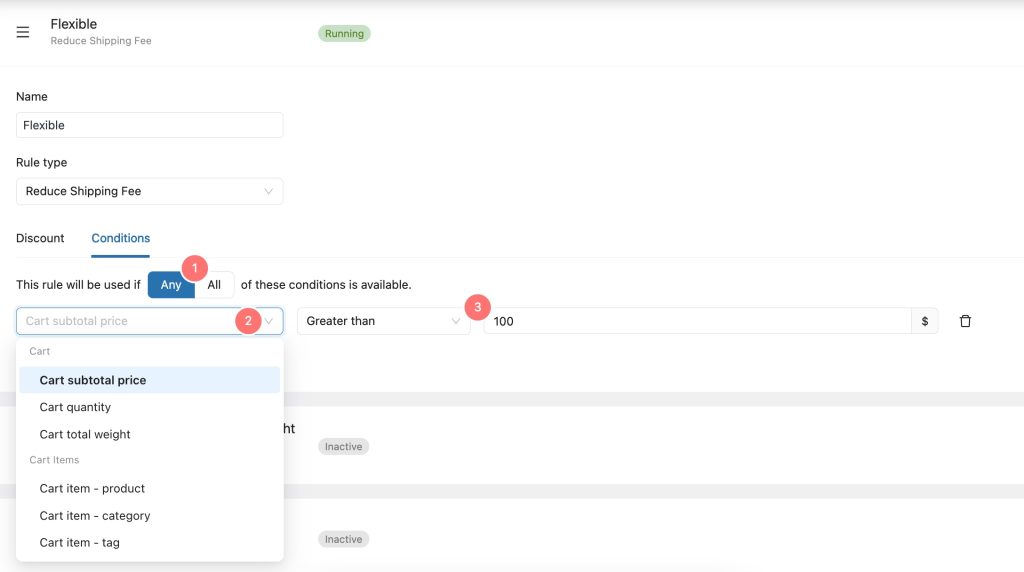
1. Choose Any or All so that the rule will take effect relatively when any/all of the condition is correct.
2. Choose the Condition Subject from the dropdown
3. Choose the value attached to that Condition Subject which triggers the condition rule
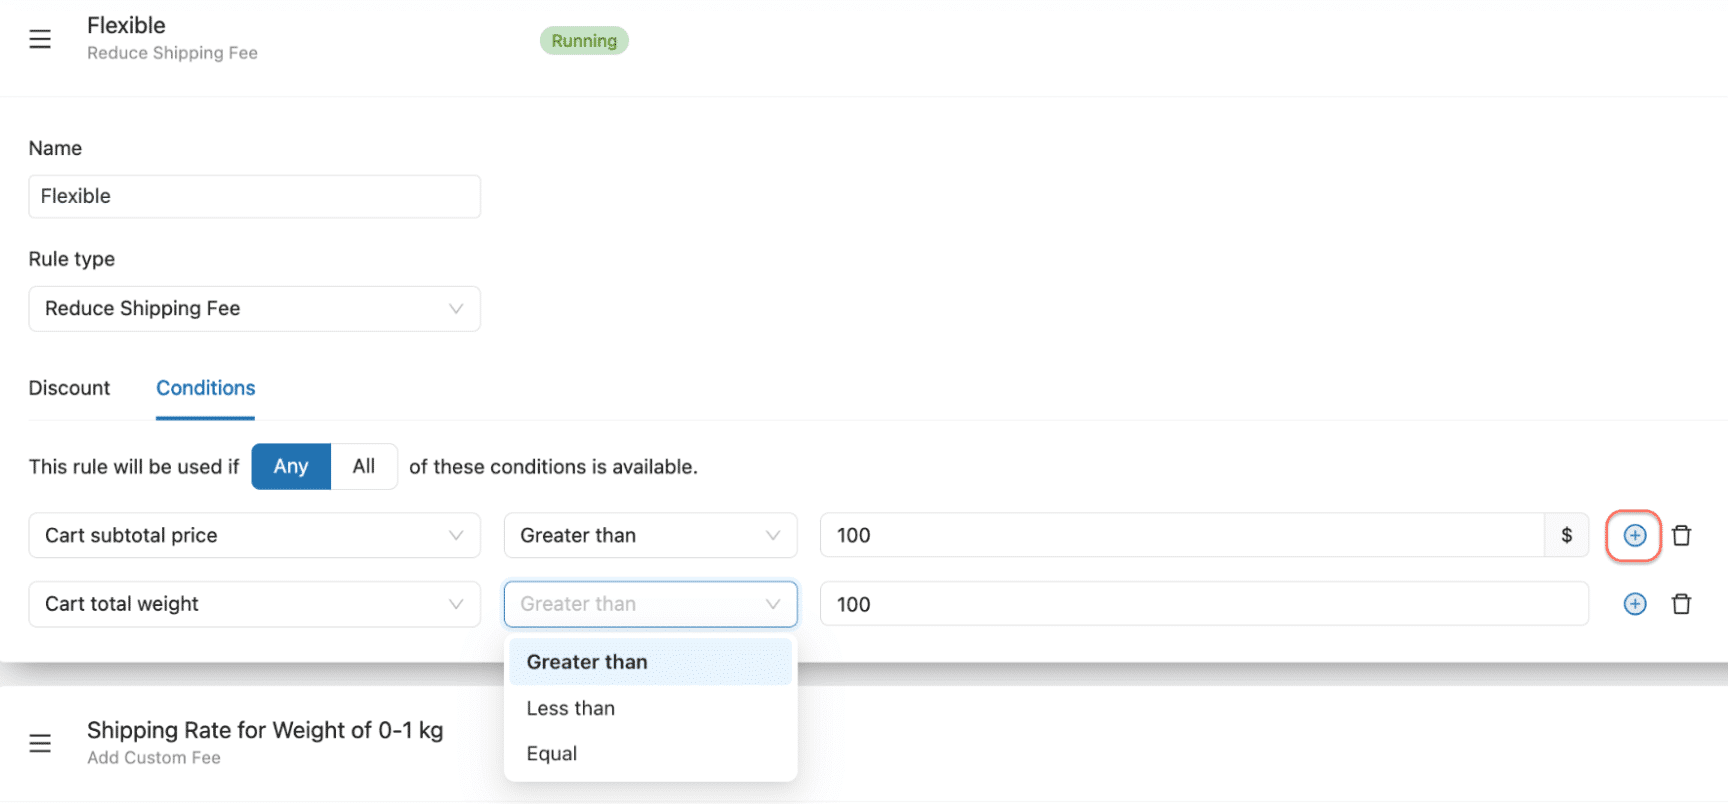
4. If you want to configure a mix of multiple conditions, click the (+) button on the right of the first condition to add a new condition rule.
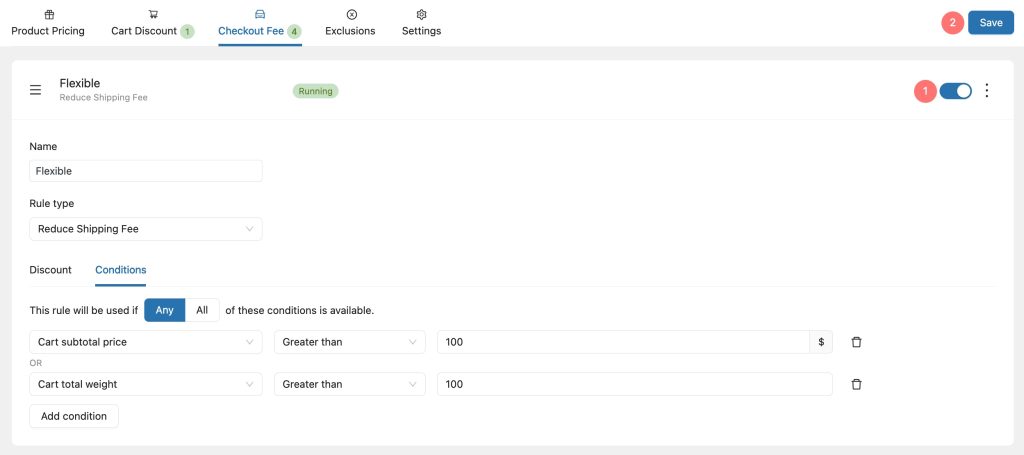
5. Switch on the button on the top right to activate the Free Shipping rule and Save.
Case study: Set Up Flexible Weight-Based Shipping
This section will guide you to set up flexible shipping for one of the most popular shipping fee scenarios, weight-based shipping, using YayPricing.
While this can also be achieved using a flexible shipping or table rate shipping plugin, recommend utilizing YayPricing for its all-in-one dynamic pricing and discount functionality.
By using YayPricing, you can easily manage all of your pricing rules in one place, making it simple and efficient to stay on top of your online store’s pricing strategy.
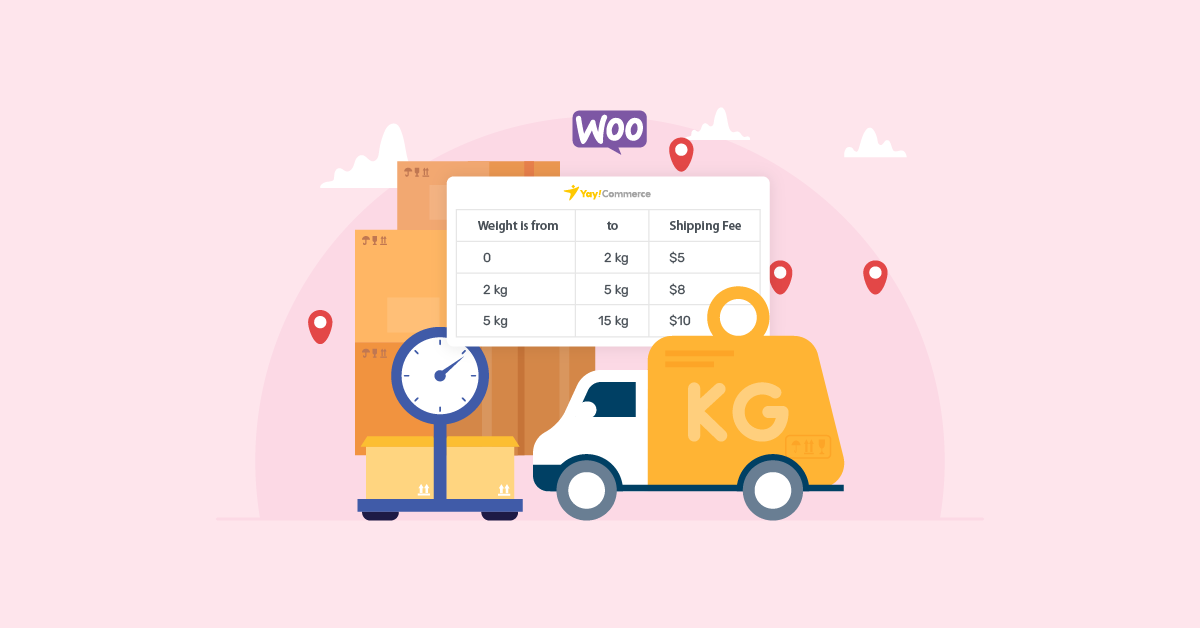
To establish a flexible shipping rate based on weight, the following table can be used as a reference guide.
| Weight is from | to | Shipping Fee |
| 0 | 2 kg | $5 |
| 2,001 kg | 5 kg | $8 |
| 5,001 kg | 15 kg | $10 |
| 15,001 kg | 30 kg | $15 |
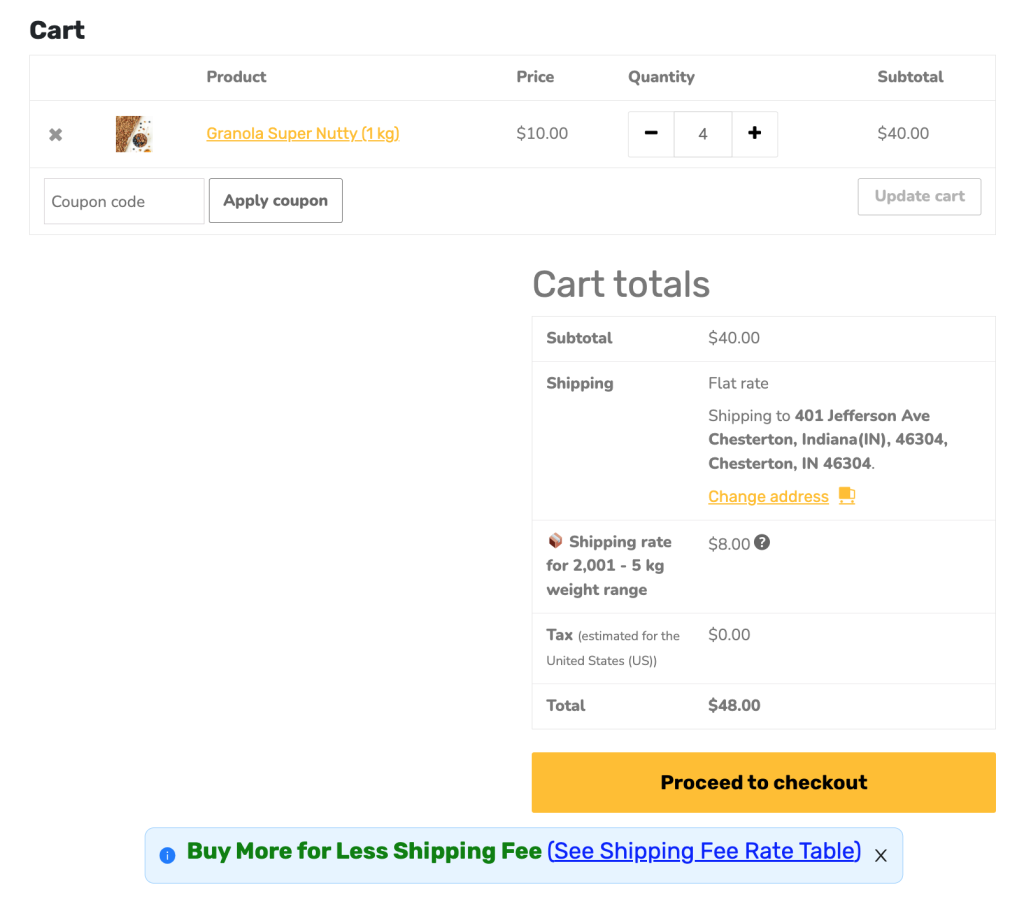
After configuring the shipping settings on the store interface, the resulting rates are displayed accordingly. Now, let’s proceed with the tutorial without further delay.
Step 0: Enter the Product Weight
You may simply define the product WooCommerce weight that will be visible on the product page.
Choose a specific product > Edit Product > Product Data section -> Shipping tab and enter the product weight.
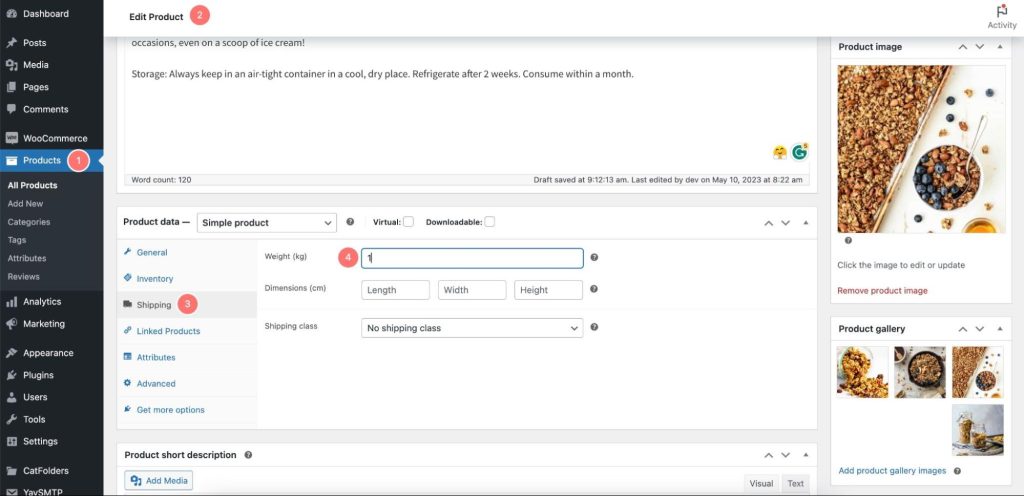
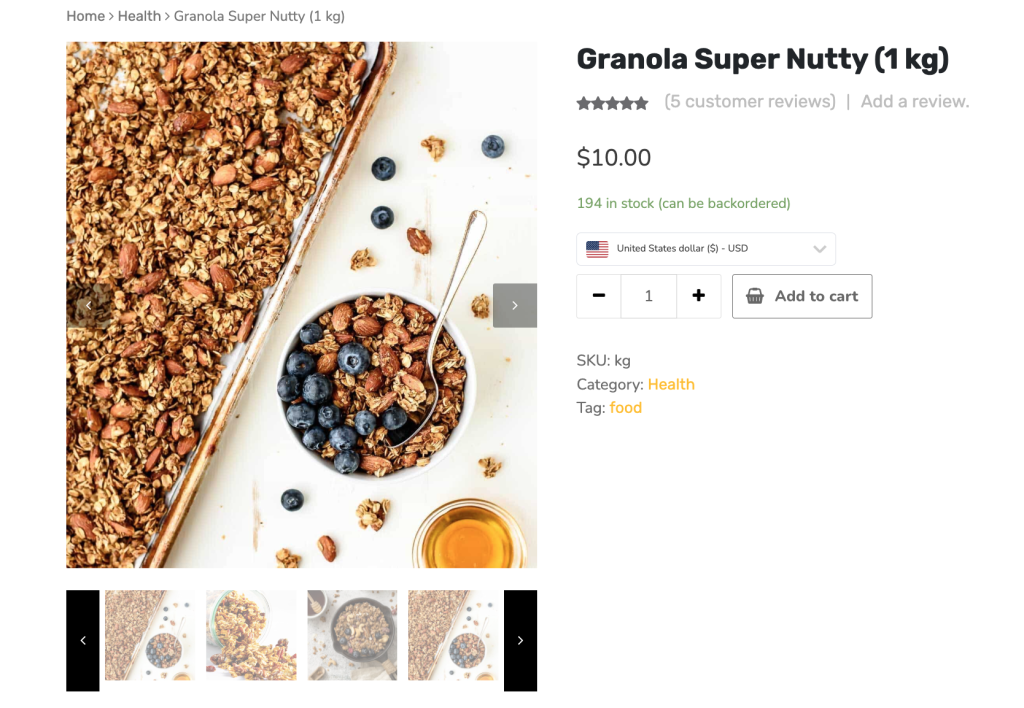
Now when you place an order for a package of Granola, it will now come in a weight of one kilogram.
Step 1: Create 1st Fee Rule in YayPricing
In this example, I will have to create four rules for four different weight ranges just like the image below.
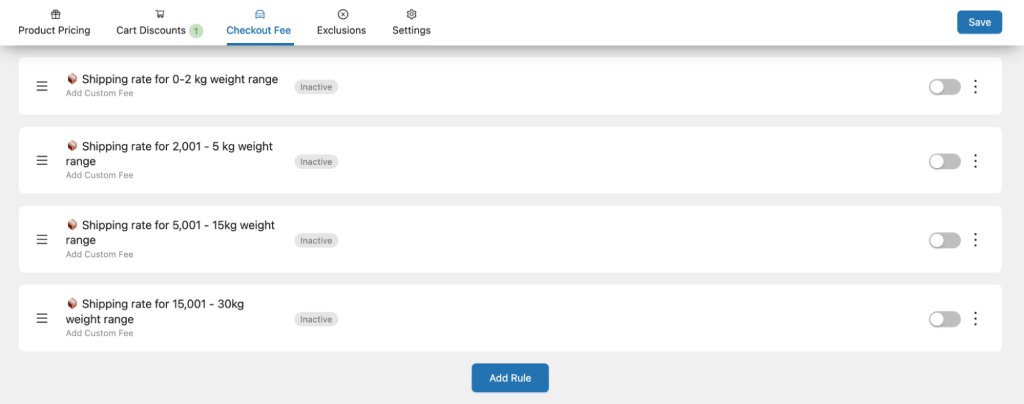
But first, I will create the first fee rule so that we can quickly duplicate it and modify the rest rules. So first, go to YayPricing > select the Checkout Fee tab > click on Add Rule.

To distinguish them, I will name each rule based on the corresponding weight range. For instance, I will name the first rule “Shipping rate for 0-2 kg weight range.
Step 2: Add Custom Fee
In the Rule type, choose Add Custom Fee instead of Reduce Shipping Fee, because we want to add an additional fee due to the cumbersome.
Step 3: Set Fixed Fee
1. To set a fixed fee for the first weight range of 0-2kg, go to the Custom Fee sub-tab and choose Fixed Fee.
2. Type Fee value as $5
3. Tick the checkbox Show tooltip on checkout fee.
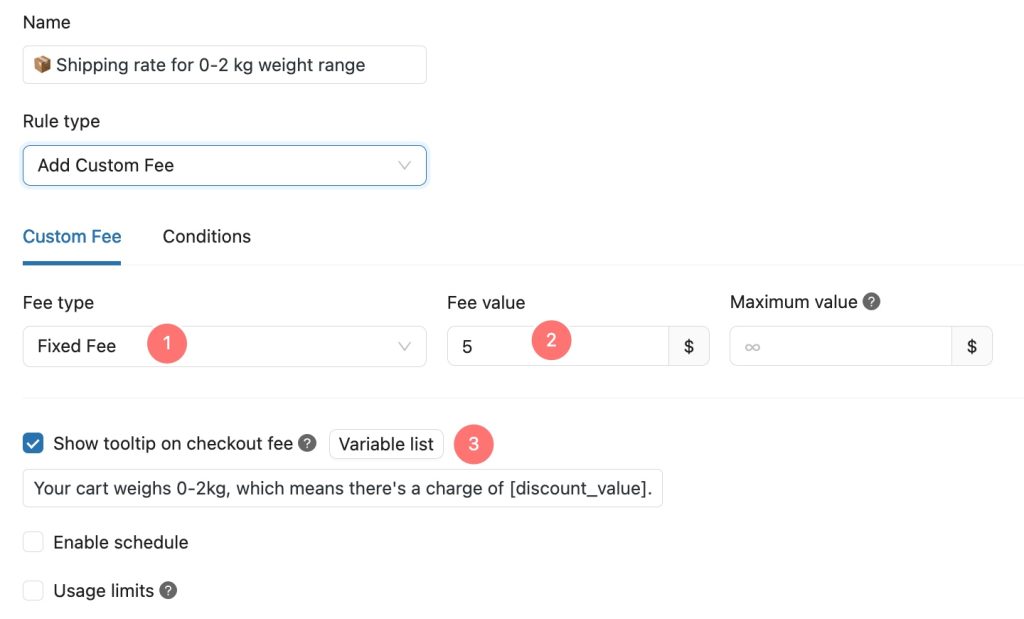
I type the tooltips here something like “Your cart weighs 0-2kg, which means there’s a charge of [discount_value]. Chat now if you have any questions 😍
Step 4: Set Condition to Apply Rule
1. In Conditions sub-tab, click add a condition to create a condition rule for the flexible shipping application.
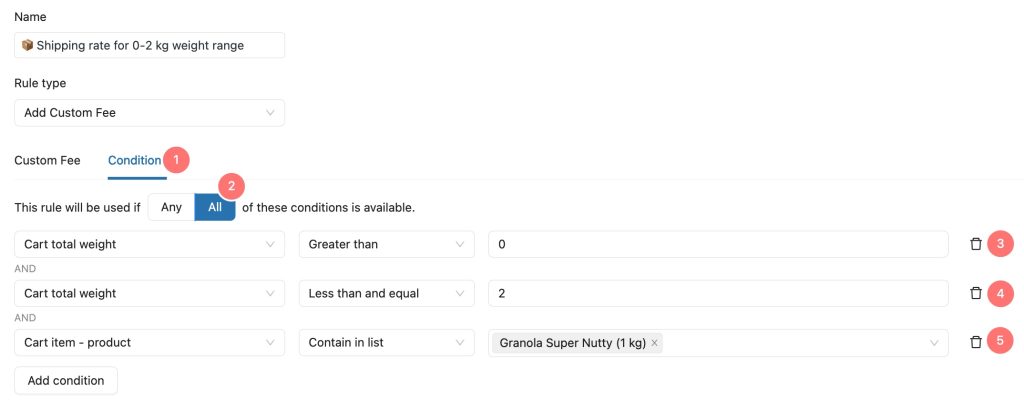
2. Choose All because I’m gonna add the conditions that must go with each other to enable the rule.
3. Regarding the first condition, choose Cart total weight being Greater than the value of 0
4. Choose Add Condition to add the second condition which is Cart total weight being Less than and equal the value of 2
5. In this case, I just want to apply this flexible weight-based shipping rate for the product Granola Super Nutty, so I add the third condition. I choose Cart item for the condition subject and then select Contain and type the name of the product.
Now the first fee rule is nearly done setting. Switch on the button on the top right to activate the Free Shipping rule and Save. You can see that the fee rule’s status is now turning to Running.

Step 5: Duplicate 1st Rule to 3 Other Rules.
To create additional fee rules, follow these simple steps:
1. Duplicate the 1st fee rule.
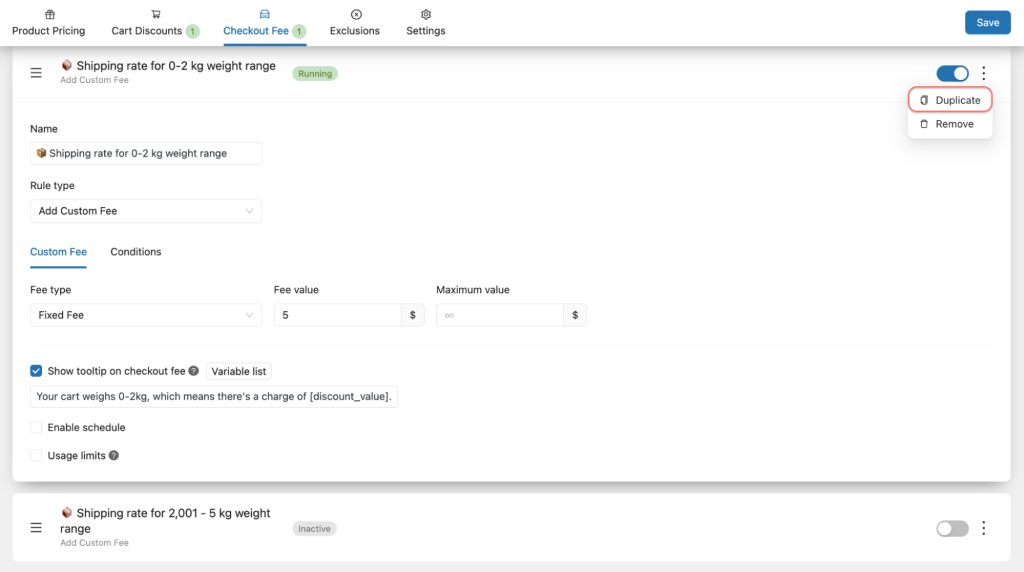
2. For each of the remaining three rules, you will need to make some adjustments. First, go to the Custom Fee sub-tab and change the name, fee value, and tooltip for the checkout fee.
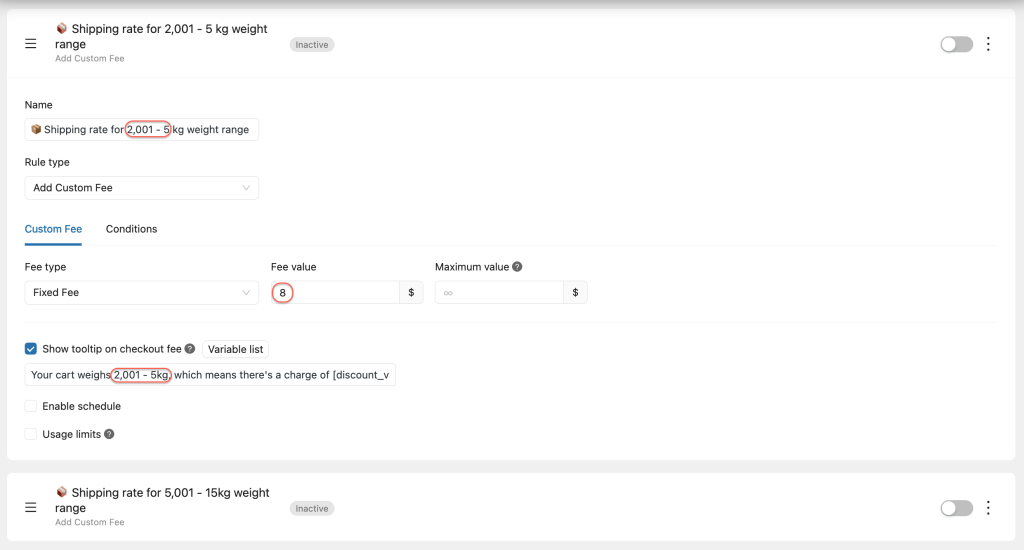
3. In the Conditions sub-tab, adjust the condition values as needed.
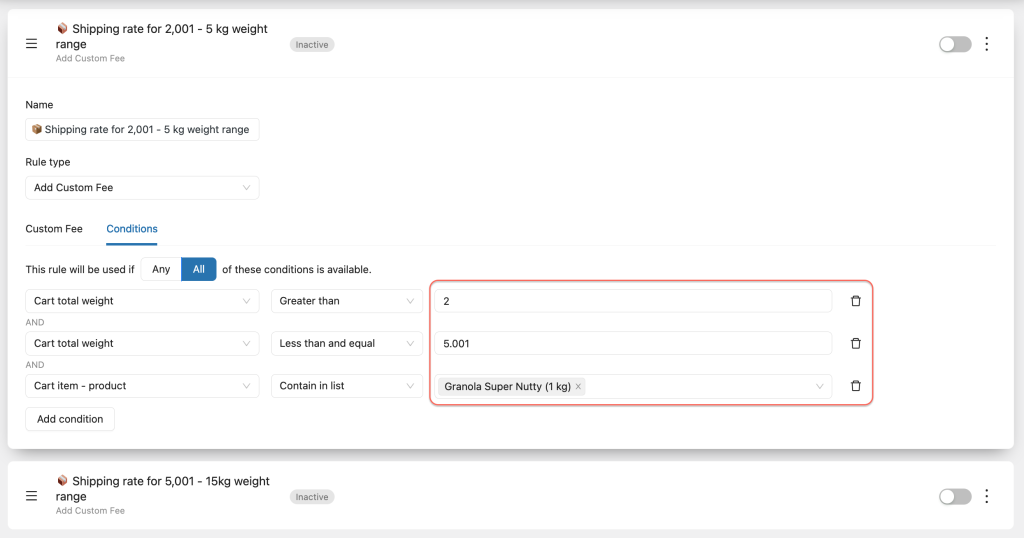
4. Finally, make sure to turn on the button to activate the rule and save the changes for each of the three new fee rules.

Once you have completed these steps, you will have successfully created all 4 fee rules to make a complete flexible weight-based shipping for the 4 weight range of Granola product orders.
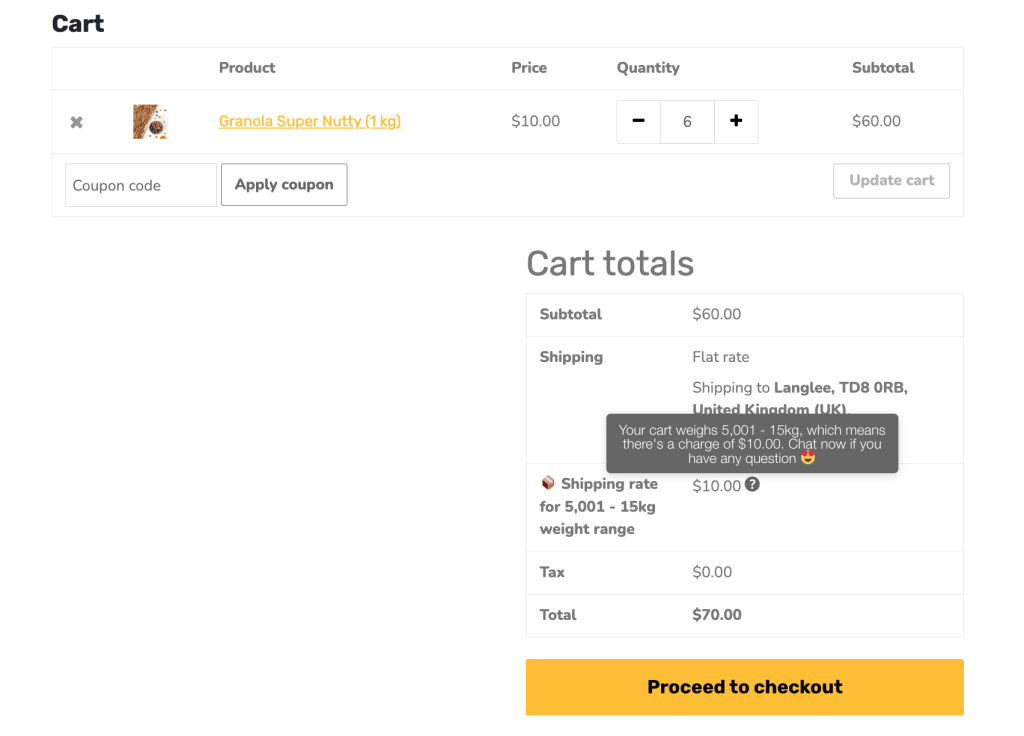
You can make a quick test by ordering this Granola in a certain quantity. Here I ordered 6 packages of Granola Super Nutty (1 kg), which mean I have 6 kg of Granola in my cart. So the shipping rate applied is $10. How cool is it?
Step 6: (BONUS) Add Spice to It!
Tips 1: Make sure to showcase your attractive shipping options on your product page to motivate your customers to purchase more and save on shipping fees. One great way to do this is to add a custom image or table in your product settings.
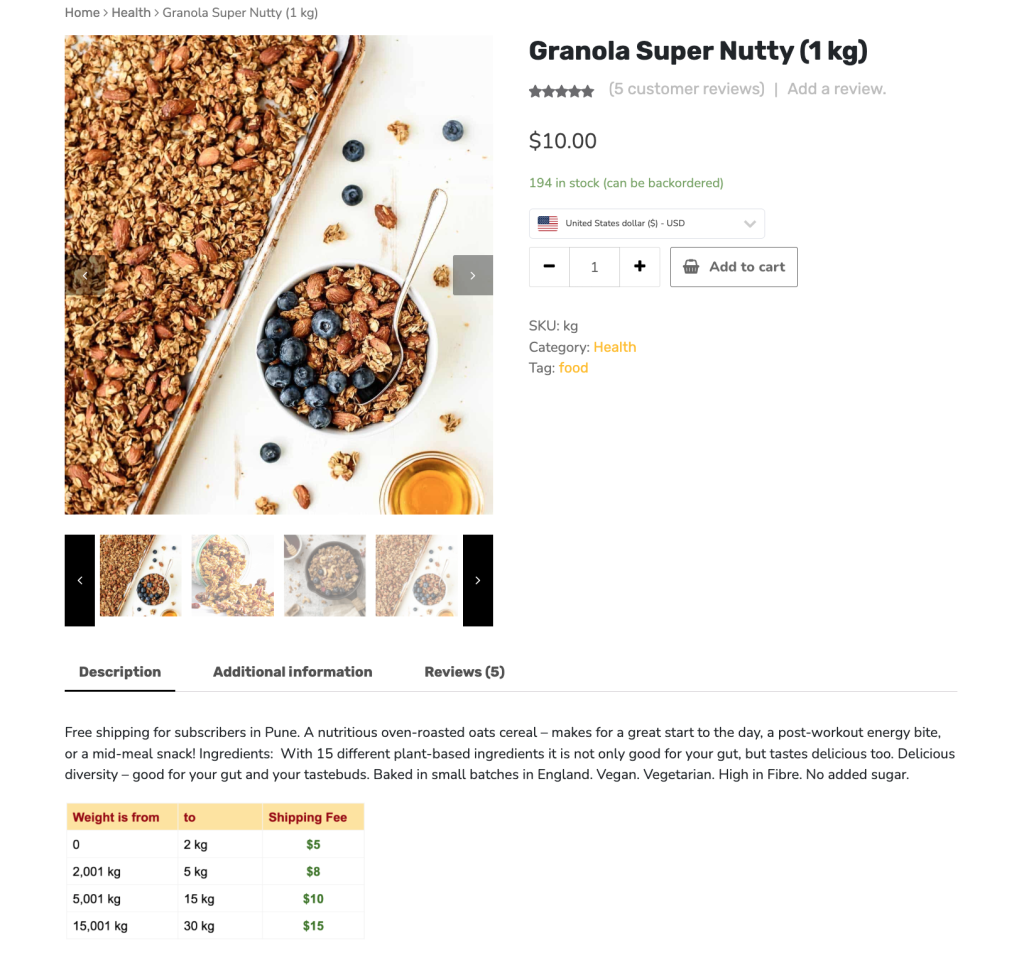
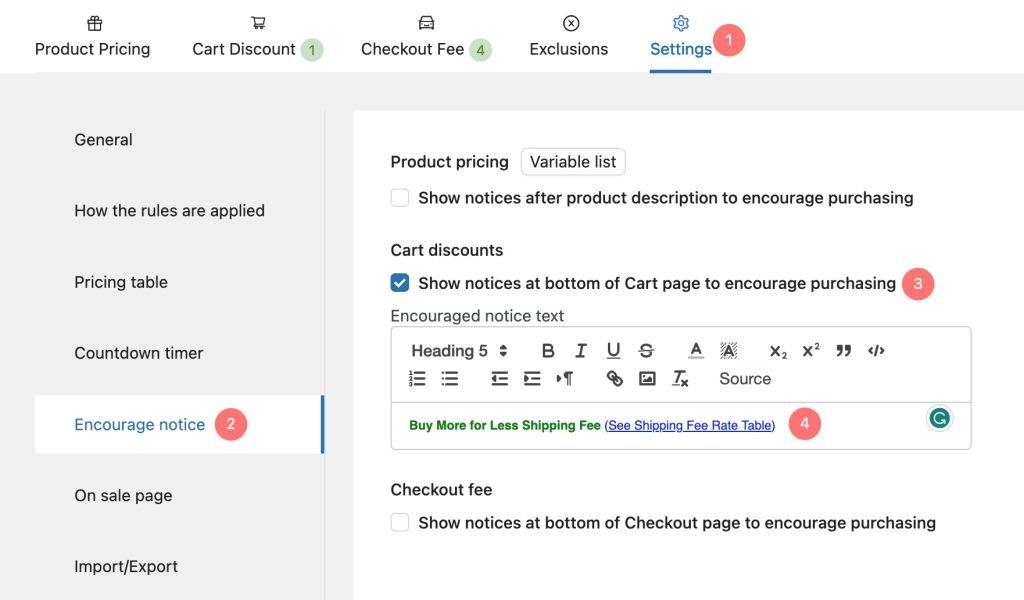
Tips 2: If you want your customers to feel even more motivated to buy, you can create a stunning notice using YayPricing.
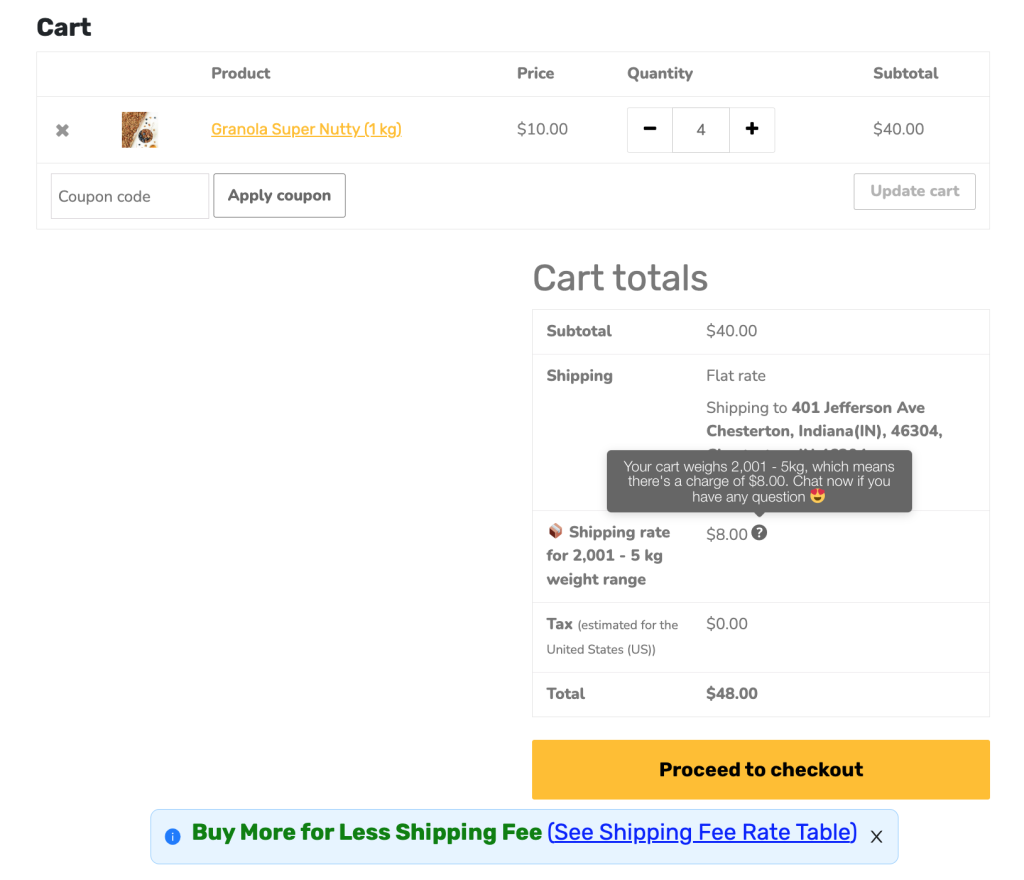
Go to Settings > Encourage Notice > You can tick to whether add a message at the bottom of Cart page or at the bottom of Checkout page. Then craft a message that resonates with your brand and customers.
It’s Your Time to Set Up WooCommerce Flexible Shipping
To conclude, YayPricing is a powerful plugin that allows you to add dynamic pricing and discounts to your WooCommerce store. It offers a comprehensive solution for store owners who want to set up flexible shipping options and integrate them with their pricing strategy.
The plugin is easy to use, and the setup process is straightforward. I hope that this guide has helped you understand how to set up flexible shipping with YayPricing and apply it to your weight-based shipping scenario. Don’t hesitate to try it out and see how it can benefit your business.
Set up WooCommerce flexible shipping with YayPricing today!
