
Out of every seven online transactions, one is performed across borders. As a WooCommerce store, allowing your customers to switch currencies is no longer a nice-to-have, but a must!
Even if you have an established brand, a new dropshipping business, or just selling subscriptions, you can unleash your sales potential with a WooCommerce multi-currency plugin.
Table of contents
- WooCommerce switch currency explained
- How to allow customers to see and change multiple currencies in WooCommerce
- How to set up a multi-currency switcher in WooCommerce
- How to integrate major payment methods in WooCommerce to enable multi-currency transactions
- FAQs
- More about WooCommerce multi-currency to consider
WooCommerce switch currency explained
So what is the future of WooCommerce multi-currency, how can more store owners best approach their shoppers?
When it comes to boosting cross-border e-commerce sales, here are the two prerequisites:
- Allow customers to see product prices, fees, and taxes in their local currency
- Offer multi-currency in the checkout process with credit card/debit card, local and international payment methods
In order to let the visitors see your prices in their national currency, you will need a currency switcher plugin to show the converted price on the go and also automatically display currency based on their IP location.
Then, using a payment gateway plugin will help online payments be processed fast and securely. For better popularity, we recommend those with integrated capabilities to PayPal Express Checkout. For European stores, Mollie Payments for WooCommerce is a better choice.
Alternatively, Stripe is one of the best payment gateways to use on WordPress/WooCommerce and is currently serving transactions in 44 countries around the world. Some Stripe payment plugins are free to use and support automatic recurring payments.
How to allow customers to see and change multiple currencies in WooCommerce
Now, how to help your neighboring countries’ customers change the currency in WooCommerce?
Glad you asked. There’s a free plugin to help you start now: YayCurrency is free on wordpress.org! And it comes readily packed with the features we need.

This WooCommerce Multi-Currency Switcher (free version) supports the following:
- Multiple currency switcher widgets
- Currency converter on WooCommerce single product page
- Allow switching currency during checkout
- Customizable psychological pricing
- Integrated multi-currency analytics in WooCommerce sales report
- Enhanced customization for currency switchers
- Fixed price settings for bundle & composite products
What are you waiting for? Let’s install and activate YayCurrency before we move on to the next steps.
How to set up a multi-currency switcher in WooCommerce
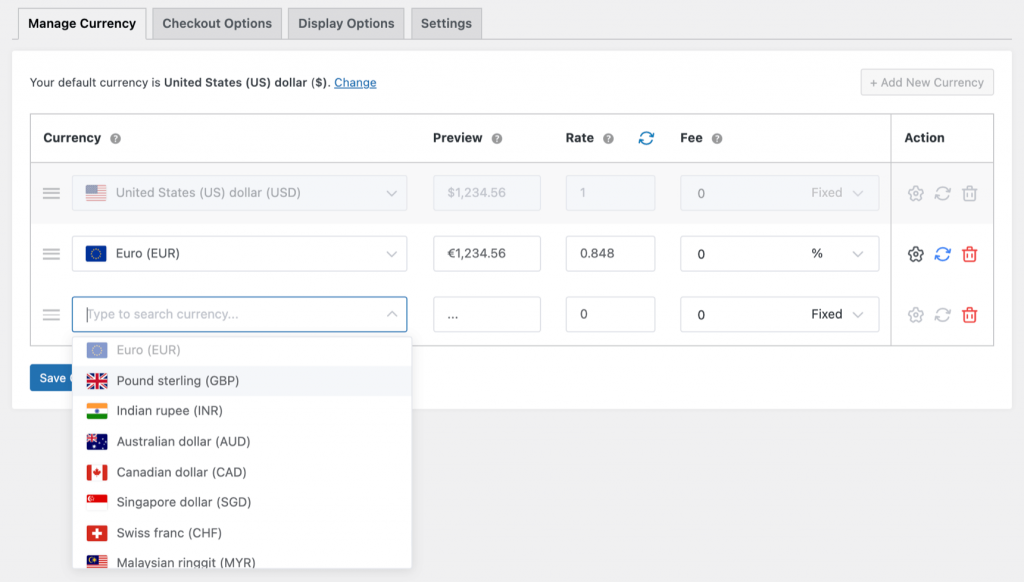
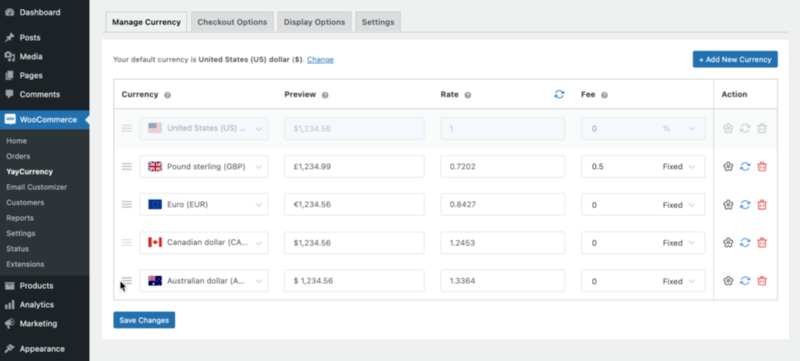
1. Add and custom new currencies
From your WordPress admin dashboard, you can easily access WooCommerce multi-currency plugin manager and take these actions:
- Add new currency from the dropdown list including 160+ currencies
- Add conversion fees in fixed amounts or percentage
- Set up currency formats and rounding rules
- Drag and drop to reorder currencies
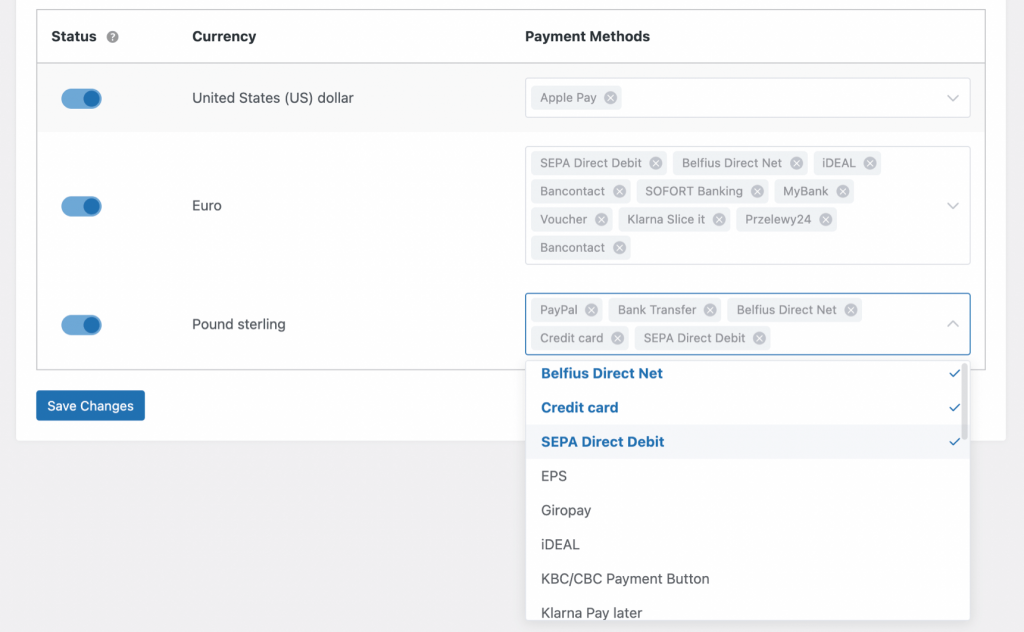
2. Allow checkout with available payment methods
Depending on the payment gateway plugins on your site, you will see all the active currencies and available payment methods.
You will be able to pick multiple payment methods to allow checkout in different currencies, i.e.
- VISA (International)
- MasterCard (International)
- American Express (International)
- SOFORT banking (EU)
- SEPA – Credit Transfer (EU)
- SEPA – Direct Debit (EU)
- Giropay (Germany)
- Cartes Bancaires (France)
- CartaSi (Italy)
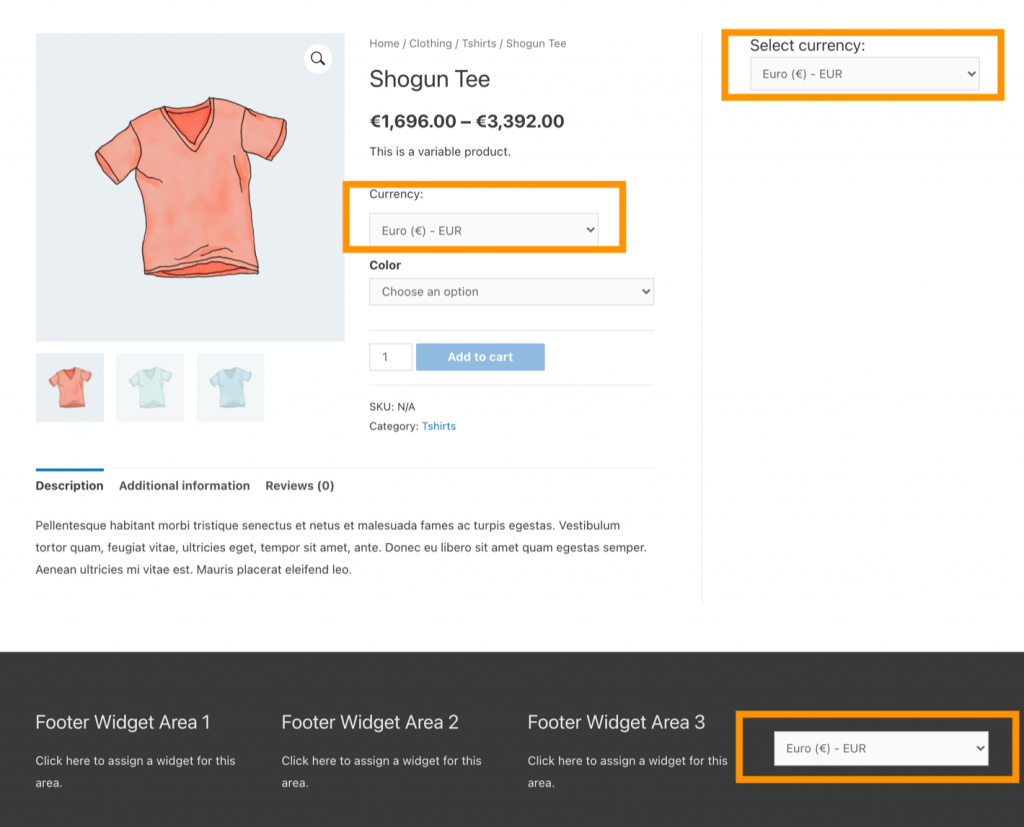
3. Display a multi-currency switcher on your store
When you’re done setting up the currency list, now it’s time to show it where you want:
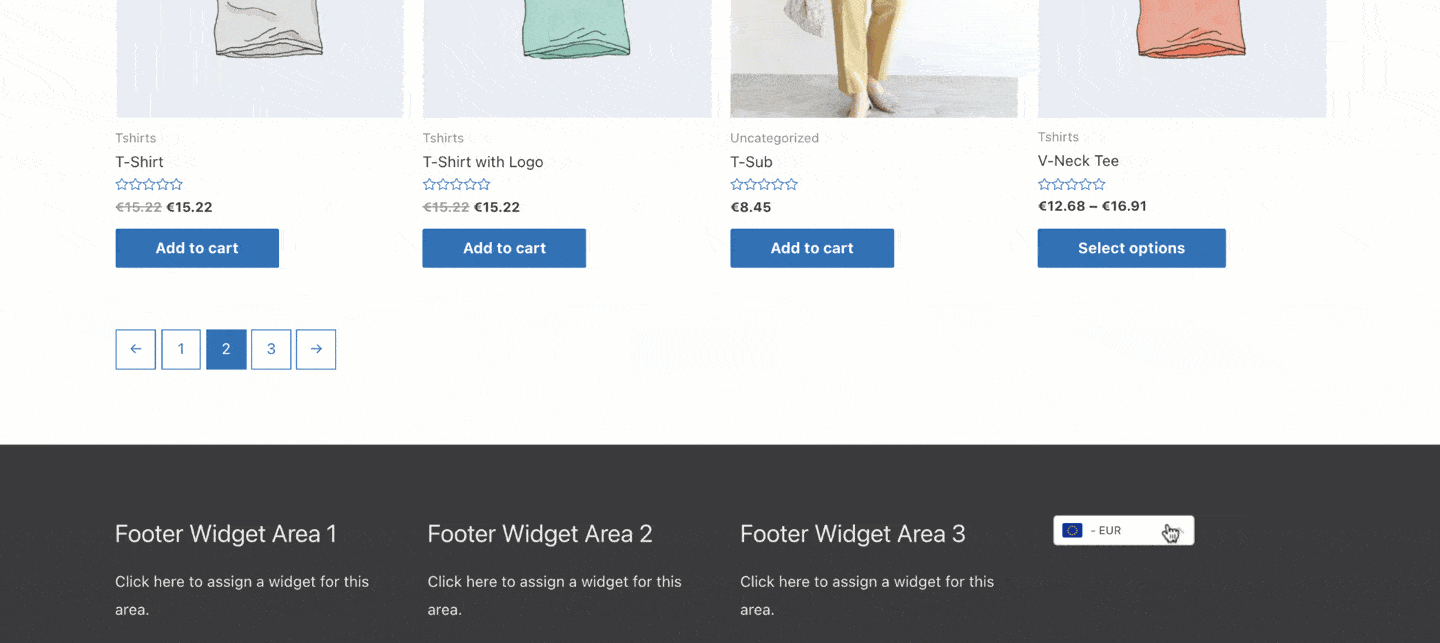
- Widget: insert the currency switcher widget into the header, footer, sidebar, WooCommerce pages, etc.
- Shortcode: display currency dropdown list on any page/post
4. How to show the multi-currency switcher on the Header and Footer menu
It’s easy to display a custom currency switcher on your menus including Header, Footer, Handheld (mobile optimized menu), or any other menus as long as your current theme supports them.
In order to add a custom menu to your site, please go to Appearance > Menus, and follow these steps:
- Select a menu to edit: I am choosing Footer (Footer Menu). If your preferred menu doesn’t exist, please create a new one and set its location.
- Tick on YayCurrency Switcher and click Add to Menu
- Customize the currency switcher:
- Switcher elements: You can choose which elements you want to show and which not
- Switcher size: Pick the one that fits best with your Header/Footer space
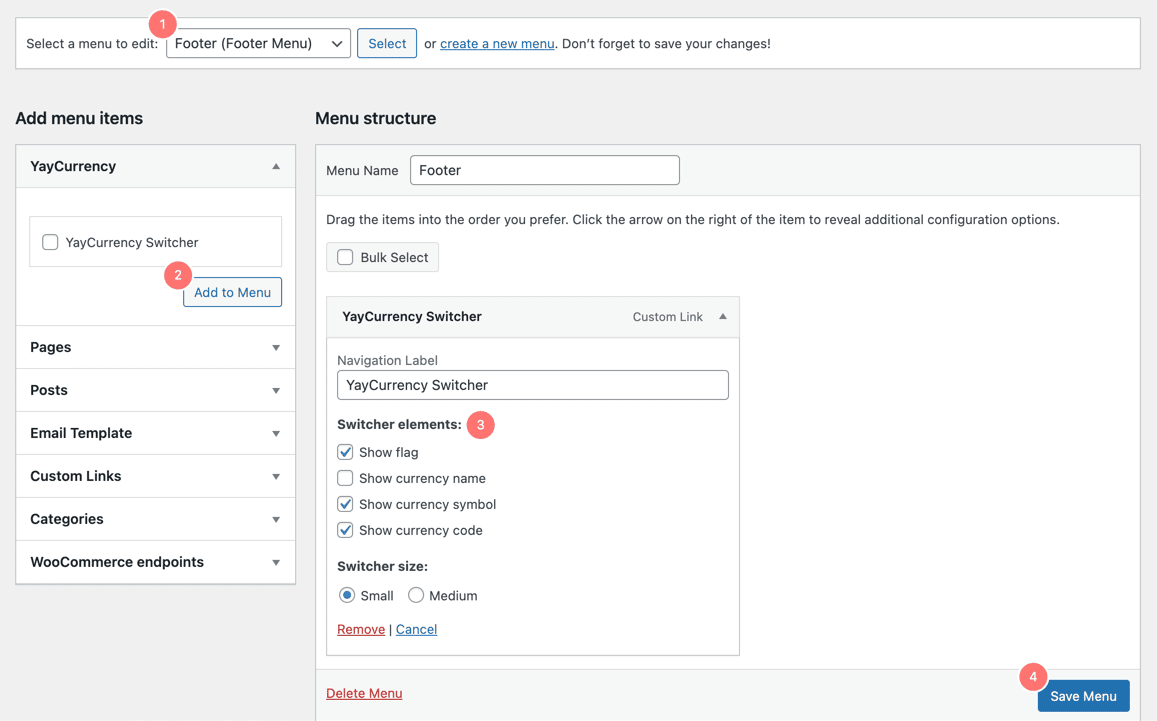
- Now Save Menu and enjoy the new menu item from front pages
How to integrate major payment methods in WooCommerce to enable multi-currency transactions
In this section, we’ll guide you through how to accept payments in WooCommerce using Mollie Payments plugin.
Overall, it’s a safe and intuitive integration that supports European and local payment methods as well as international payment methods.
Before we get started, make sure to prepare these prerequisites:
- Sign up for a Mollie account and get your business info verified
- Mollie Payments for WooCommerce (installed and activated)
1. Get Mollie API key
Log in to your Mollie dashboard, navigate to Developers > API keys, and you will see two types of keys:
- Test API key: used to test your integration in a dev mode, meaning you can create a test order and pay with the test card info
- Live API key: deploy to accept real payments
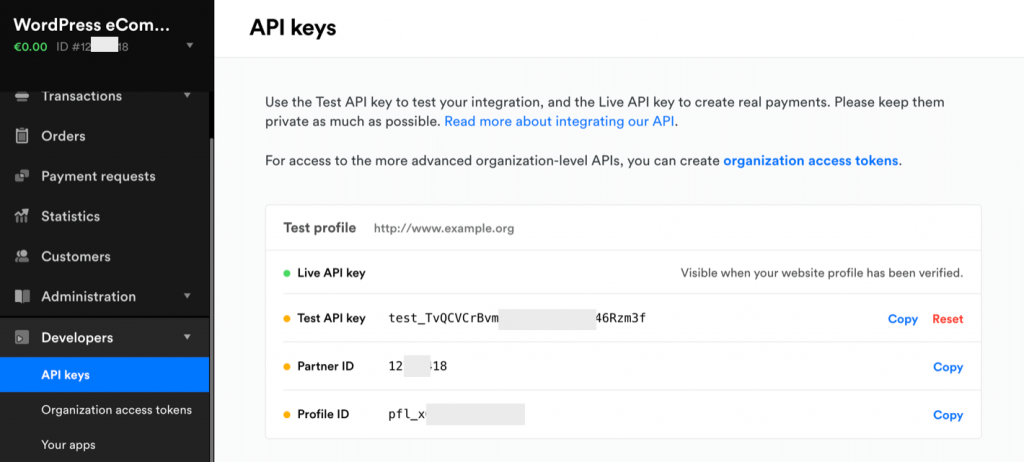
We recommend test mode and using the Test API key first to try out the payment processing flow. Enabling debug mode also helps a lot in case something goes wrong on your site.
2. Activate payment methods
There are a variety of payment methods right inside the Mollie Settings dashboard. Please head over there and activate those you need.
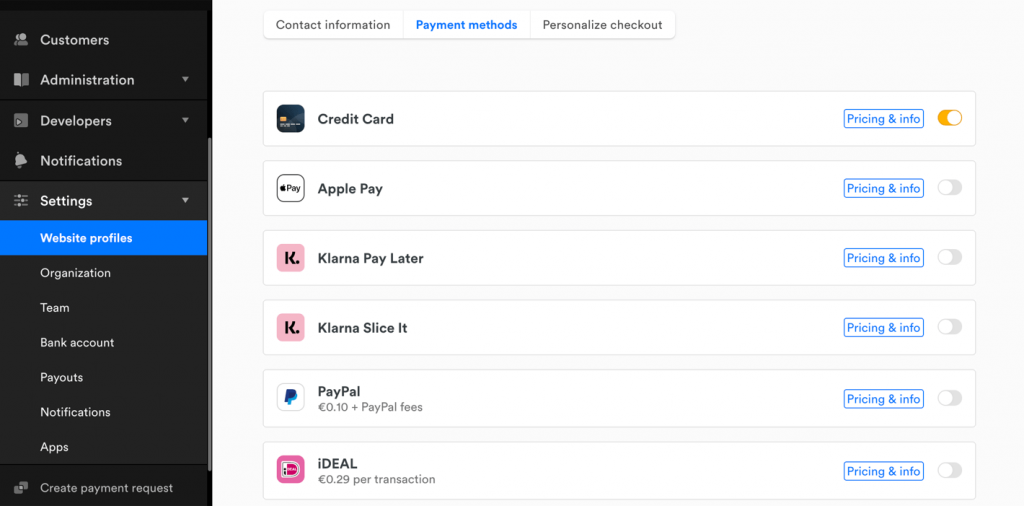
After successfully connecting and authorizing those payment methods, Mollie can record transactions and payments received through them. The funds will then be held in your Mollie account for a few days and transferred into your registered business bank account.
When you’re good with the payment gateway activation, please go back to the WordPress dashboard and customize the appearance of those payment methods on your WooCommerce store.
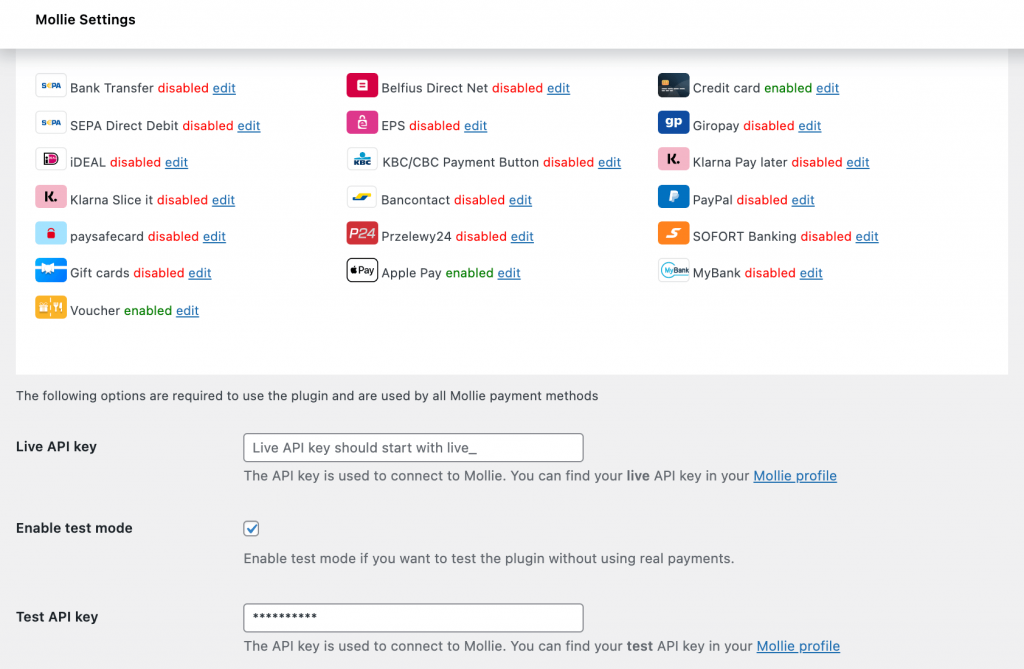
For each payment method, you can click edit and have these options:
- Add custom logo for the payment gateway
- Apply the payment method for specific countries
- Add payment surcharge to make sure you have no cash loss
- Customize Pay button and so on
Ta-da! 🎉 Now you can accept payments from international customers!
FAQs
To let the visitors see product prices in their national currency, you will need a currency switcher to show the converted price on the go and also automatically display currency based on their IP location. Then, using a payment gateway plugin will help online payments be processed quickly and securely.
Step 1: Install YayCurrency for free or get YayCurrency Pro.
Step 2: Add and customize new currencies.
Step 3: Allow checkout with available payment methods.
Step 4: Display a multi-currency switcher on your store
We’ll guide you through accepting payments in WooCommerce using Mollie Payments plugin.
Step 1: Get Mollie API key.
Step 2: Allow checkout with available payment methods.
For each payment method, you can click edit and have these options. Now, you can accept payments from international customers!
More about WooCommerce multi-currency to consider
Now that we’ve shown you the basic steps of enabling multi-currency for your WooCommerce online business. Here are some other side dishes that you want to know before grabbing the whole meal.
Per the transaction fee policy
Many WooCommerce payment gateway plugins are free to install. Some of them have no sign-up fee, no lock-in contracts, and no subscription plans.
The only fee you have to pay is calculated per transaction, and it differs based on card type and cardholder’s country.
We’ve put together the typical use cases and their per-transaction fees below.
| WooCommerce Payments | Stripe | Mollie Payments | |
| US – local | 2.9% + $0.30 USD | 2.9% + $0.30 USD | 2.8% + €0.25 EUR |
| US – international | 3.9% + $0.30 USD | 3.9% + $0.30 USD | 2.8% + €0.25 EUR |
| EU – local | 1.4% + $0.25 USD | 3.9% + $0.30 USD | 1.8% + €0.25 EUR |
Please note this table is merely a brief glance as many other conditions may affect the final value fee.
From this, you can see Mollie is the better choice if you are an EU-based business and mostly handle local payments. If your store sells more in the US, Stripe is a great candidate.
We hope that from this article, you see how best to make currency switching as easy as possible for your international customers throughout their whole shopping journey.
From now on, you can start by checking out YayCurrency free and premium plan here: