
When customers browse your WooCommerce store, you only have a few seconds to capture their attention. With hundreds of products competing for attention, how can you make certain items stand out?
One simple way is to add sale badges and custom product labels to your product images.
Whether you want to highlight a limited-time discount, introduce a new collection, promote bestsellers, or draw attention to special offers, product badges can help customers identify important products without reading every product description.
WooCommerce gives you one badge out of the box: the default “Sale!” tag. It works, but it is generic; it cannot show how much your customer saves, and it does not appear for every kind of discount. If you want to highlight real savings, new arrivals, bestsellers, or low stock, you need a little more control.
In this guide, we’ll explore several ways to add sale badges and custom product labels in WooCommerce, including built-in settings, custom code, and the YayPricing plugin. You’ll also learn how to choose the right labels, apply them strategically, and avoid common mistakes that can make your product pages look cluttered.
What Are Sale Badges and Product Labels in WooCommerce?
Sale badges and custom product labels are small visual elements displayed on product images or listings to highlight key information. A product label (or custom badge) is the broader version: any short message on a product image or listing that highlights something worth noticing, like a new arrival, a bestseller, free shipping, or limited stock.
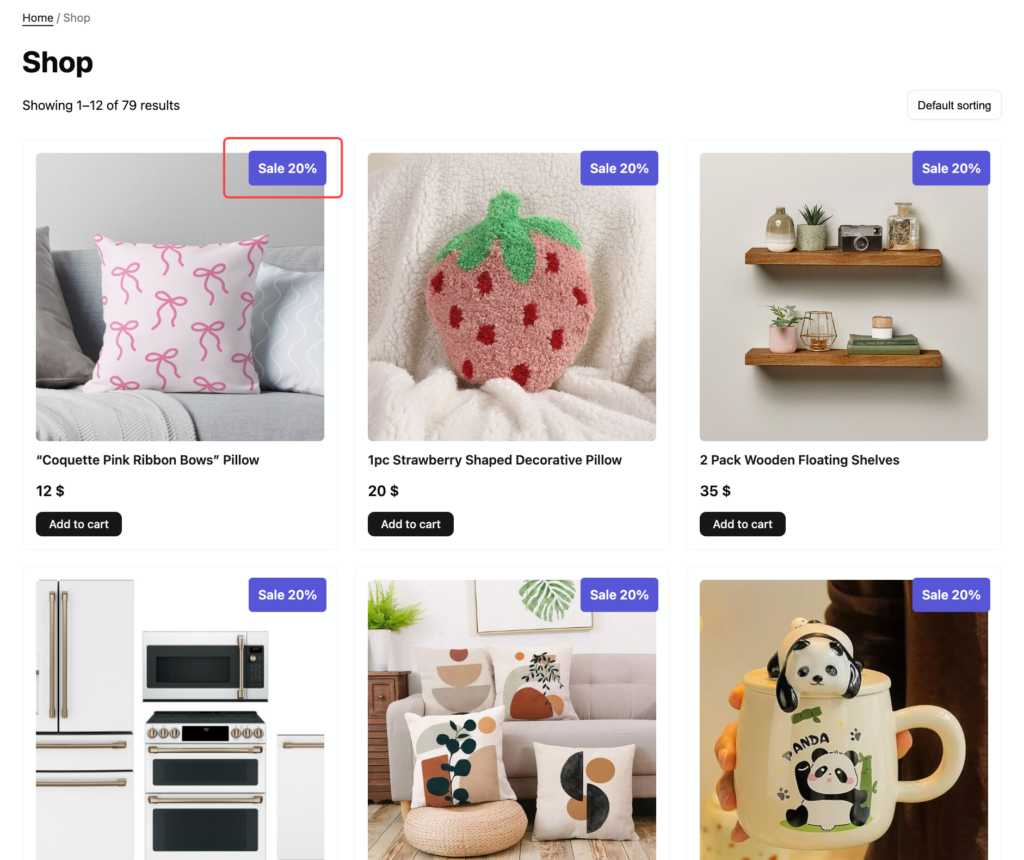
The terms are used interchangeably across the WooCommerce ecosystem. You will also see them called product tags, stickers, ribbons, or flashes. They all do the same job: they help shoppers decide in a glance whether a product is worth a closer look.
The main purpose is to help shoppers understand why a product deserves their attention. A well-designed badge can make an important promotion easier to notice and help customers navigate a large product catalog.
Why Should You Add Product Badges to Your WooCommerce Store?
Product badges might look like a small design detail, but they can play an important role in your store’s merchandising strategy. Instead of expecting customers to discover every promotion by reading product descriptions, you can use visual labels to communicate important information immediately.
Here are several reasons to consider adding them.
Make Discounted Products Easier to Find
When you run a seasonal promotion or a storewide sale, customers want to identify discounted products quickly.
A visible “Sale” or “30% OFF” badge helps shoppers identify promotional items while browsing your catalog. It also makes discounted products easier to distinguish from regular-priced products.
For example, if you offer discounts on selected products during Black Friday, adding sale badges to those products helps customers spot the deals without opening each product page.
Highlight New Products and Collections
Launching a new collection? Adding a “New Arrival” or “Just Launched” label can help introduce products to returning customers.
This is particularly useful for fashion, beauty, electronics, and lifestyle stores that regularly add new products.
Rather than relying entirely on a separate new-arrivals page, you can highlight recently added products directly in your existing product catalog.
Create a Sense of Urgency
Labels such as Limited Stock, Flash Sale, or Last Chance can encourage customers to pay attention to products with limited availability or time-sensitive promotions.
However, make sure these labels reflect real conditions. For example, don’t display a Low Stock badge on products with plenty of inventory just to pressure customers into purchasing.
Honest promotional messages help maintain customer trust.
Build Customer Confidence
Labels such as Best Seller, Customer Favorite, or Top Rated help shoppers recognize products that have already gained attention from other customers.
These labels can be useful when your store has many similar products and customers need help deciding which one to explore.
Only use performance-based labels when you have accurate information to support them.
Support Your Marketing Campaigns
Product labels can also reinforce your marketing campaigns across different channels.
For example, you might run a campaign around a new product launch, a holiday collection, or a limited-time discount. Using consistent labels across your website helps customers recognize the products associated with that campaign.
You can also combine product badges with discount pricing, promotional banners, and other marketing elements to create a more consistent shopping experience.
How to Add a Sale Badge in WooCommerce Using Built-in Features
By default, WooCommerce shows a “Sale!” badge on a product when it has a sale price. You can set one in the product editor: open a product, go to Product data, enter a value in the Sale price field, and optionally schedule the start and end dates.
However, some store owners may want to change its appearance or wording to match their brand better. So, in this article, there are two practical ways to go beyond the default badge.
Let’s see how to configure it.
#1: How to Add Sale Badges in WooCommerce with YayPricing
The easiest way to show a sale badge that follows your actual discounts is YayPricing. It is a WooCommerce dynamic pricing plugin that lets you create percentage discounts, fixed discounts, bulk pricing, buy X get Y deals, and more, all without code. Just as important for this guide, it can display a sale tag on your products and even show how much shoppers save.
This matters because the sale badge stays connected to your pricing rules. When a campaign starts, the tag appears. When it ends, the tag goes away. You do not need to edit each product by hand.
Let’s see how to configure it.
Step 1: Install and Activate YayPricing
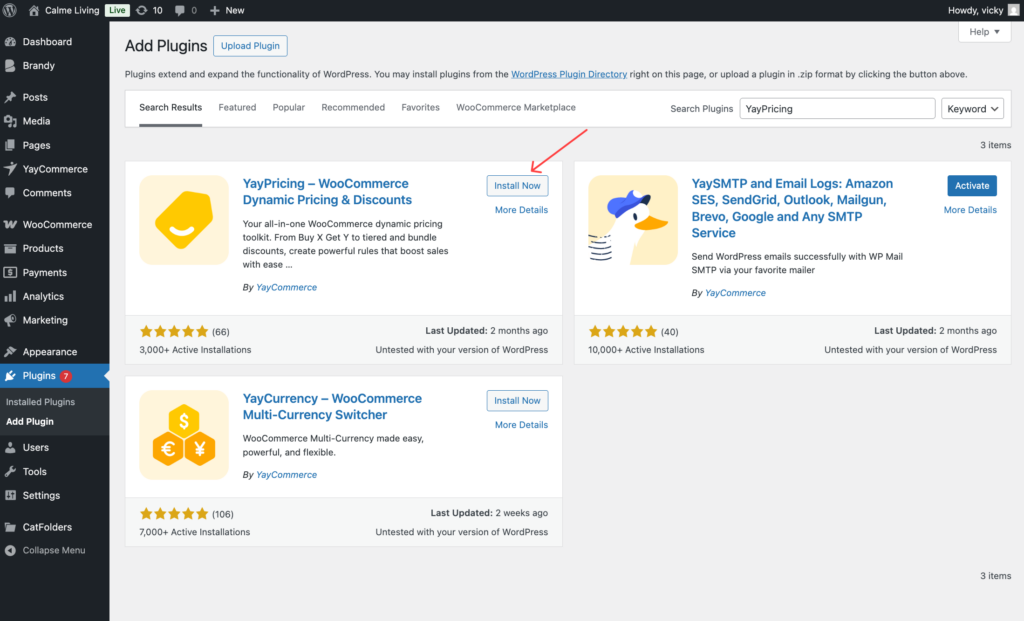
First, install and activate YayPricing on your WooCommerce website.
You can get started with the free version from the WordPress.org plugin directory or explore the additional features available in YayPricing Pro.
After activation, navigate to WooCommerce → YayPricing from your WordPress dashboard to access the plugin settings.
Step 2: Create a product pricing campaign
Before displaying a sale badge, you need to configure a discount that customers can actually receive.
In the YayPricing dashboard, open the Product Pricing section and create a new pricing campaign.
Give it a clear name, such as “Black Friday 25% Off”, so you can find it quickly later.
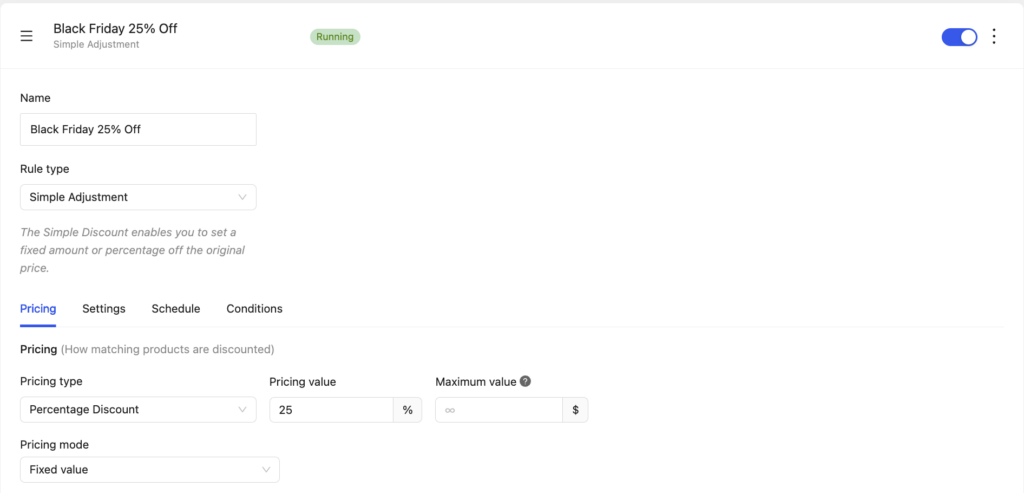
Next, choose the rule type. For a classic sale, pick a percentage discount. You can also use a fixed discount or another pricing type if it fits your offer.
Step 3: Set the discount value and choose products
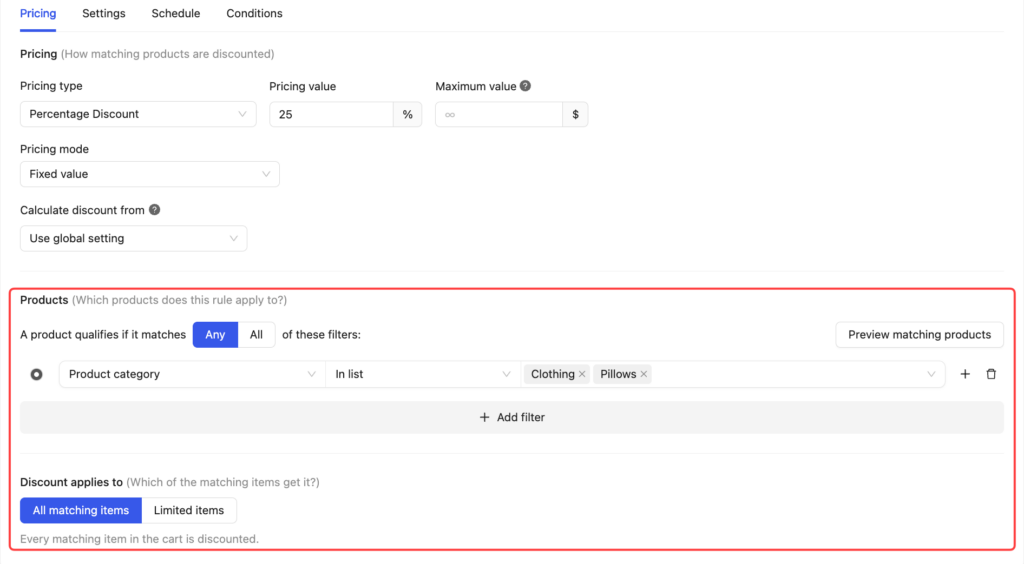
Enter the discount amount. In this example, we will use 25%. If you choose a percentage discount, you can also set a maximum monetary value for the discount, which helps protect your margins on high-priced products.
Then choose which products the campaign applies to. You can filter by product, category, tag, or variation, or simply apply the rule to all products.
Step 4: Add conditions and a schedule (optional)
If you want the sale to apply only to certain customers or carts, add conditions. YayPricing supports conditions such as user roles, first-time buyers, logged-in or guest users, cart subtotal, shipping location, and payment method.
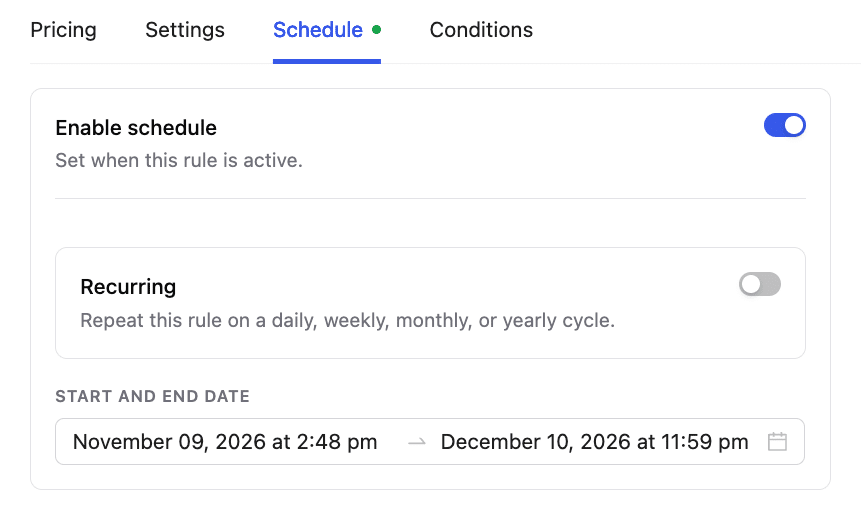
For time-limited sales, schedule the campaign so it starts and ends automatically. That way, your badge appears at the right time and disappears when the promotion is over.
Once you are happy with the rule, save it and switch it on.
Step 5: Turn on the sale tag
Now for the badge itself. Open the YayPricing Settings and look for the Product sale display options. Here you will find the settings that control the sale tag:
- Show sale tag for sale product: displays a sale tag on the product image on both the shop page and the single product page.
- Show sale off amount on the sale tag: adds the discount amount (or range) to the sale tag, so shoppers see the savings instead of just a generic word.
- Show sale tag and discount price as: lets you choose what the tag reflects. You can pick the discountable price range, the current discount tier, or the next discount tier as if one more item is added to the cart.
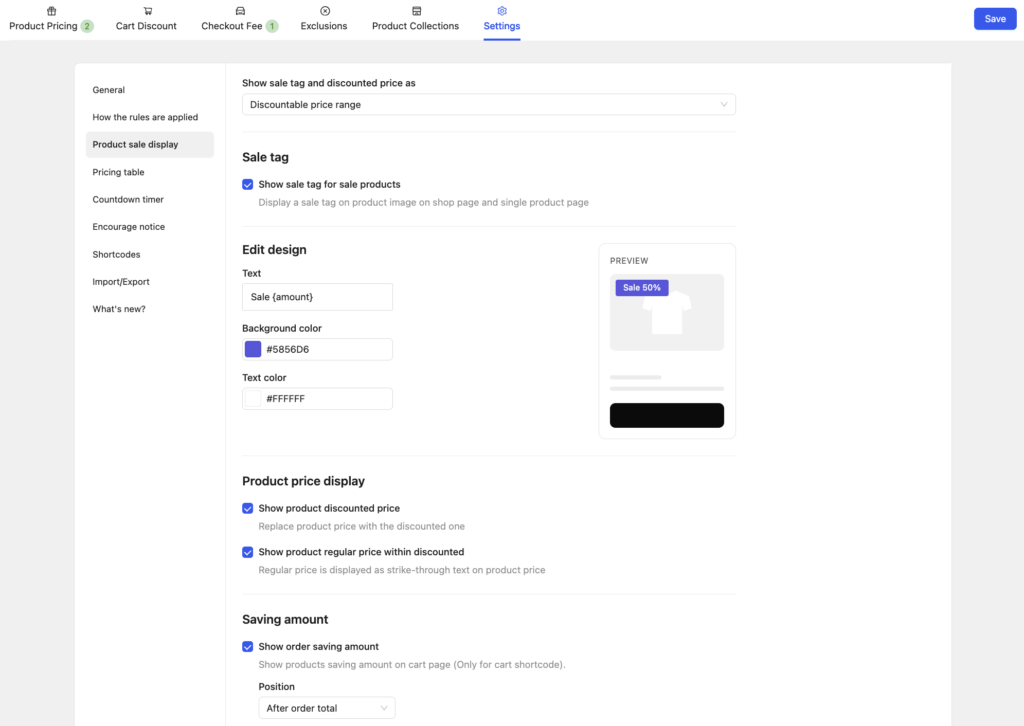
The tier options are especially handy for bulk or quantity-based pricing. The current discount tier shows the discounts that apply when the product is in the cart and meets the rule conditions, while the next tier option shows the price a shopper would get after adding one more item. That is a neat way to encourage bigger orders.
Tick the options you need and save your settings.
Head over to your storefront and preview an item included in your rule. If enabled, the customized promotional badge will appear directly over the image alongside the exact savings. Be sure to verify the display across catalog grids, individual item pages, and mobile viewports.
#2: How to Add Low-Stock Labels in WooCommerce with YayBoost
Sale badges are great for discounts, but they are only one kind of label. Another high-impact label is the low-stock label, such as “Only 5 left in stock”. It is simple, it is honest, and it gives hesitant shoppers a reason to buy now instead of “when they get around to it”.
YayBoost includes a Stock Scarcity feature built for exactly this. It shows low-stock indicators on product, shop, and category pages, with no coding. The free version of YayBoost includes core features such as Stock Scarcity, so you can try it before upgrading to Pro.
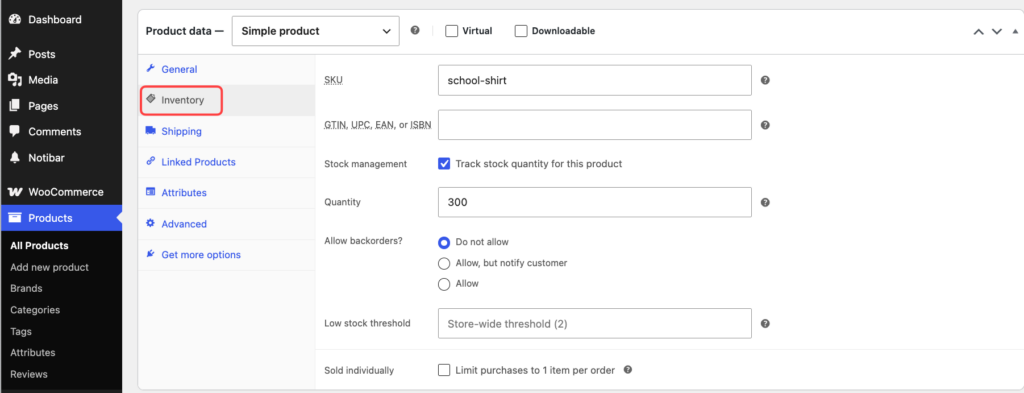
Step 1: Make sure your products track stock
Stock labels need a real stock number to work with. Open a product, go to Product data, then Inventory, and enable stock management. Enter the quantity available. Repeat for the products you want to label.
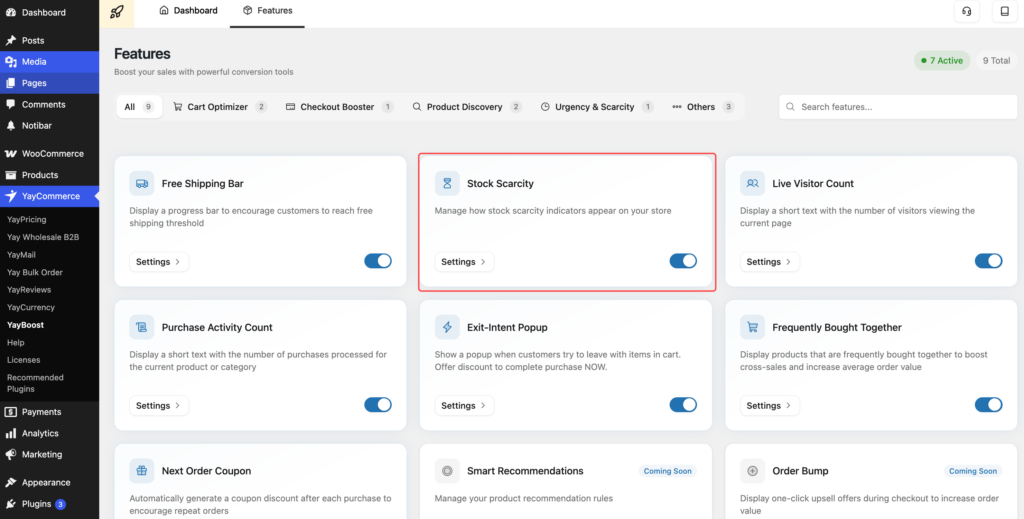
Step 2: Install YayBoost and open Stock Scarcity
Install and activate YayBoost, then open its settings and find the Stock Scarcity feature. Features can be toggled on or off with a single click, and each one has a live preview, so you can see how the label will look before it goes live.
Step 3: Set your stock threshold
Choose the stock quantity that triggers the label. For example, if you set the threshold to 10, the alert appears when a product has 10 items or fewer left.
Pick a number that matches how fast you sell. A threshold that is too high makes the label feel meaningless because shoppers see it everywhere.
Step 4: Customize the message
Write the message shoppers will see when stock is low. You can use the {stock} placeholder to show the exact remaining quantity automatically.
Here are a few message ideas:
- Only {stock} left in stock
- Hurry, just {stock} left
- Selling fast: {stock} remaining
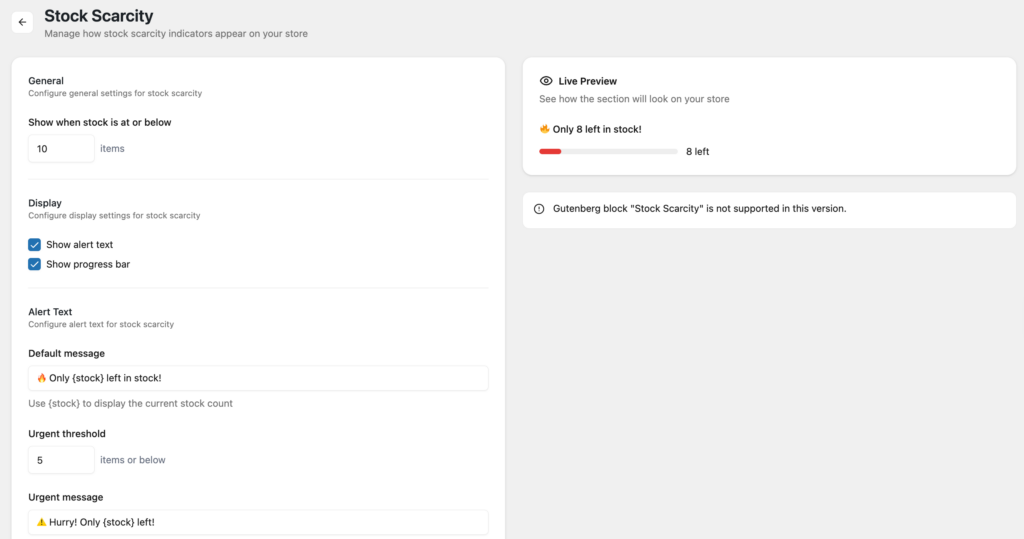
You can also set an urgency threshold for products that are nearly out of stock, so the message becomes more urgent when stock drops even further.
Step 5: Choose where the label appears
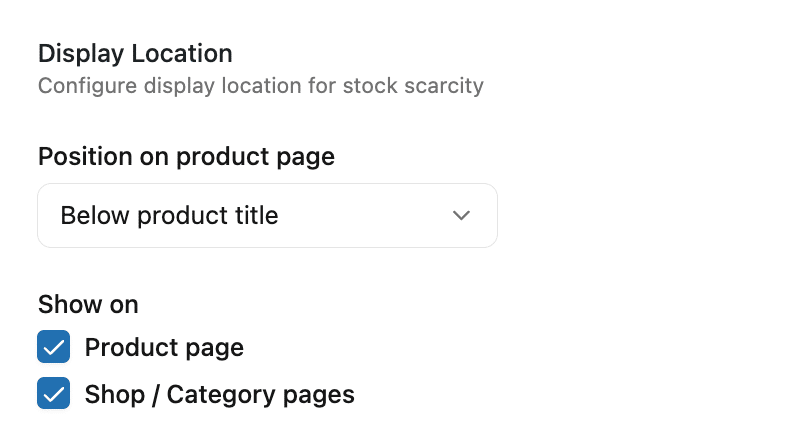
Select the places where the label should show. Stock Scarcity can appear on the product page and on shop and category pages. Showing it on the shop grid helps shoppers notice the urgency before they even open the product page.
Step 6: Target the right products
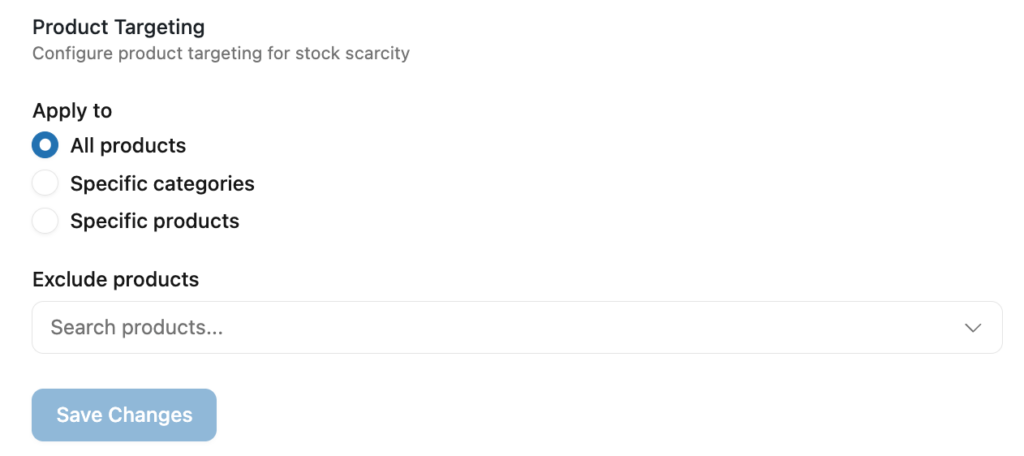
Finally, choose which products the feature applies to. You can apply it to all products or only to specific categories. For many stores, limiting it to fast-moving or limited-edition categories keeps the label credible.
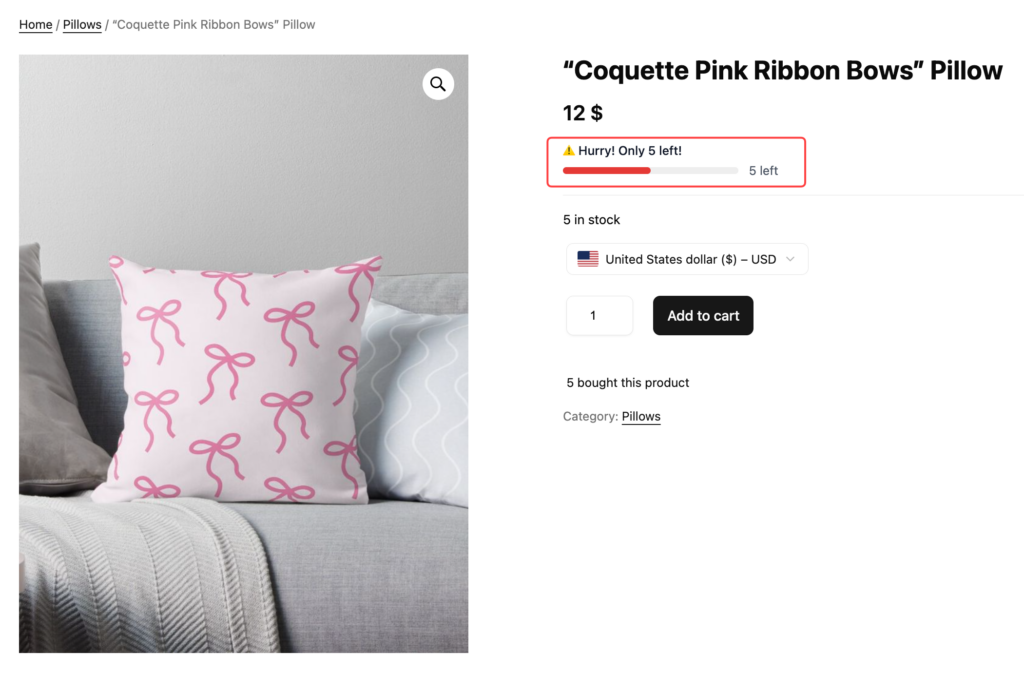
Save your settings, open a low-stock product on your storefront, and confirm the label appears where you expect.
Best Practices for WooCommerce Sale Badges and Product Labels
Adding badges is relatively easy. The more important question is how to use them effectively without overwhelming your product catalog.
- Use Clear and Short Badge Text: Product badges are small, so customers should be able to understand them immediately. Avoid long phrases that take up too much space on product images.
- Choose Colors That Match Your Brand: Colors can help customers recognize different types of promotions. For example, red for sales, green for new arrivals, and amber for low stock. Shoppers learn the meaning quickly.
- Limit Badges Per Product: One or two is plenty. A product wearing four badges looks cluttered, and none of them gets noticed.
- Use Labels That Reflect Real Product Information: Customers rely on product labels to make purchasing decisions. If you use labels such as Best Seller, Low Stock, or Limited Edition, make sure they accurately describe the product.
- Check Mobile and Speed: Most shoppers browse on phones. Test your badges on small screens, and keep your setup lightweight.
Frequently Asked Questions
Now, let’s take a look at some frequently asked questions and answers about WooCommerce sale badges and product labels.
How do I add a sale badge to WooCommerce products?
The simplest way is to enter a value in the Sale price field under Product data when editing a product. WooCommerce then shows its default “Sale!” badge automatically. If your discounts come from pricing rules or you want the badge to show the amount saved, you can use a plugin such as YayPricing, which has a sale tag option for products on the shop and single product pages.
How do I change the “Sale!” text to a percentage in WooCommerce?
You can do it with a small code snippet that filters the sale badge output, or with a plugin. With YayPricing, you can enable the option to show the sale-off amount on the sale tag, which displays the discount instead of a generic word. The code method works for products with a regular price and a sale price saved on the product.
Can I show a low-stock label on WooCommerce products?
Yes. YayBoost’s Stock Scarcity feature lets you set a stock threshold, write a custom message with the remaining quantity, and choose to show it on product, shop, and category pages. You can apply it to all products or only to selected categories.
Do product badges help increase WooCommerce sales?
Product badges can make promotions and product information easier to notice. They may help shoppers discover discounts, new arrivals, and popular products more quickly. Their impact on sales depends on factors such as product demand, pricing, design, and the overall shopping experience.
Can I use custom product labels for new arrivals or bestsellers?
Yes, you can add labels for new products, bestsellers, or other messages using plugins or custom code. These work well alongside sale badges to highlight different details without cluttering the product image.
Is it possible to schedule sale badges in WooCommerce?
WooCommerce lets you schedule sale prices, which controls when the default Sale badge appears. With YayPricing, you can also schedule full pricing campaigns so the sale tag turns on and off automatically with the promotion.
How many badges should I show on one product?
Keep it to one or two badges per product. Too many labels can make the product image look cluttered and harder to read, especially on mobile.
Can I style the sale badge to match my store’s branding?
Yes, you can change colors, text, and position with custom CSS or with plugins that offer styling options. Matching the badge to your brand colors helps it look more professional.
Do product labels work on mobile devices?
Most modern badges and labels are responsive, but you should always check how they look on phones. Make sure the text stays readable, and the badge does not cover important parts of the product image.
What’s the difference between WooCommerce’s default sale badge and using a plugin?
The default badge only shows the word “Sale!” when a sale price is set. Plugins like YayPricing can show the actual discount amount, tie the badge to pricing rules, and support more flexible campaigns.
Conclusion
Sale badges and custom product labels are useful ways to make your WooCommerce products stand out. Whether you’re promoting discounts, introducing a new collection, highlighting bestsellers, or creating a seasonal campaign, the right labels can help customers understand your offers at a glance.
WooCommerce already provides a basic Sale badge when you configure a product’s sale price. You can customize its text and appearance with code or use additional plugins for more flexibility.
If your main goal is to manage discounts and display sale information more effectively, YayPricing is worth considering. It helps you create flexible pricing rules, manage promotional campaigns, and show discount information through product sale tags.
By combining clear product labels with a well-planned pricing strategy, you can create a more organized storefront and make it easier for customers to discover the products and offers that matter most.
