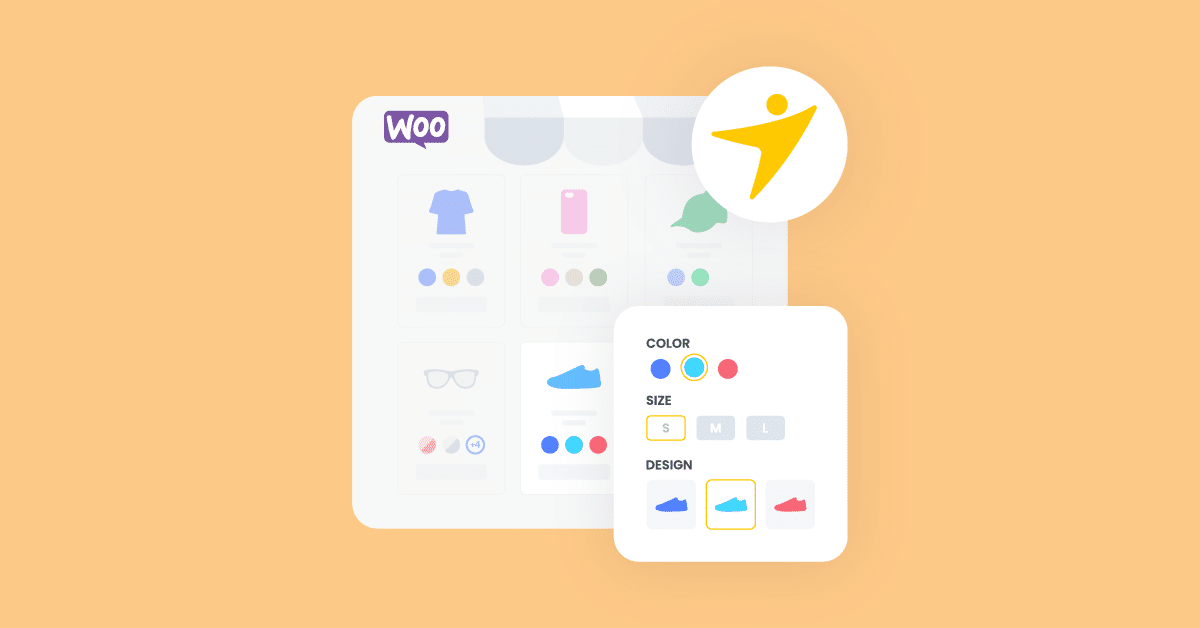
In this article, we aim to share with you how to show color variations on the WooCommerce shop page by using one of the best WooCommerce variation swatch plugins.
Together, we will explore the functionality and benefits of using WooCommerce variation swatches to enhance the display of product variations on your online store. By doing this, your store can provide full product data for your customers. This means they don’t need to access individual product pages, but still results in a seamless and faster shopping experience, increased conversion rate, and improved customer satisfaction.
So, let’s dive into this tutorial, by using the features and functionalities of YaySwatches in-depth, We’ll guide you through the process of maximizing its potential to set up show color variations on your shop page as below:
- Set Up Product Attributes
- Customize The Shop / Categories Variant Display
- See How It Works and Updates on Product Variants
Step 1: Set Up Product Attributes with WooCommerce Default Setting
First things first before you can begin to enjoy the power of the YaySwatches plugin, you need to create your product attributes and assign the attributes to your variable products.
1. Create Global Attributes
By following these simple instructions, you’ll be able to effortlessly set up attributes following the WooCommerce tutorial and define the corresponding terms which are the basic prerequisites before you can set the WooCommerce variation swatches. Let’s get started!
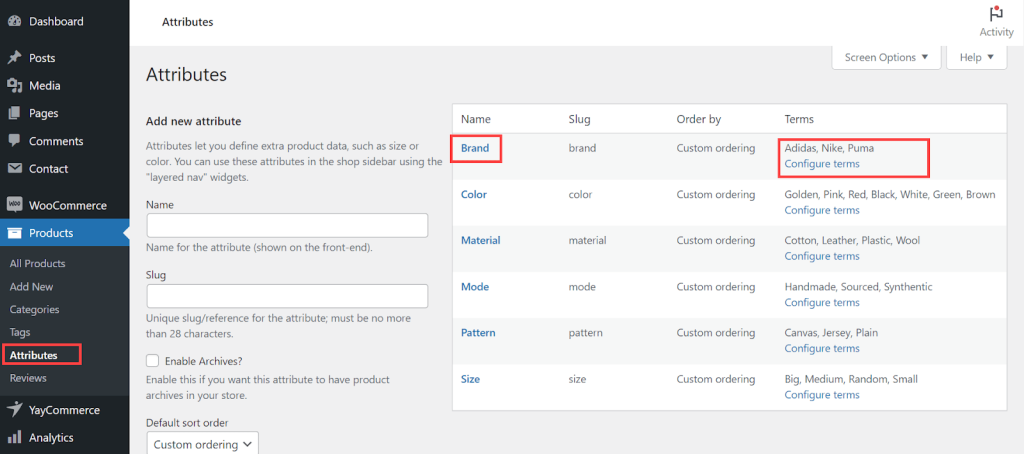
First thing, to access the Product Attributes Section, you should navigate to your WooCommerce dashboard and click on “Products” in the left-hand menu. From the drop-down menu, select “Attributes“. This will take you to the Product Attributes page.
Then, on the Product Attributes page, you will find an option to “Add New Attribute“. Click on this button to create a new attribute for your products. Provide a clear and descriptive name for your attribute, such as “Color” or “Size“.
Once you’ve added the attribute, you’ll notice a “Configure Terms” link next to it. Click on this link to define the specific terms or options for your attribute.
For example, if your attribute is “Color“, you can configure terms like “Red,” “Blue,” and “Green”. Add all the terms that you want to associate with the attributes and the section will be saved automatically as you add.
Congratulations! You have successfully created your product attributes and configured the attribute terms. These attributes can now be assigned to your products, allowing you to provide more detailed and customizable options for your customers.
2. Custom Variable Products
Now let us walk you through the process of adding attributes and variants to your products in WooCommerce.
Create Variable Products
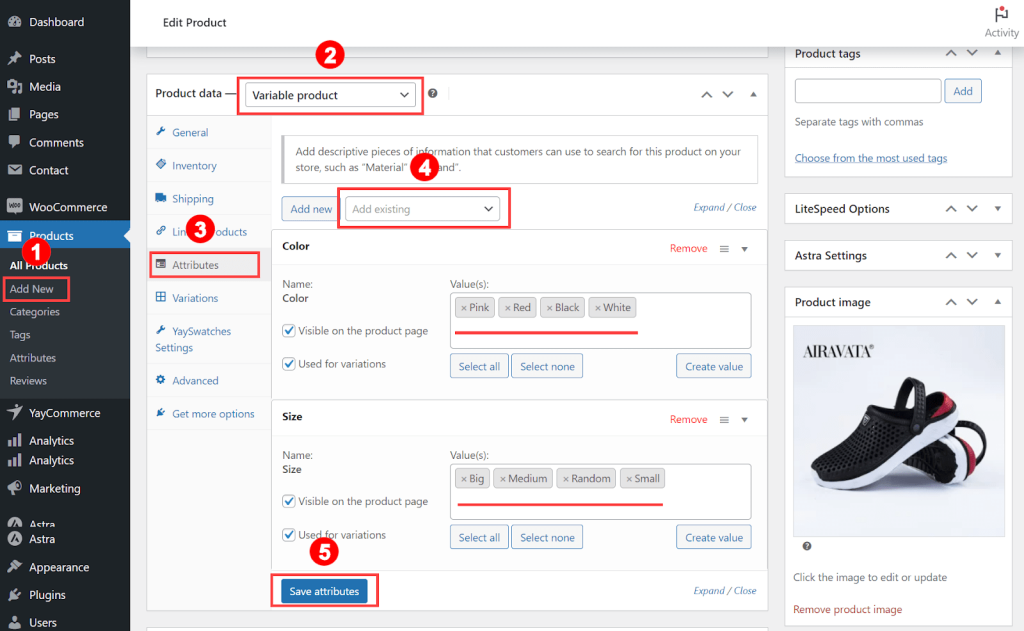
1. Begin by either adding a new product or editing an existing one. In your WooCommerce dashboard, navigate to “Products” and select the product you wish to modify. If you’re creating a new product, click on “Add New” to start.
2. Once you’re in the product editor, locate the “Product Data” section to set the Product Data to Variable. You should choose “Variable product” from the available options. This setting allows you to assign attributes and create variations for your product.
Add Attributes to Use for Variations
By following the next steps, you’ll be able to easily add attributes and variants to your products.
3. Following the step, under the “Attributes” tab, you have two options. You can either select a custom attribute from the drop-down menu or create a new one. To add a new custom attribute, click on the “Add” button and provide a name for the attribute. Then, specify the values or options associated with that attribute.
For example, if your attribute is “Size,” you can define values like “Small,” “Medium,” and “Large.”
4. Once you’ve added the attribute, ensure that the two checkboxes, “Visible on the product page” and “Used for variations“, are selected. This makes the attribute visible to customers on the WooCommerce product page and enables it to be used for creating variations.
5. Remember to save your changes.
Add Variations to Products
Next, to create variations, you should navigate to the “Variations” tab within the product editor. Here, you have two options. You can either add new variations “manually” or use the “Generate variations” option to automatically generate variations based on the attribute options you defined earlier.
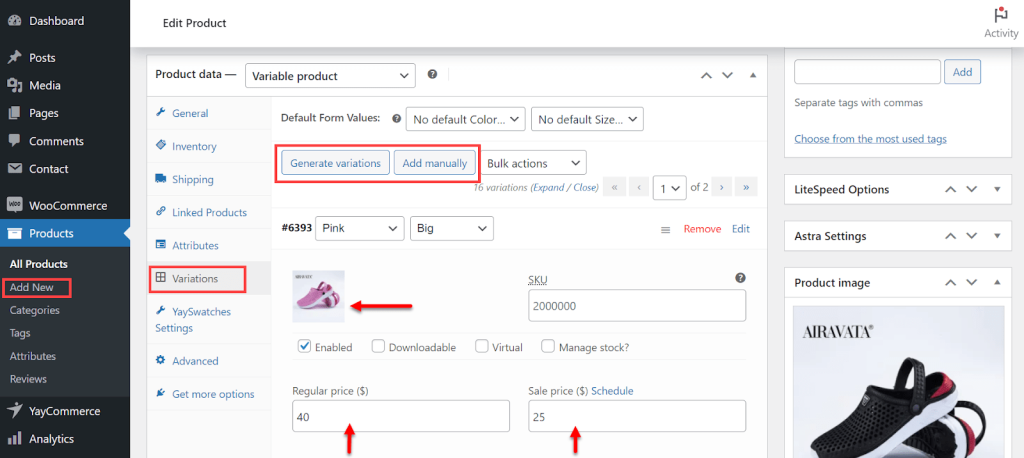
For each variation, set the corresponding price and assign an image if desired. You can repeat this process for all variations until you’ve customized them to your satisfaction.
Finally, once you’ve configured your variations, click “Save changes” to save your product settings and publish this product.
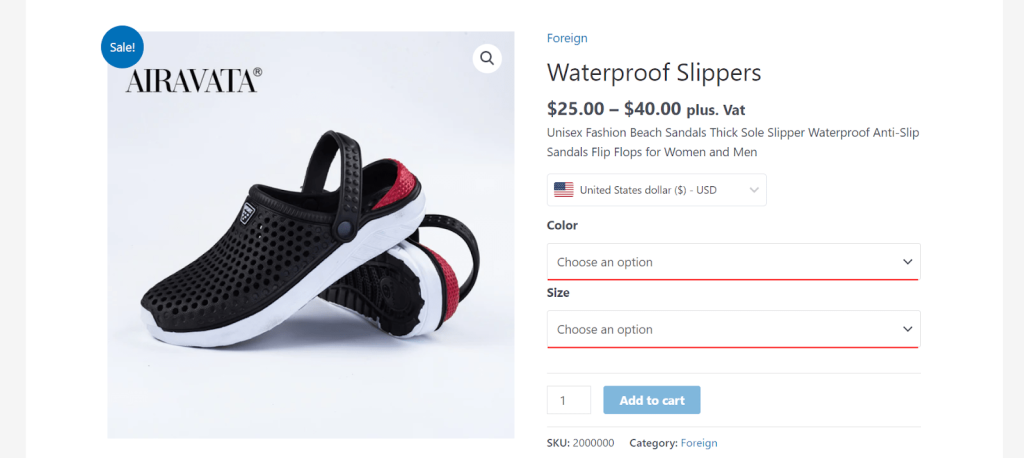
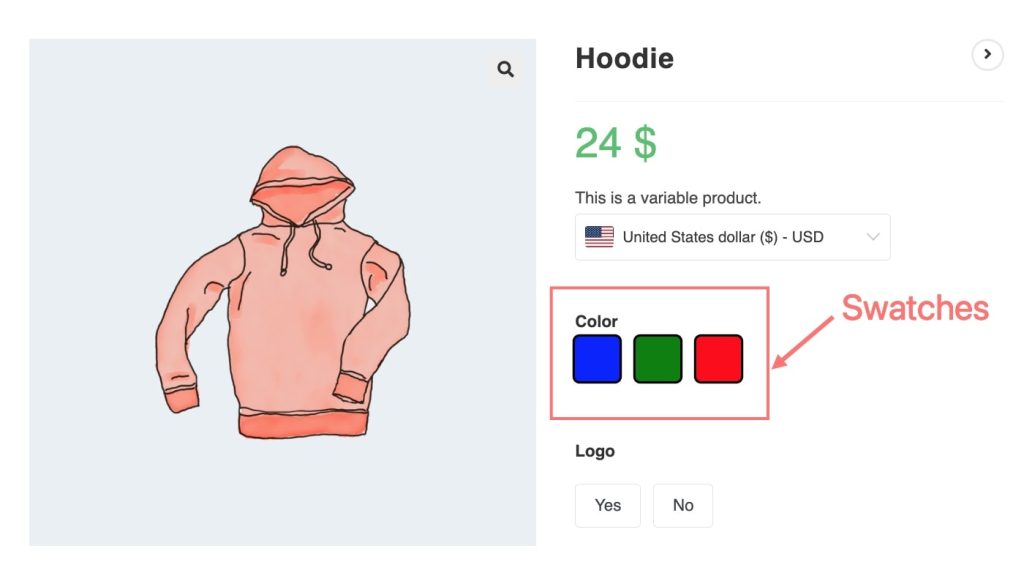
At this point, without activating the YaySwatches – WooCommerce variation swatches plugin, this is how the variants look like in the single product page, as a default dropdown style:
Step 2: Customize The Shop / Categories Variant Display
To make your product display page have a great look for customers, YaySwatches is a perfect tool to help you create color variations on your shop page. Let’s explore the options available for customization.
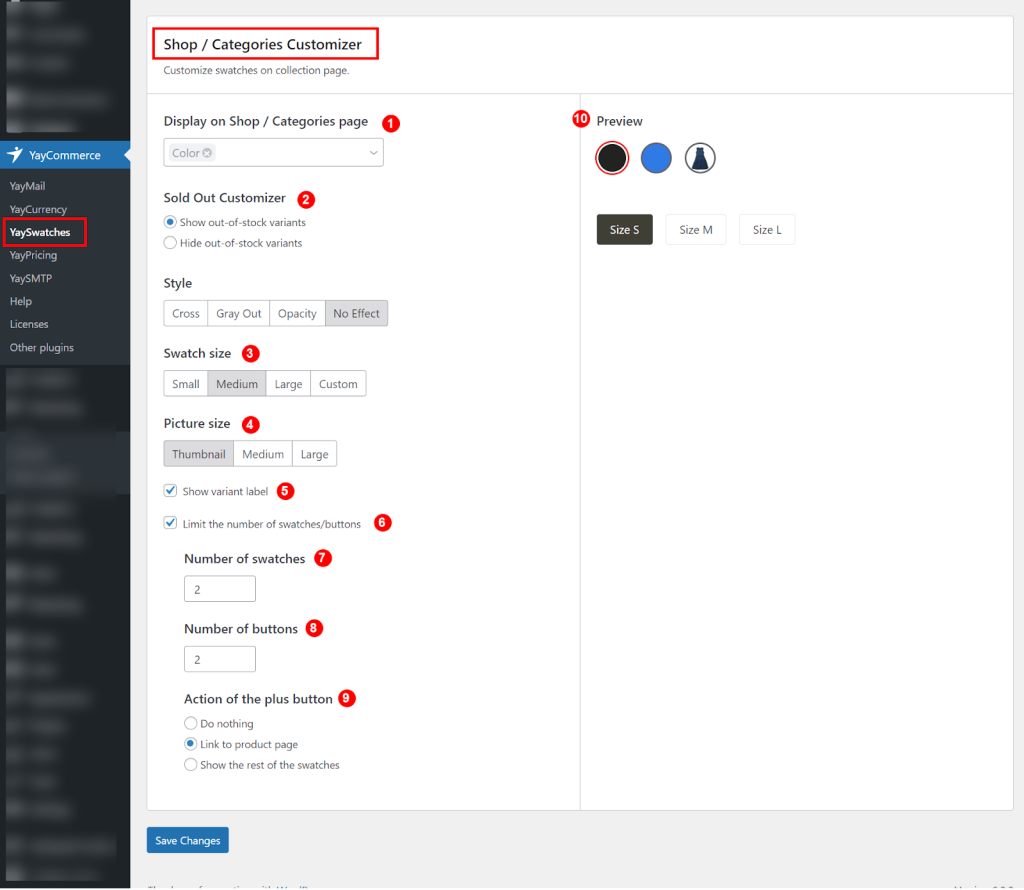
1. Display on the Shop / Categories page Dropdown
This dropdown allows you to select the attributes you wish to display on the Shop / Categories page.
For example, you can choose the color to display which is customized before. In the customization section of the WooCommerce variation swatches plugin, you can personalize the appearance of swatches on your product page.
This allows you to create a cohesive and visually appealing display for your variant options. Within the YaySwatches plugin settings, you’ll find a dedicated section for customizing.
By utilizing the customization of these options, you can create engaging color variations that align with your brand and enhance the overall shopping experience for your customers. Remember to save your settings after making the desired customizations.
2. Sold Out Customizer (Optional)
This option allows you to set the display of out-of-stock variants and you can choose any of the sub-options as you want.
(a). Show out-of-stock variants: If you select this option, you can further customize the style applied to the sold-out variants.
YaySwatches offers several styles to choose from, such as a cross, greying out, opacity reduction, or no effect. Select the style that best suits your website’s design and provides a clear indication of unavailable options.
(b). Hide out-of-stock variants: This option allows you to control the visibility of out-of-stock variants. You can choose between two sub-options
- Automatic: This option is suitable when you have only one variant title per product. YaySwatches will automatically hide out-of-stock variants, ensuring a streamlined browsing experience for your customers.
- Manual: Selecting this option is beneficial when you have more than one variant title per product. With the manual setting, you have the flexibility to manually control the visibility of out-of-stock variants, allowing you to tailor the display based on your specific requirements.

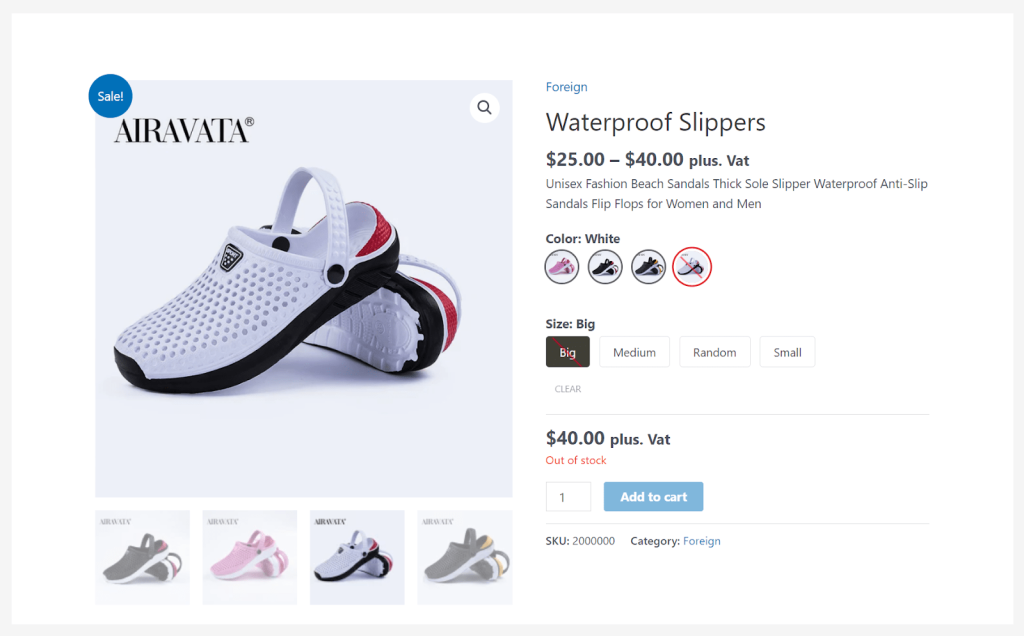
Example of displaying the out-of-stock variants.
3. Swatch Size
You can set the size of the swatches to small, medium, or large, or specify a custom size. This allows you to ensure that the swatches are visually appealing and proportionate to your product display.
4. Picture Size
If you are using image swatches, you can set the picture size to Thumbnail, medium, or large. This ensures that the associated images are displayed at the desired dimensions, providing a consistent and professional look.
5. Show Variant Label
By checking this box, you can activate the display of variant labels. This feature allows you to show additional information or descriptions alongside the swatches, providing more context for customers to make informed choices.
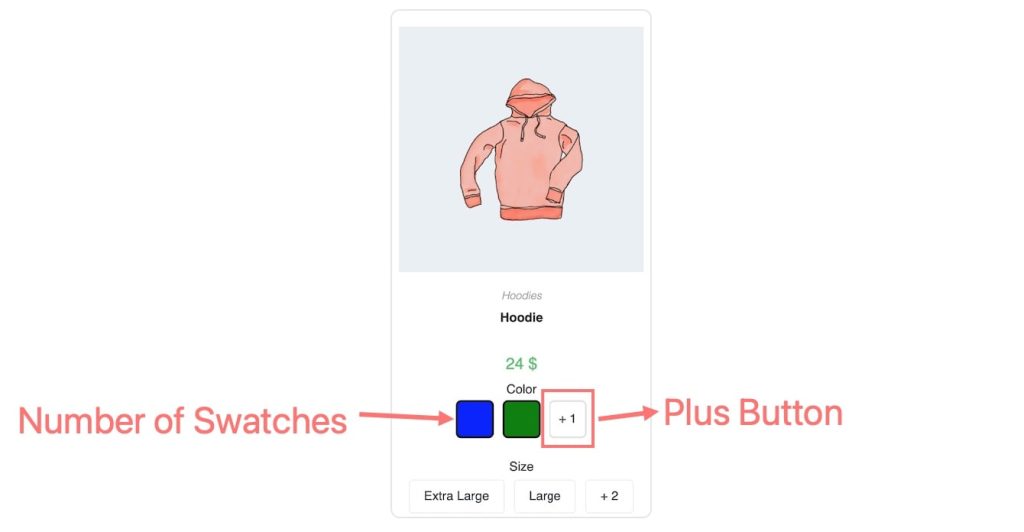
6. Limit the Number of Swatches/Buttons
To avoid overcrowding your shop or category pages with an excessive number of swatches and buttons, you can check this box. This enables you to define the maximum number of swatches and buttons displayed.
7. Number of Swatches
When limiting the number of swatches, you can specify the desired number to be shown on the page. This ensures a streamlined and organized display of swatch options.
8. Number of Buttons
Similarly, when limiting the number of buttons, you can define the desired number to be displayed. This helps prevent the page from becoming cluttered and maintains a clean and user-friendly interface.
9. Action of the Plus Button
When the plus button appears on the shop or category page, you can select the desired action. You have three options to choose from
- Do nothing: The plus button will have no action when clicked.
- Link to the product page: Clicking the plus button will redirect the customer to the product page for further details and selection.
- Show the rest of the swatches: Clicking the plus button will reveal the remaining swatches that were not initially displayed.
10. Preview Changes in Real Time
To give you some ideas about how your setups would look, YaySwatches offers a preview section that simulates the effects of your customizations in real time.
Save all your changes!
Step 3: See How It Works and Updates on Product Variants
In the final step, visit your WooCommerce store and see the result of how WooCommerce shows color variations of products on your store
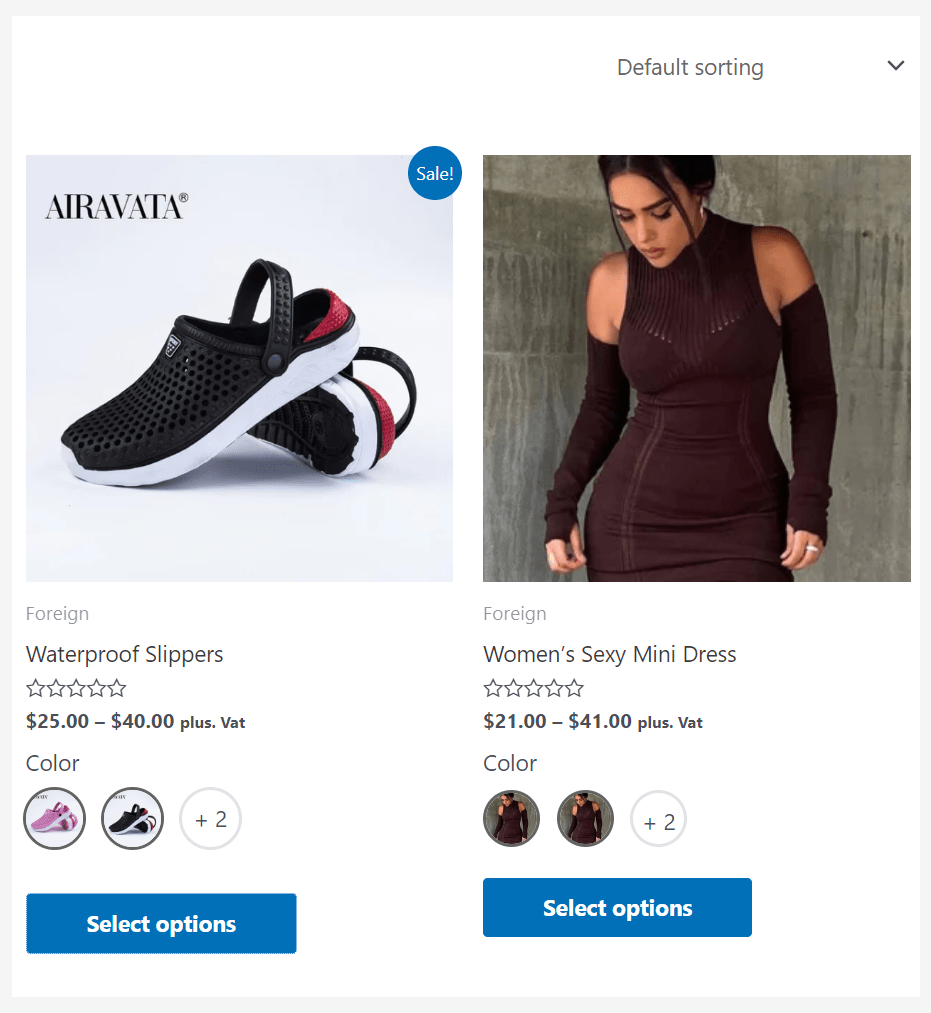
Here is how it looks like on the Shop page:
Besides, YaySwatches also allows you to individually add WooCommerce variation swatches to each product during product editing.
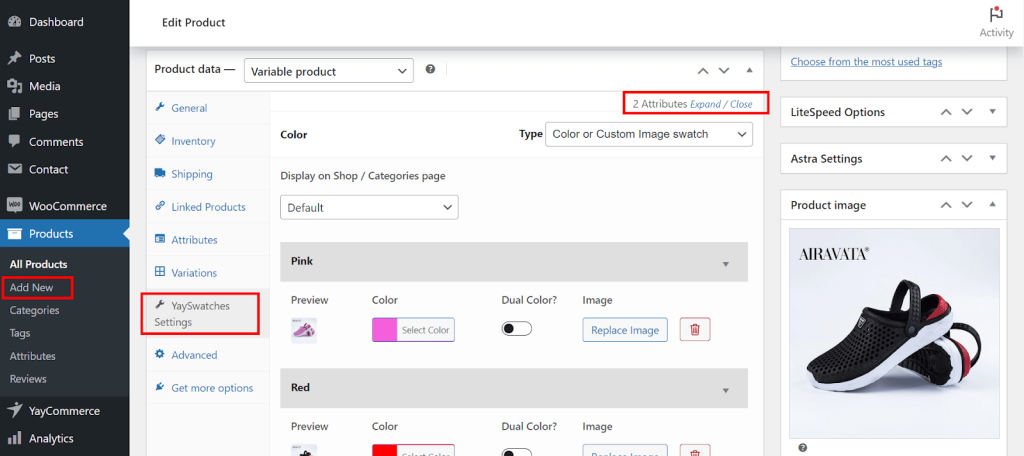
Simply navigate to the product editing interface and locate the YaySwatches Settings option. By clicking on it, you gain immediate access to customize the swatches specifically for that product.
This streamlined process ensures that you can effortlessly tailor the swatch display to meet the unique requirements of each product, providing an engaging and visually appealing shopping experience for your customers.
Why Should Choose YaySwatches to Add Color Variations on the Shop Page
YaySwatches is an exceptional WordPress plugin designed to enhance your WooCommerce-powered webshop. With this WooCommerce variation swatches plugin, you can transform the way your variation products are displayed, providing your customers with an engaging and visually appealing experience.
YaySwatches offers a range of impressive features that make showcasing product attributes a breeze. Whether it’s colors, buttons, or images, this plugin enables you to display color variation and select options in a way that captivates your customers’ attention and enhances their understanding of each product.
One of the key advantages of YaySwatches is its compatibility with multi-lingual sites, ensuring a seamless experience for customers from different regions. Its intuitive user interface (UI) and user experience (UX) make it incredibly easy to use, both for you and your customers. You’ll be able to set it up quickly and effortlessly, without any hassle.
Conclusion
In conclusion, YaySwatches is a versatile WooCommerce variation swatches plugin that empowers you to enhance the display color variation and select options on your online store.
After the detailed instructions with its intuitive customization options, you can completely control the interface of your WooCommerce shop page, specifically the color variant, and from that improve the shopping experience for your customers. They can purchase at the shop page which also helps boost your sales.
With flexible swatch styles to customizing the color table, YaySwatches offers a comprehensive solution to optimize the visual interface of your WooCommerce store.