The attractive ads that come after searching for a product on Google are the outcome of the Google Shopping product feed. Google shopping ads are visually appealing and include enough details to attract customers to click on them. As a result, marketers are using Google’s business platform to spread product information in both local and worldwide markets.
If you have a WooCommerce store, you have a lot of opportunities to showcase it using Google Shopping ads. To build and publish shopping ads, you must first generate an optimal feed file. Therefore, you must first understand how to produce a feed file before moving on to shopping ads.
WooCommerce plugins such as CTX Feed can facilitate the creation of product feeds from WooCommerce. This post will walk you through the steps of building a Google Shopping product feed with WooCommerce.
- Google Shopping Ads and Its Necessity for WooCommerce
- Creating WooCommerce to Google Product Feed
- Step 1: Install CTX Feed for WooCommerce
- Step 2: Create Google Shopping Product Feed
- Step 3: Manage the Feed File
- Step 4: Setting Up Google Merchant Center
- Step 5: Insert your Business Info
- Step 6: Choose Programs According to Business Objectives
- Step 6: Insert Tax and Shipping Info
- Step 7: Verify Your WooCommerce Website
- Step 8: Configuring Google Ads Account
- Step 9: Uploading the Google Shopping Product Feed file
- Step 10: Finalizing the Feed Upload Process
- Final Words
Google Shopping Ads and Its Necessity for WooCommerce
Google has a tremendous search volume – 5.6 billion search queries per day and two trillion per year. Moreover, shoppers are increasingly clicking on Google shopping ads rather than traditional text-based ads. For most eCommerce sites, Google shopping ads are effectively bringing more visitors at a lower cost. Finally, sales are increased as a result of Google’s numerous perks and ad types.
What are Google Shopping Ads?
Google shopping ads are displayed on top search results of a user’s or shopper’s search query. It generally appears for product search on Google and googles shopping. Google shopping ads are different from traditional search ads because they display additional details. It includes properly formatted –
- Product image
- Title
- Price
- Store name (Link Embedded)
- Customer reviews
- Promotions
Therefore, with all this vital information, customers are easily motivated to click the ads. Consequently, they are redirected to the WooCommerce or eCommerce website after clicking the ads.
To display and take control over these ads, you need to create an optimized product feed. As you have control over your WooCommerce product information, you can easily create a product feed using the right plugin. When a customer gets what they are looking for
In relevant search results, they finalize the purchase process.
With the help of product feed, you can easily create accurate shopping Ads and get numerous benefits –
- You can include the Product title on a Product Feed file, customize it, and make it more attractive. Moreover, you can analyze the marketplace and insert proper keywords to make it more discoverable.
- You include the product image on a feed file, and by inserting a clear and optimized image, you can inspire your customers.
- You can upload feed files on Google Merchant Center and create numerous types of Google Ads. Therefore, your products will turn up on different networks of Google Display and generate more sales.
- You will notice a greater conversion rate with a lower cost per click on ads.
Benefits of Google Shopping Ads for WooCommerce
One thing is certain at this point: you will need a Google Shopping product feed to develop Ads, particularly Google Shopping Ads. But, what are the advantages of these ads? With additional benefits, Google Shopping Feed helps boost the WooCommerce website’s merchandise. Let’s have a look at those advantages.
Increased WooCommerce Product Visibility
With the Ads created by the product feed, the visibility of your products increases massively. That is because –
- Your WooCommerce products will be displayed at the top position of Google search results. As a result, customers will notice your ads first before the organic search results. Therefore, they will click the ads without searching for more options.
- Images work better than slogans, keywords, or texts. Therefore, shopping ads have a better chance to stand out.
- Using multi-currency for WooCommerce helps display your product prices in local currencies.
Get More Return Compared to Investment
Investing in Google product feed yields bigger returns than expenditures. Why? Google Ads performs better than other types of ads in terms of cost per click (CPC), click-through rate, and conversion rate.
If you invest in Google shopping campaigns, you will get better CTRs. That is due to the fact that, from paid Google search results, 65% of clicks (via Mobile device ) originate from Google. Google shopping ad spend is growing (41% from previous years ) every year. So, it’s clear that shoppers are more likely to click on Google shopping ads compared to other ads.
The cost of Google shopping ads ($0.66) is less than ordinary search ads. Therefore, using Google shopping ads will save your promotional costs. In addition, the conversion rate of Google shopping ads is really high across numerous industries.
Reach More Customers
Apart from standard search results, shopping ads are represented on different channels of Google, including:
- Google Shopping Tab (via Google search)
- Google Images search result
- Different websites that partner with Google
- Various display networks such as YouTube, Gmail, Google Display Network
Another notable benefit is, Google takes a huge space on SERP and displays multiple ads. Moreover, it displays text ads and shopping ads or sponsored ads together. There is a chance to display multiple WooCommerce products and WooCommerce product tags in a single search query.
Filtered Traffic for WooCommerce Products
Ads created on Google via product feed come with a greater quality of traffic. That is owing to customers searching on Google will have a clear intention of buying products. They search on Google to get relevant WooCommerce product galleries that you are displaying via ads. Therefore, your ads will be displayed if Google considers them relevant to a search query.
Moreover, shopping ads display information that is not included in other ad formats. By getting all the details, customers are convinced to click your ads and purchase from your store.
Easy Management of Product Feed
After creating your feed file with the product feed plugin on WooCommerce, you can easily manage it on Google. All you need to do is create a feed file and upload it to Google Merchant Center. From the merchant center, you can manage the feed file and create ads with a step-by-step process. We will soon discuss this process of creating a feed file for the Google shopping campaign.
Most importantly, you can upload all the WooCommerce product information within a single feed file. Additionally, there are many tools in the Google Merchant Center to minimize your effort in publishing ads.
With the help of reporting tools of Google, you can sort out which products from a product feed file are performing well. You can also analyze the product’s performance according to its brand and product category. In addition, get all the reports on impressions, clicks, and CPC along with the conversion metrics.
Creating WooCommerce to Google Product Feed
Since you’ve learned about the benefits of Google shopping product feed, let’s move one step forward. We will now describe how easily you can create a feed file from the WooCommerce store.
There are many options to create an optimized product feed file for promoting your products. We recommend using CTX Feed, the Best Woocommerce product feed generator plugin. It allows you to create limitless feeds for any number of WooCommerce products. Hence, you can create a feed for top marketing channels, including Google. The best part is, it has pre-built templates for 100+ marketing channels out there. As a result, hassle-free feed file creation within seconds, which you can update easily.
Step 1: Install CTX Feed for WooCommerce
Let’s assume you have a WooCommerce powered WordPress website up and running. First of all, from the dashboard of your WordPress website, go to the Plugin section and click on Add New. Then write CTX Feed on the search box and press enter.
You will notice, the plugin name will appear along with the description and Install Now button. Install the plugin and activate it to proceed to the next step.
,

Step 2: Create Google Shopping Product Feed
After activating the plugin you will notice the CTX Feed plugin is visible in the dashboard. Click on CTX Feed plugin > Make Feed. Consequently, the Content Settings area of this extension will show up on the right-hand side.
On this page, provide the country of origin of your business from the dropdown menu. Next, select the template as Google Shopping, and provide a file name. The file type is XML by default, but you can change it if needed.
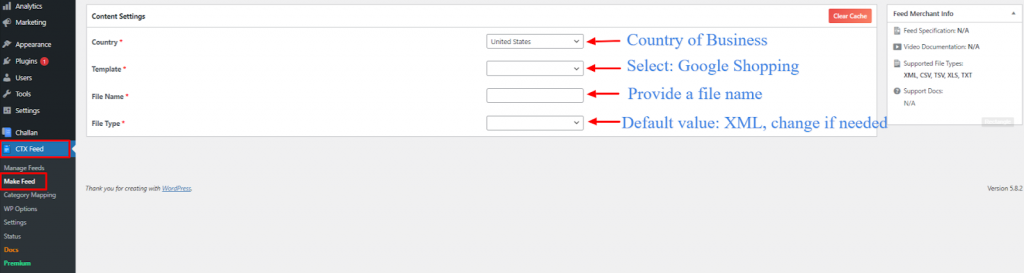
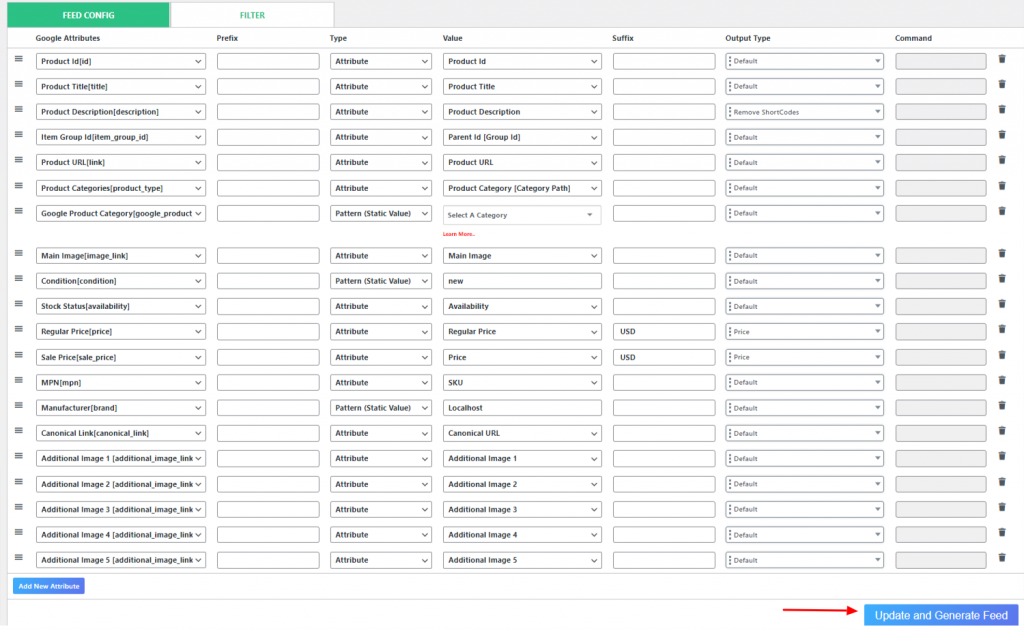
Once you select the Google Shopping template, the feed configuration area will appear. When you are done with configuring or adding new attributes, update and generate the feed file.
Step 3: Manage the Feed File
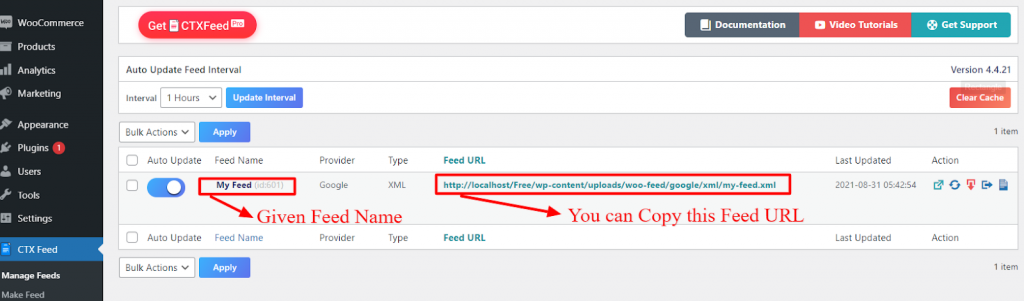
After generating the feed file, click the Manage Feed option from the dashboard to view the feed file. In this section, you will be able to see the feed file which you’ve created. As you can see from the image below, We can see the Feed Name, Feed URL, and some other options on the right-hand corner.
Now you are ready with your google shopping product feed created from your WooCommerce store. The next step will guide you on how to upload your feed file on Google Merchant Center. You must comply with Google’s instructions on product feed files or data specifications. That is because Google will understand your data easily if you follow their guidelines.
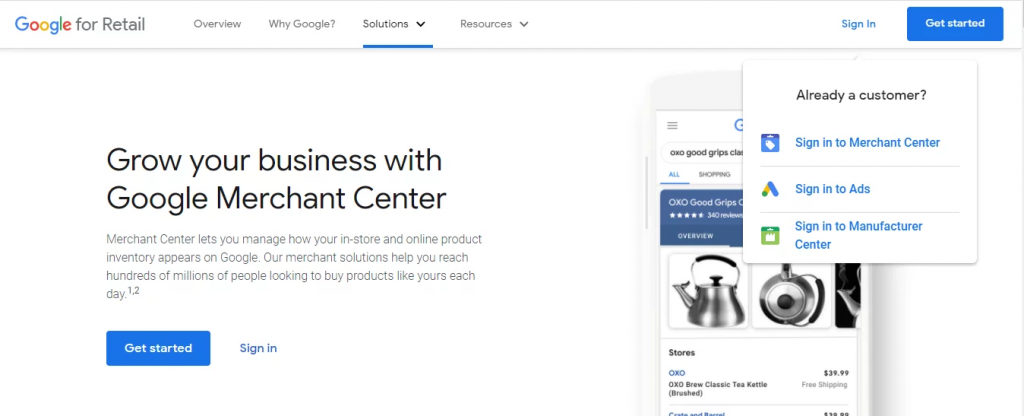
Step 4: Setting Up Google Merchant Center
First of all, open a new google account if you don’t have one and use it to log into Google Merchant Center. If you already have a Gmail account or Google My Business account, use it to log in to the merchant center.
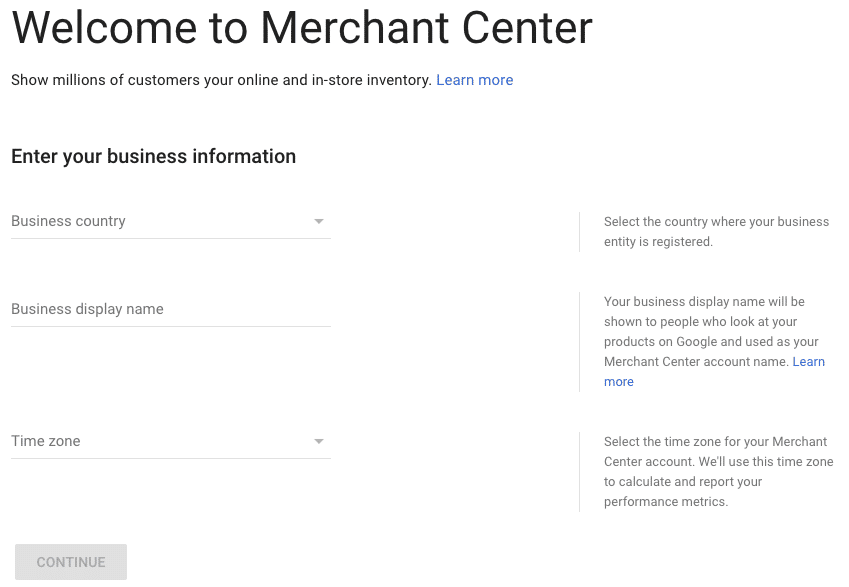
Step 5: Insert your Business Info
Right after signing in, you will see a page with a heading – WelCome to Merchant Center. Here, you have to fill in your business information, including:
- Business location
- Business Display Name / Website Name / Store Name
- Time Zone according to your business location
After filling in all this information, press Continue to move on to the next step.
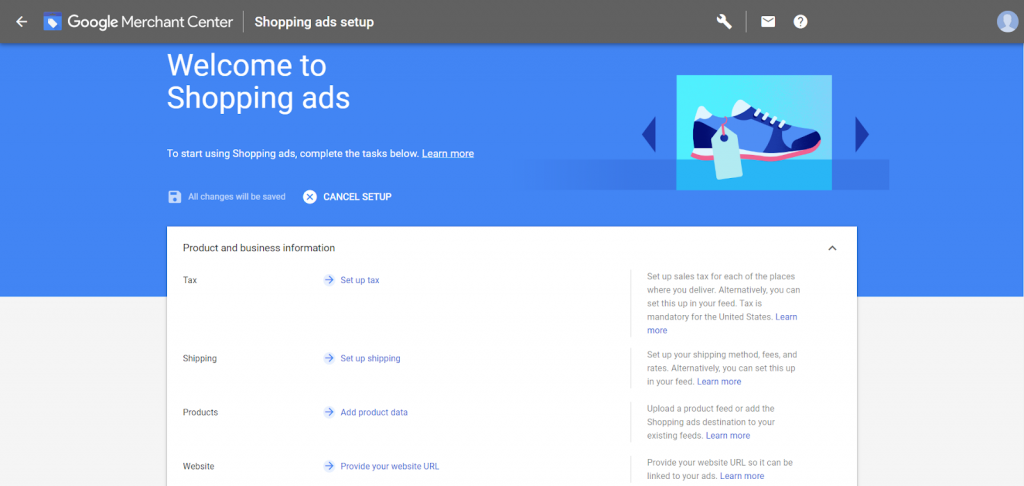
Step 6: Choose Programs According to Business Objectives
When you are done filling up all the business information, choose a program according to your business objectives. Shopping ads are one of the best options to promote WooCommerce products via Google. Therefore, select the Shopping Ads and click Continue to move forward.

You just need to review the summary of your account details and move on to the next step.
Step 6: Insert Tax and Shipping Info
At this step, you need to enter the Tax and Shipping information of your business. Your WooCommerce store’s tax and shipping information should be added in this section. Follow the shipping requirements that are applicable to your business location.
Tax and shipping information is the most critical business information of an eCommerce store. When you include this info with the total cost, customers will get a clear idea about the payment. You must set up the tax and shipping information based on the location of your business.
Step 7: Verify Your WooCommerce Website
Now, you have to verify your WooCommerce website URL by passing through the verification process of Google. In the Google Merchant Center dashboard, click the Tooltip icon and select Business information from Tools Section.
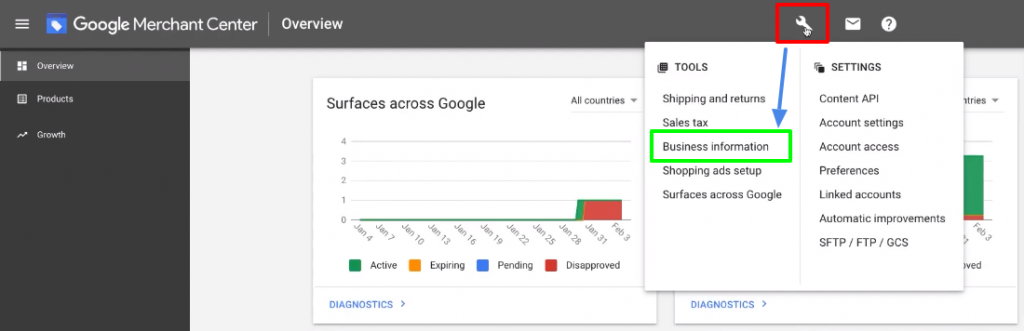
Now from the UI of your screen, select the Website tab from the top bar. Here, you can enter your website’s URL and verify your WooCommerce website. This verification step is mandatory to make sure that you are the actual owner of your website. Finishing this step will allow you to link your website with your Merchant center account.

Step 8: Configuring Google Ads Account
In this step, you need to create a Google ads account to link it with your merchant center account. Firstly, click on Tools, and click on Linked Accounts. Secondly, click the + sign on the Google Ads tab. A pop-up will open up with a heading- Create your Google Ads account. Recheck the time zone and currency of your business and click Create.
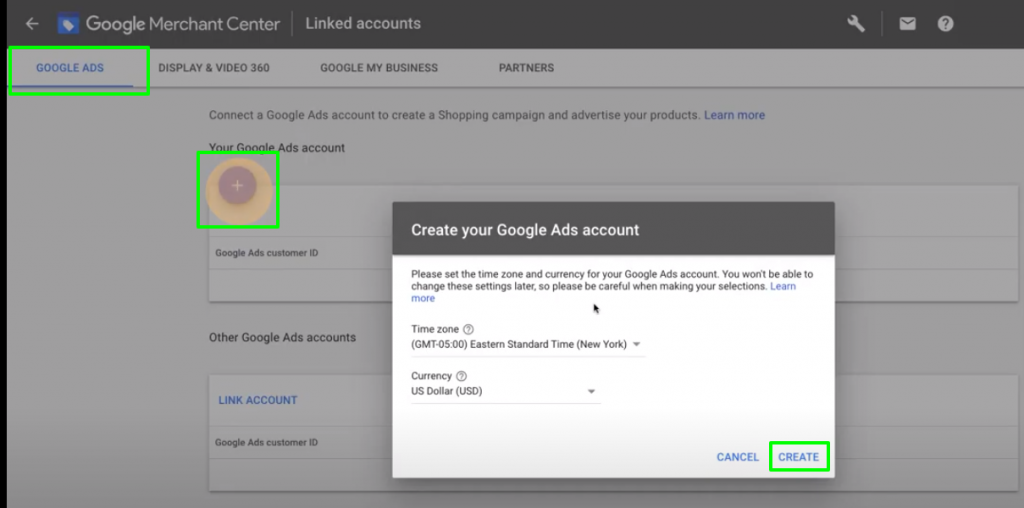
Use your Gmail account for the Google My Business account and link the Google Ads account. It may require you to relog into your Merchant Center account to proceed further.
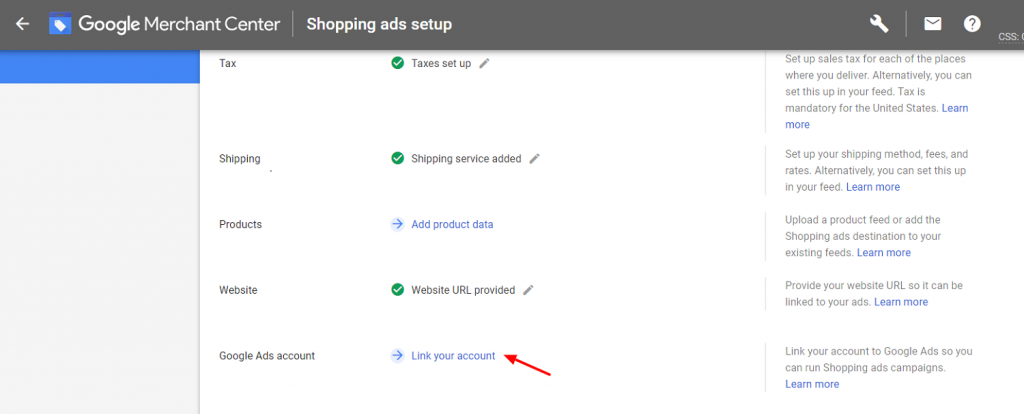
Step 9: Uploading the Google Shopping Product Feed file
Now, you have your account ready for uploading the feed file on Google Merchant Center. Before uploading, you should check out steps 1-3 and ensure your feed file is ready with the URL.

Let’s head back to the Merchant Center and click Products located on the left side menu. Select the Feeds under the Products tab. You will get a + button located under the heading – Primary Feed. Click the plus sign to upload the feed file, but you have to enter some information to proceed.
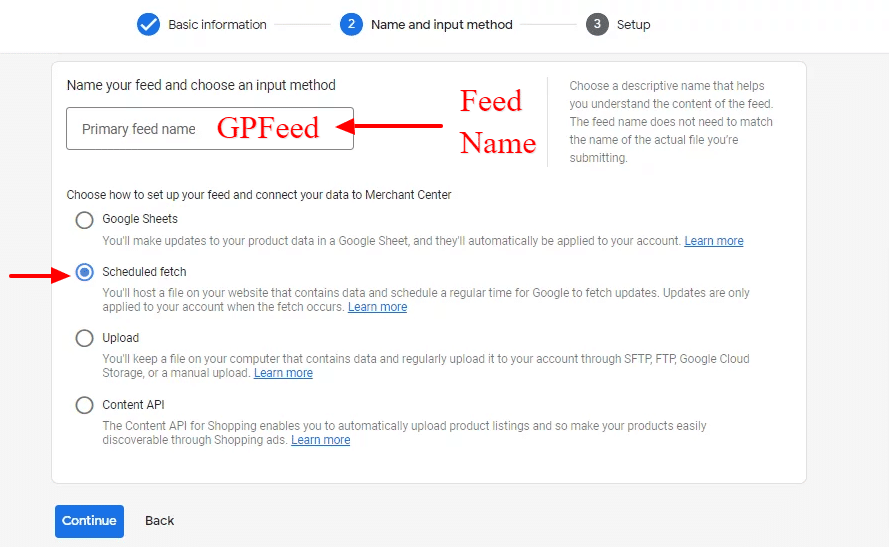
You may provide some essential information – Country of sales and Language on the New Primary Feed page. When you are done, click continue to jump to the next step.

At this point, name your feed file and select the input method of the feed file. For example, we’ve given the feed file name “GPFeed.” The instruction on the right side says the feed file name doesn’t need to match the file name that you’ve created earlier.
Select the Schedule Fetch option because it’s the easiest to upload the feed file that gets auto-updated. Therefore, updating the product information on your WooCommerce website will update the feed file in Google Merchant Center.
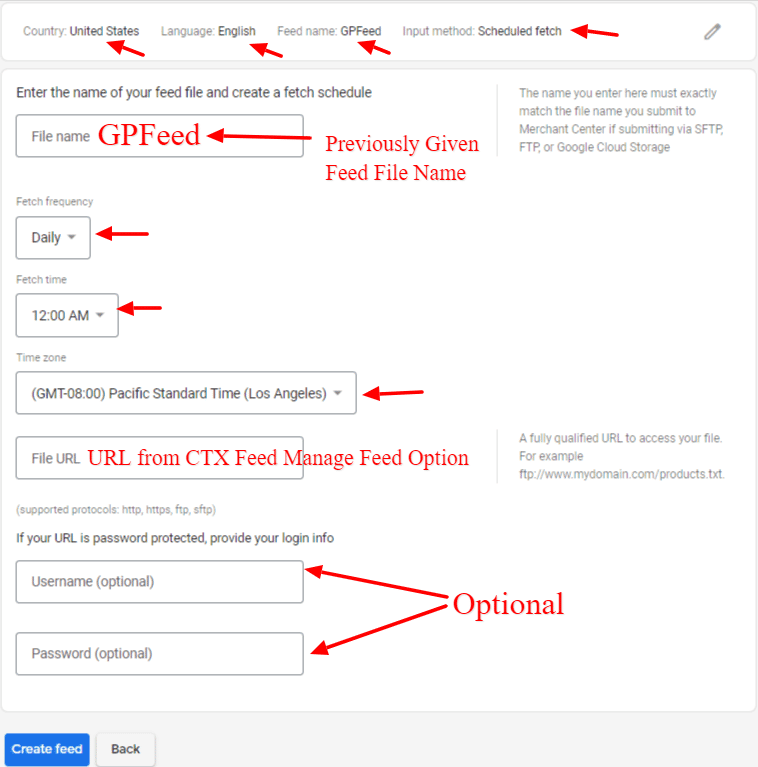
Step 10: Finalizing the Feed Upload Process
In this step, you have to provide the Google Product Feed URL along with some additional information. Firstly, Provide the feed file name which you’ve created previously on the WooCommerce store. Secondly, select your preferred fetch frequency from the dropdown menu.
The fetch frequency informs the Merchant Center about how often you want to fetch the product data from your website. After selecting the fetch frequency, select your preferred fetch time to indicate when you want Google to pull your data.
Also, select the time zone of your WooCommerce business, which you’ve already provided in Step 5. Subsequently, input the feed URL created by the CTX Feed Plugin that you will get on the Manage Feed option of the plugin. Click the Create Feed button after providing all the information to finalize the feed upload process.
The process of creating & uploading Google Product Feed with WooCommerce is now complete. With product feed on the merchant center, you can launch a Google Shopping campaign, create Google shopping ads, and promote your products in ways that Google allows. As a result, you’ll get a huge customer base and promote your products with ease.
To optimize the Google shopping product feed, you can learn more about CTX Feed and expand your revenue. This top-notch WooCommerce plugin will make your marketing effort more successful and reasonable than ever before.
Final Words
Creating a feed file for promotional purposes is either a new or complex term for most online store owners. But, at the end of the day, it is a necessary step to becoming a successful eCommerce business owner. Therefore, you should go through this article to learn the easiest way of creating a Google Shopping product feed with WooCommerce.
Keep in mind that along with applying these tactics, you should also create a custom signature in the WooCommerce email templates to resonate with the effects.
Once the feed file is ready, you can outwit your competition by utilizing it on Google Merchant Center. However, now it’s your turn to explore the opportunities that Google has to offer for your WooCommerce store. You can also read the Complete Guide of Google Shopping Ads and enhance your knowledge about Shopping Ads.
I have tried to create a feed, but it doesn’t appear in Manage Feeds