
If you’re managing several different WordPress-powered websites separately, keeping everything in sync and organized can be quite a time-consuming process.
Leveraging the WordPress multisite feature removes the need to modify and update each site individually, but rather have all your websites under one roof, accessible via a single WP dashboard.
WordPress Multisite is an excellent solution for operating a network of websites identical in form and functionality.
In addition, the feature saves you time by making constant switches between dashboards, and streamlining website management tasks such as installing themes and plugins, or updating theme.
In this article, we will discuss what WordPress Multisite is, how the functionality works in practice, and whether it is the right solution for your needs.
Finally, we’ll cover the necessary steps to properly set up your WP Multisite network to make the most of it.
What is WordPress Multisite?
Rolled in 2010, WP Multisite is a powerful functionality to create, manage, and maintain a virtually limitless network of WordPress-powered websites using the same WP installation.
Whether you’re managing two or one thousand and two websites, WP Multisite allows you to quickly switch between them via a dropdown menu and make any updates across all sites in bulk.
The Multisite functionality makes site administration easy within a single WP dashboard. It saves site admins’ time and nerves by granting limited access to users who’ll manage their part of the network without admins worrying about the security of the main website.
WP Multisite Site & User Structure
Setting up a Multisite network means creating sites of two unique statuses:
- The main website that serves as the network’s core
- The individual websites within the network acting as subdirectories or subdomains of the main site
Besides different site levels, Multisite also includes two types of users:
- Network admin (also referred to as super admin)
- Site admin
Network admin has a higher level of access compared to site admins. For example, a network admin can install themes and plugins on the network level, whereas a site admin can activate these for their site(s) only.
Site admins cannot install/uninstall themes and plugins or make changes that affect others’ sites and the entire network.
Is the WordPress Multisite Functionality for You?
Multisite is a beneficial feature for everyone whose website has multiple subdomains or those who require entirely separate web locations.
However, the websites you can operate within the Multisite have to be, to an extent, correlated – but also relatively different. In other words, your network can include several blogs or eCommerce sites, but not both of these together.
Developers or web agencies use Multisite to manage their clients’ entire network or individual website(s). In addition, businesses or organizations can leverage the functionality to run separate sites or blogs for their representatives or services.
Examples of WordPress Multisite in Practice
Multisite is a viable solution for real estate agencies or best bank websites that want to run their main websites and allow their agents to create similar websites to manage individually within the network.
WP Multisite feature is also used by universities, such as Harvard, to generate a web presence for their departments, professors, or students, and media outlet websites, like BBC, to set up local or regional sites.
In addition, WordPress Multisite is an effortless way to set up a multilingual business website. Any digital strategy firm and trusted experience design agency out there will advise you, instead of watering down your business, to fuse all your efforts into building a robust Multisite network.
How to Set Up Your WP Multisite Securely & Efficiently
As WordPress Multisite comprises many users, abundant content, and many website activities in general, it is more prone to security issues. Thus, it requires dedicated and secure hosting and an experienced developer to manage the technicalities.
Still, the benefits WP Multisite offers far outweigh its downsides. And by installing and setting up the network correctly, you’re minimizing the chance of experiencing the functionality’s potential hazards.
Read on to discover the steps to install and activate your WordPress Multisite network hassle-free.
#1 Prepare For WordPress Multisite Installation
Inhale, exhale, do a couple of squats, and slap your thighs – cause setting up WordPress Multisite successfully is a wild ride.
Building a Multisite Network from Scratch
If you’re creating a brand-new WordPress installation for your Multisite network, you have several options for installation. You can install WordPress via your web hosting provider or download the software from WordPress.org. Depending on your specific needs, you might also want to explore specialized blog hosting services for optimized performance, or consider other types of hosting, such as shared, VPS, or dedicated hosting based on your website’s scale and requirements.
You can choose between using subdomains or subdirectories for your network’s websites. Subdirectories are easier to work with; however, if your website is older than 30 days, you’re only allowed to use subdomains.
Building a Multisite Network on the Existing Website
Before starting your WP Multisite installation, ensure all your environments – live and staging sites – are synced up.
Updating all site versions with the latest code and data ensures your Multisite construction process goes smoothly and successfully without losing any updates and duplicating content.
#2 Backup Your Website
There won’t be much to back up if you’ve just set up your new WordPress site. However, if you are installing Multisite over an existing WordPress website, creating a backup of it is crucial.

You can backup your site in various ways: manually, via your hosting provider, or by a backup and restore plugin.
During the process, ensure you’ve backed up your:
- WordPress database containing your posts and other data
- WordPress site files, such as WP core installation, plugins, themes, images, files, static web pages, etc.
#3 Deactivate All Your Plugins
In the dashboard, go to the Plugins sections, and deactivate all your website plugins.
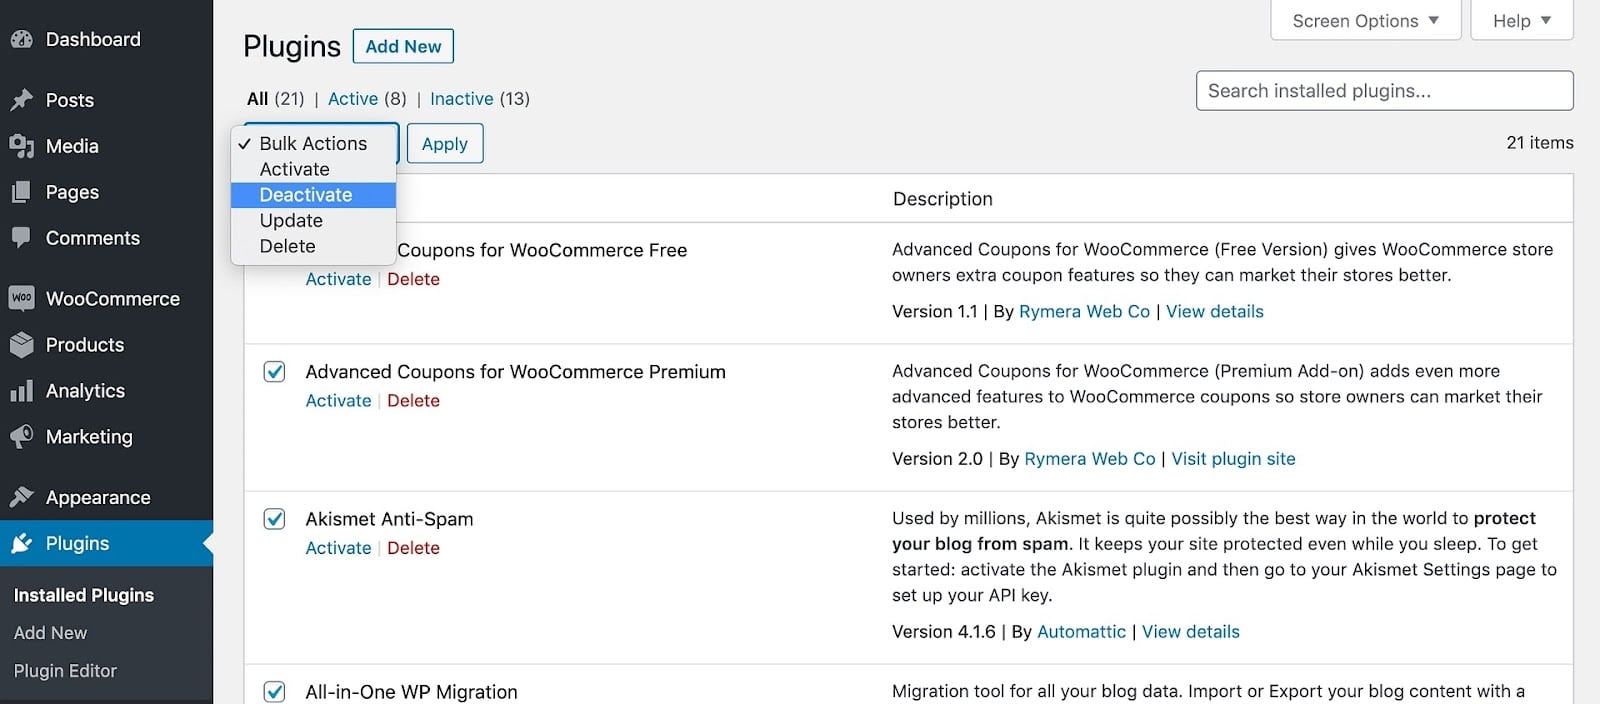
Once you’ve ensured the feature is working, you can reactivate the plugins you need.
#4 Update ‘wp-config.php’ File
Depending on the FTP or file manager you’re using, browse the root directory of your WordPress website and locate the public_html folder, and within, find and open the wp-config.php file.
Add the following code /*Multisite*/ define(‘WP_ALLOW_MULTISITE’, true); in the file and save changes.

#5 Install Multisite on WordPress
Once back on your site, log in again, go to /wp-admin/network.php and do the following:
- Select subdomains or subdirectories for your Multisites network
- Enter the network title
- Add the network admin email
Click the Install button.
#6 Enable Your Multisite Network
Clicking the Install button generates two codes: one you should add to your wp-config.php file, and the other to add to your .htaccess file.
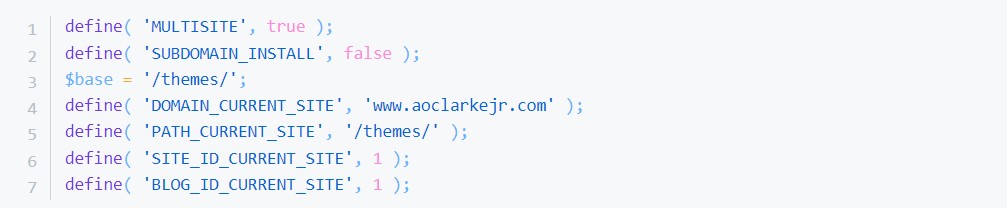
Add the following to your .wpconfig.php file.
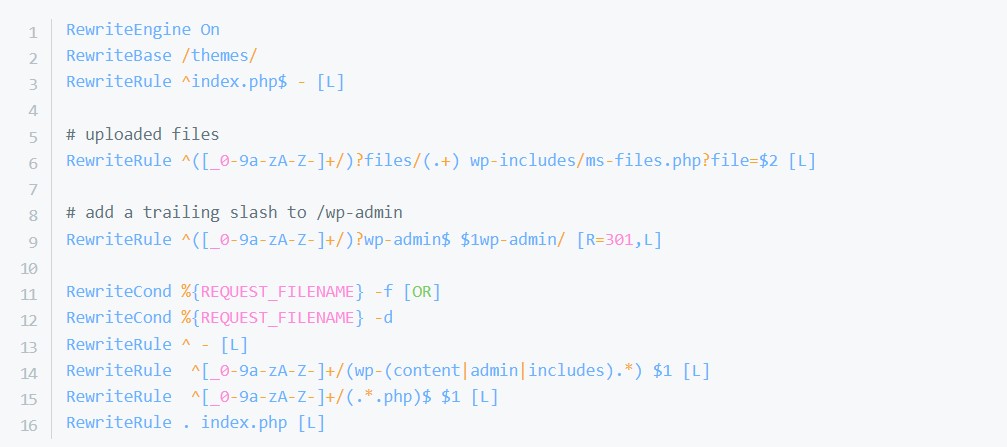
Add the following to your .htaccess file.
Paste the corresponding snippets where required, making sure you’ve turned on the option to reveal hidden files, as the .htaccess file can be hidden on the server. Save the changes to the files, and log in to WordPress again.
Your WordPress Multisite should be up and running, but mind you – your journey towards mastering the endless Multisite options has only begun.

WP Multisite Installation Bonus Tips
- Allow new user registration within the dashboard; go to My Sites > Network Settings > Settings and allow new user accounts registrations.
- Set up upload settings to limit the size of files, maximum upload file size, and file types that can be uploaded.
- Activate theme and plugins for the network via My Sites > Network Admin and apply changes, or go into the dashboard of each individual site and manage the plugins and themes as needed.
- Change the permalink structure as the default URL will have ‘/blog’ in it; go to My Sites > Network Admin > Sites > Select Edit Your New Site, and in Permalink Structure, modify the link per your wish.
And this section completes our installation guide for a WordPress multisite network! If you have any thoughts about it, please hit the chat button and let us know!