Do you want to offer a WooCommerce category discount on your online store? If you are looking for a dedicated guide, keep reading this article. Here, we will show you everything you need to know about WooCommerce category discounts and how to configure them properly.
When you run a WooCommerce store, you should develop multiple strategies to boost sales and conversions. To increase the conversion rates, offering a discount is an ideal choice.
But do you know that WooCommerce discount promotion can take you to the next level?
Instead of creating site-wide coupon codes, you can offer discounts on specific categories or products. In some situations, offering a WooCommerce category discount would be useful.
The WooCommcerce plugin doesn’t come with this feature by default. This guide will help you implement a WooCommerce category discount feature. We will explain why offering category discounts is a good idea and how to implement this feature in your online store.
First, let’s see why offering WooCommerce category discounts is an excellent option.
- Why Offering WooCommece Category Discount Is Good?
- How to Offer WooCommerce Category Discount?
- 1. Create Category-Wide Discount
- 2. Create Buy One Get One Deals for Specific Categories
- 3. Create Buy X Get Y for Free Campaign for Specific Categories
- 4. Add Bulk Pricing Discounts for Specific Categories
- 5. Create Buy X Get Y Discount for Specific Categories
- 6. Offer Total Cart Discounts on Specific Categories
- 7. Offer Discounted Shipping on Specific Categories
- 8. Buy 3 Items With Just $100 for Product Categories
- 9. Apply Tiered Pricing for Product Category
- How to Use YayPricing for Further Optimization
- Conclusion
Why Offering WooCommece Category Discount Is Good?
Offering category discounts is good. For example, offering category-only discounts would be helpful if you are running a tech event and need to give discounts only on tech-related products like mobiles, computer parts, and laptops.
This way, you can only offer discounts on specific products. Another notable advantage of category discounts is that they quickly increase sales and conversion. Since most people would love to get a discount on products they need, customers will immediately purchase the product.
This way, you can increase the overall revenue of your online store.
Now you know why offering WooCommerce category discounts is profitable. Next, let’s see how to offer WooCommerce category discounts properly.
How to Offer WooCommerce Category Discount?
This section will show how to offer Woo product category discounts in various situations. The situations we are going to cover are:
- Set up a category-wide discount
- Buy one, get one offer
- Buy x, get y for free offer
- Bulk pricing discount for product categories
- Buy x, get y for a discount
- Apply total cart discount for specific categories
- Discounts on shipping on particular categories
- Buy 3 items with just $100 for product categories
- Apply tiered pricing for product categories
To make the process simple, we will use YayPricing. YayPricing is a freemium tool to add/modify custom rules on your WooCommerce installation. For this tutorial, we will use the premium version of it.
Check out the WordPress plugins repository if you want the free version.
Let’s look closely at each situation where we can offer the WooCommerce category discount.
1. Create Category-Wide Discount
After activating the plugin, you can see the settings under the YayCommerce option.
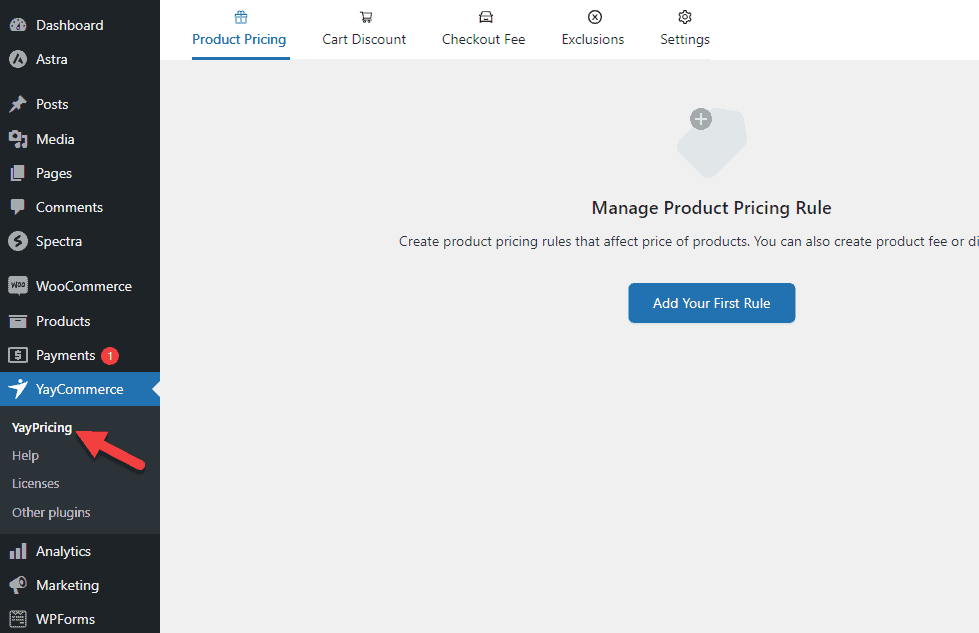
If you check the top bar, you will see five options.

- Product Pricing
- Cart Discount
- Checkout Fee
- Exclusions
- Settings
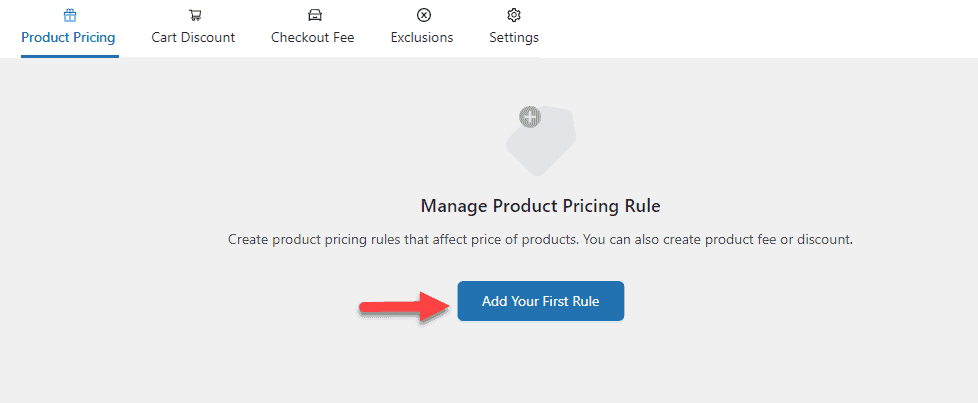
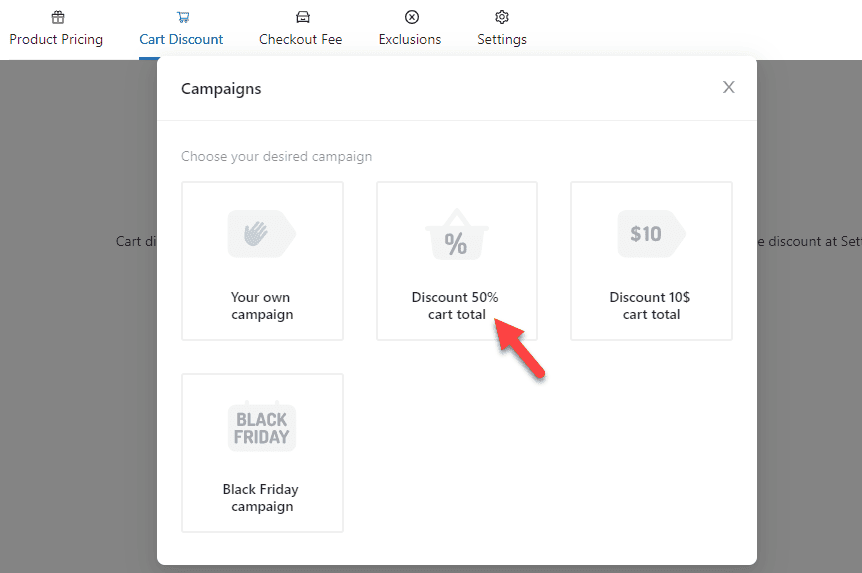
1.1 Choose the Right Campaign
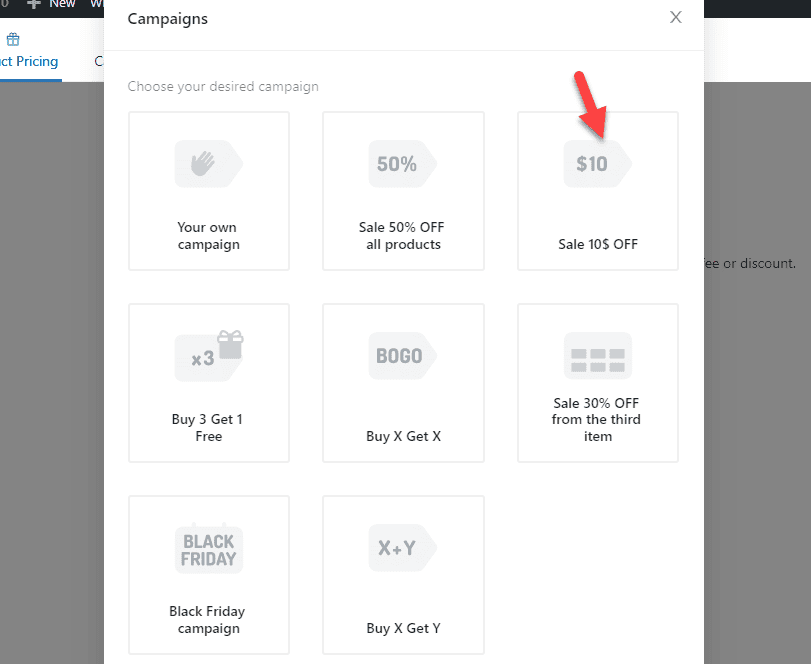
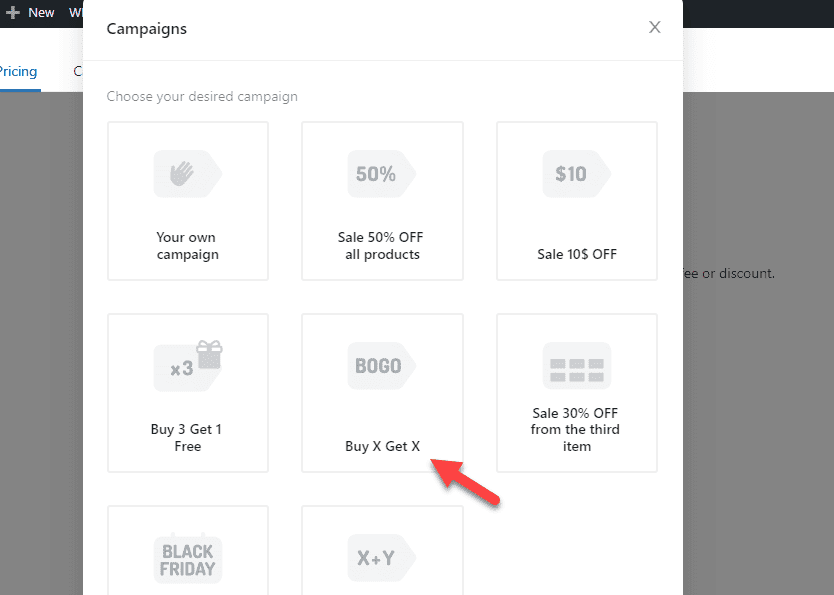
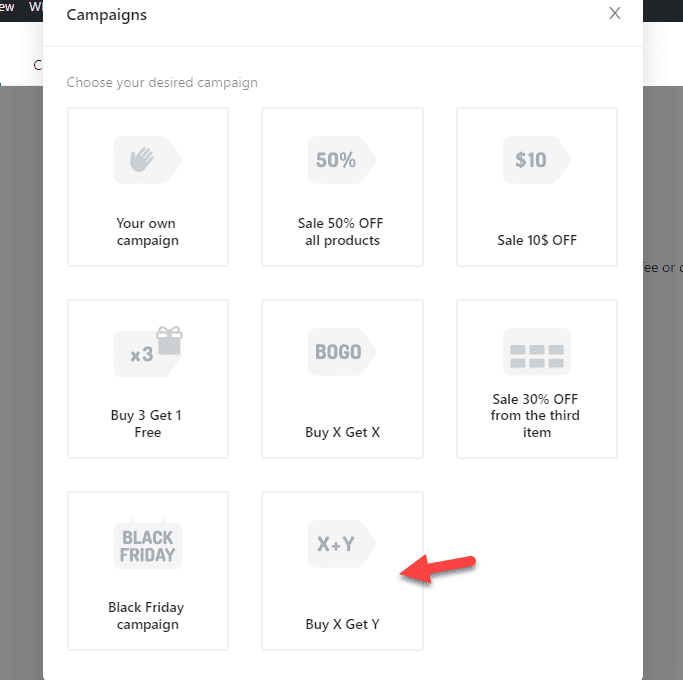
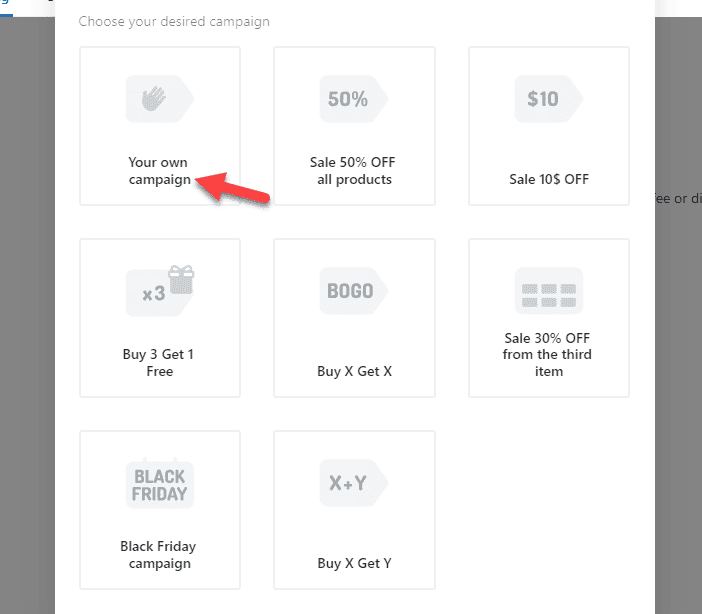
In this case, we will create a new rule in the product pricing section. To complete the task, click on Add New Rule.
You will see a set of pre-made campaign options on the next screen.
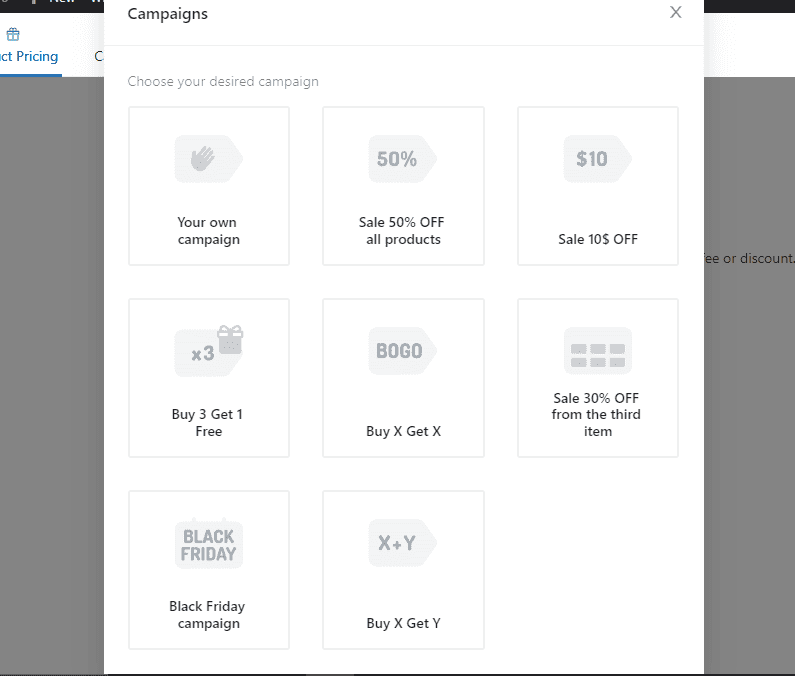
In our case, we will choose the Sale $10 OFF campaign.
Now, give the rule a name.
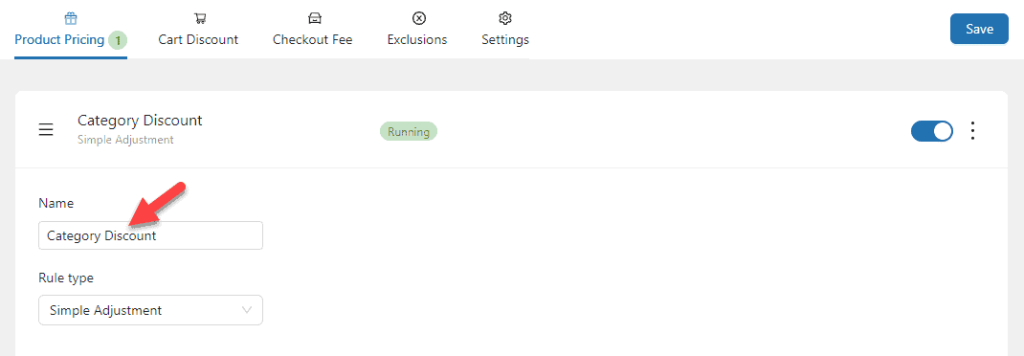
The name is for identification. It will not affect the front end of the website, and you do not need to modify the rule type.
1.2 Configure the Campaign
Once you are done with it, move to the Pricing Options.
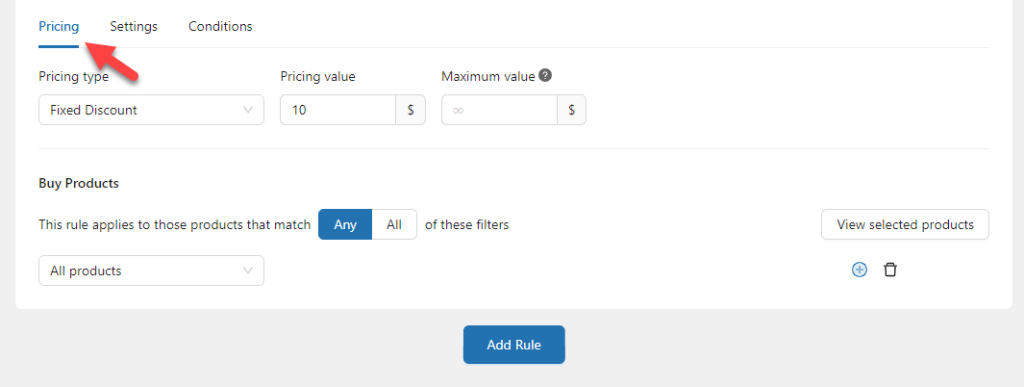
There are three pricing types:
- Fixed Discount
- Percentage Discount
- Flat Price
You can choose an option based on your requirements. In this case, we will select the Percentage Discount. After that, enter the discount amount. We plan to give a 25% discount on every purchase in a specific category. So, in the field, enter 25.

Use the third option if you need to cap the discount. This will prevent the discount from exceeding a certain amount.
1.3 Choose Products
Now, move to the Buy Products section. From the dropdown menu, you can select the Product Category option instead of all products.
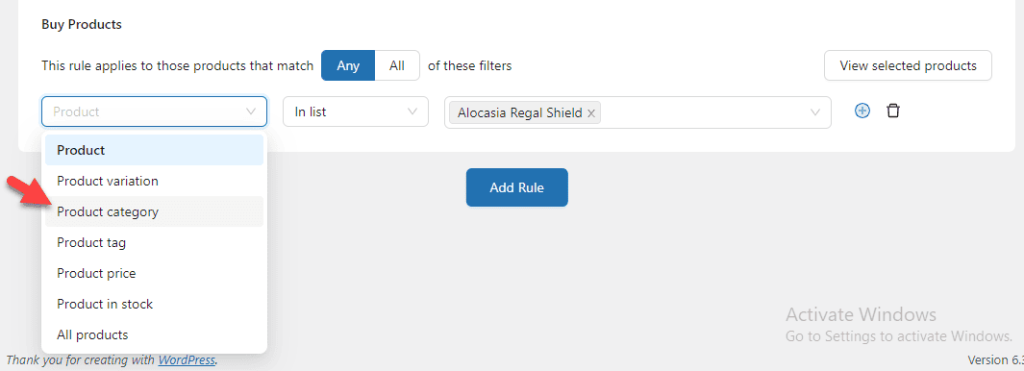
Now, select the categories for which you need to apply the discount. You can always add multiple categories to the list.
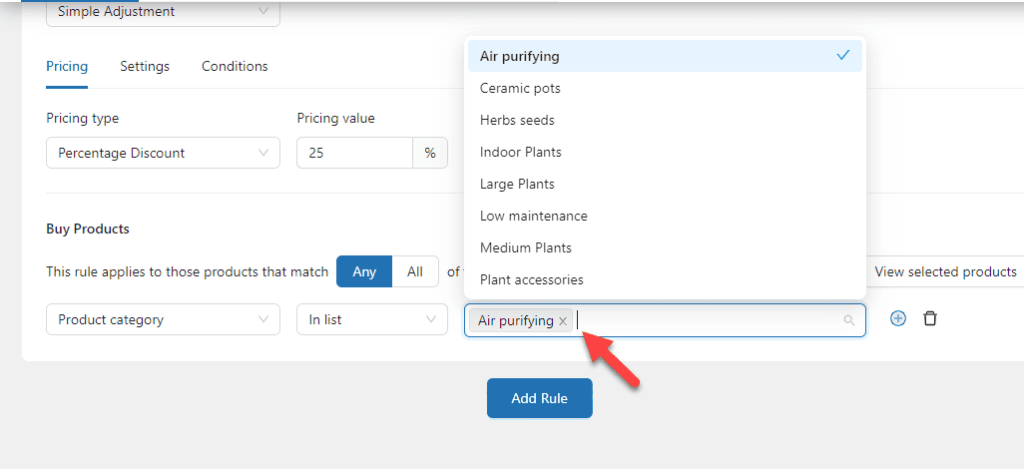
You can click the view selected products button to see all the products affected by the rule.

If you go to the Settings section, you can see further customization options.
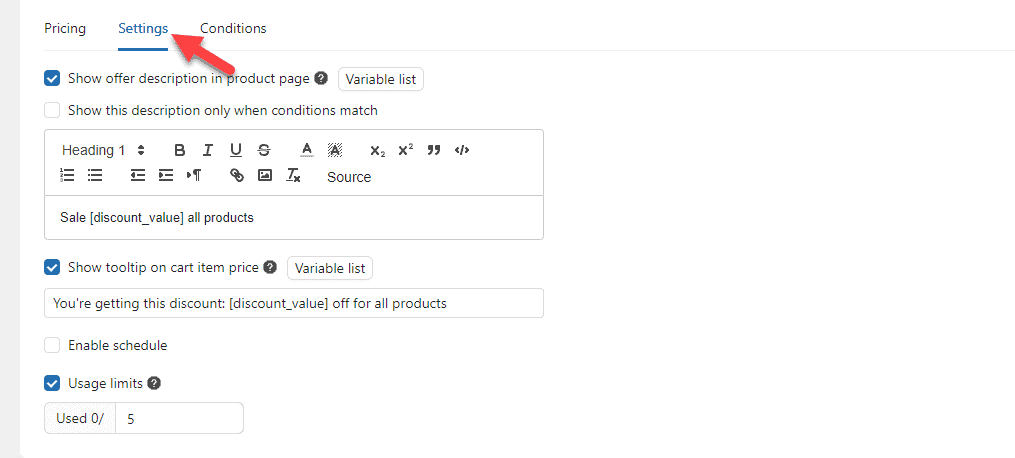
Configuring these options will help you improve the user experience and inform customers about your discount program. The usage limits feature also allows you to limit the discount usage per account.
Conditions are another notable feature you would love. Using this feature, we could target specific people or situations. For example, conditions would be handy if you only need to allow discounts on a cart with a higher sell amount than $100.
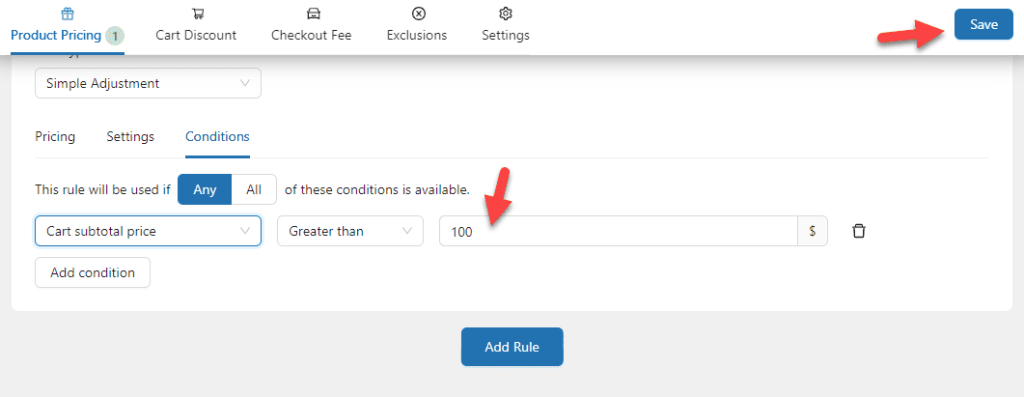
Once you have modified everything, save the settings. This way, you can create a category-wide discount on your online store. When someone gets a product from the specified category, a 25% discount will be automatically applied.
2. Create Buy One Get One Deals for Specific Categories
The next type of discount you can offer is related to BOGO deals. Under the Product Pricing section, you will see the Buy X Get X campaign. Select it.
The idea is simple: Customers who purchase a product will receive the second product for a discounted price. Once you have selected the pre-made campaign, tweak the campaign name and discount type.
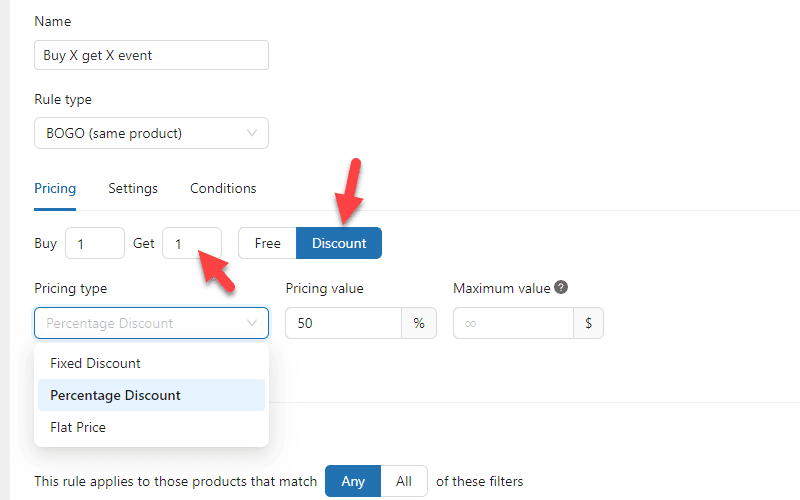
Make sure you have selected discount as the primary option. In the condition we displayed above, when someone buys a product, they will get a 50% discount on the second purchase. Besides a percentage discount, you can also enable a fixed discount.
Modify the rules according to your liking and move to the next step. As we did earlier, the last thing you need to do is modify the Buy Products section. Instead of all products, select the category you prefer.
This way, you can set up BOGO deals with a discount using YayPricing.
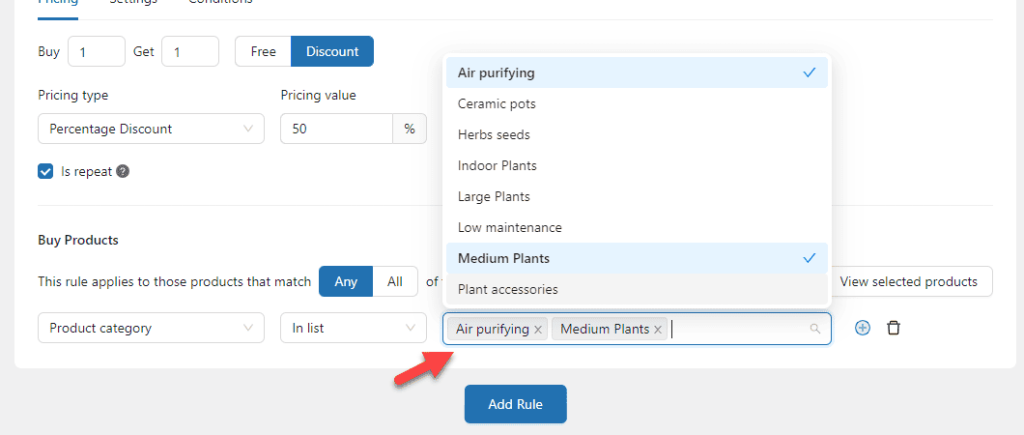
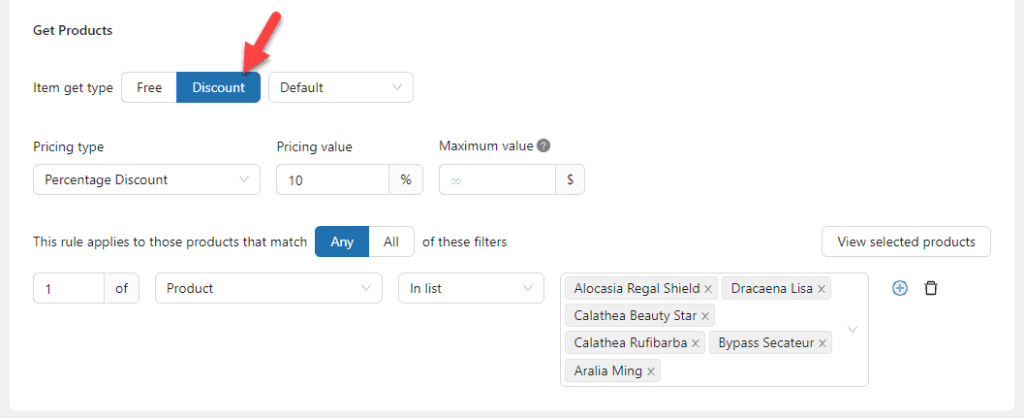
3. Create Buy X Get Y for Free Campaign for Specific Categories
Our next option is to buy X and get Y for free. This strategy would be best for boosting conversion rates. First, select the Buy X Get Y campaign from the Product Pricing tab.
The default campaign needs some customization. The first step is to configure the Buy Products option.
The options you have there are:
- Number of products
- Type
- In the list/ not in the list
- Specify products/ archives
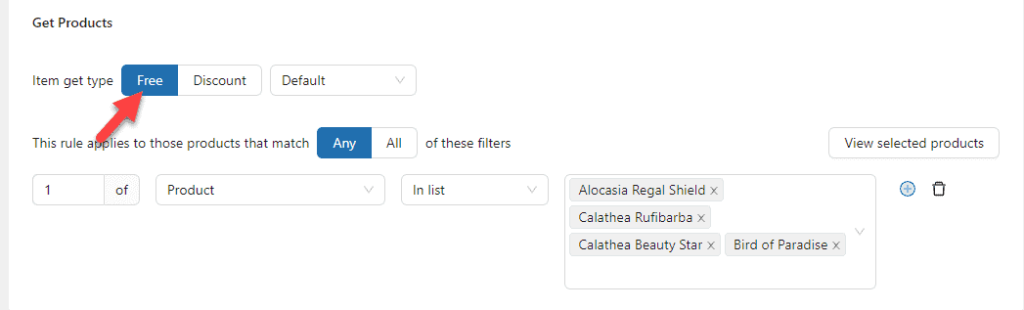
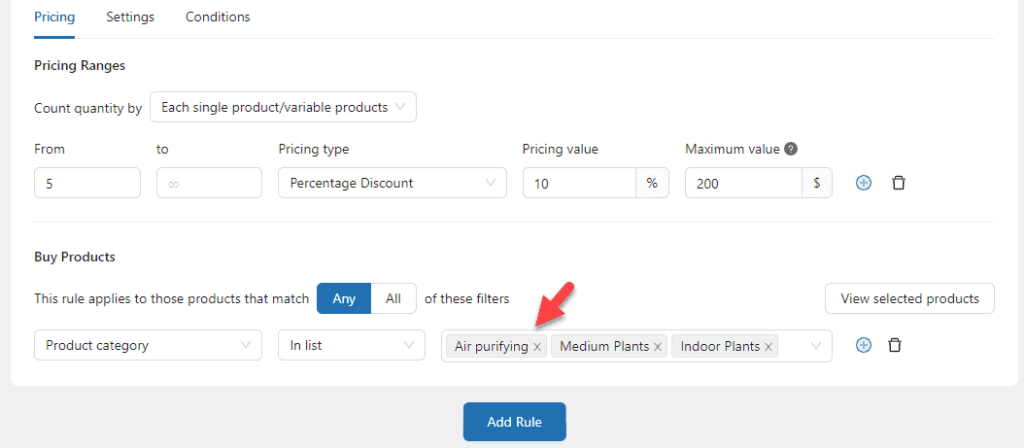
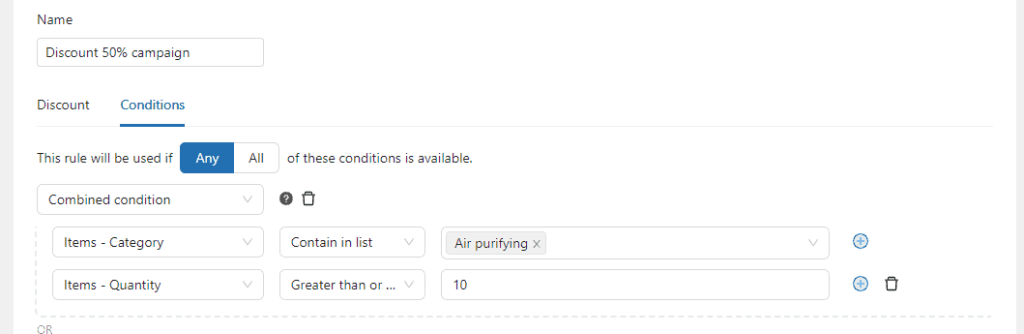
In this case, we will configure the rule so that when someone purchases three items from the air purifying category, they will receive one product for free.
So the new rule will look like this:

Come to the Get Products section and select the items to give away. Make sure you have chosen the get type as free.
After modifications, save the rule. Now, when someone purchases a specific amount of products from the mentioned category, they will get one product for absolutely free. As mentioned earlier, this is an excellent strategy to increase sales and conversions. When you need to run a clearance sale, try this method.
4. Add Bulk Pricing Discounts for Specific Categories
This section will explain how to add discounts on bulk purchases. Offering discounts on bulk orders is a good idea to boost the conversion rates. Here is how to do it.
The first thing you need to do is create a custom campaign under the product pricing tab.
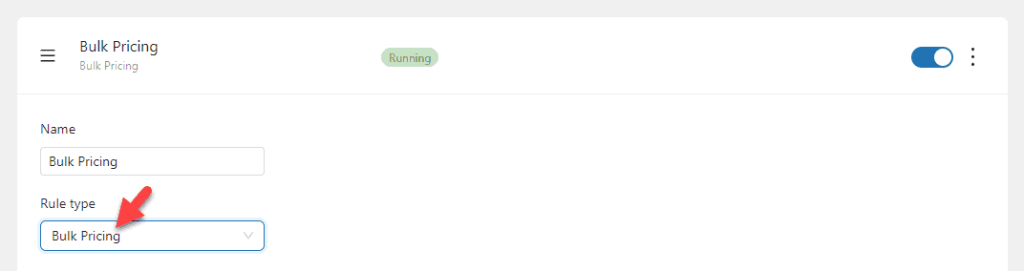
Name the campaign and choose Bulk Pricing as the rule type.
Next, configure the Pricing Range section.
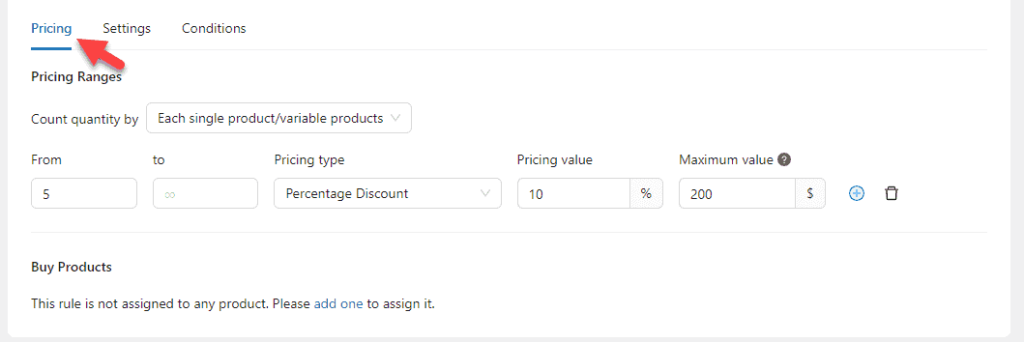
In this case, we have selected the minimum order quantity of five products. The discount type is on a percentage basis, and the value is 10%. In addition, the discount has a maximum cap of $200.
This rule is ideal in most situations. So far, we have configured the rule properly but haven’t assigned it to any products or product categories. To configure that part, add a new rule.
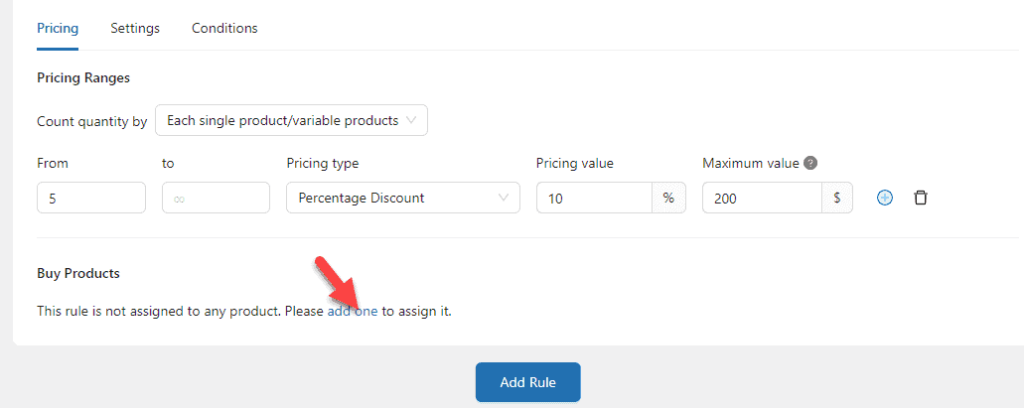
Now, choose the product category from the dropdown and select the categories for which you wish to apply the rule.
Once you are done with the configuration, save the settings. The new condition will work seamlessly based on the configurations from now on.
That’s it! Next, let’s see how to create a buy x, get y discount rule using YayPricing.
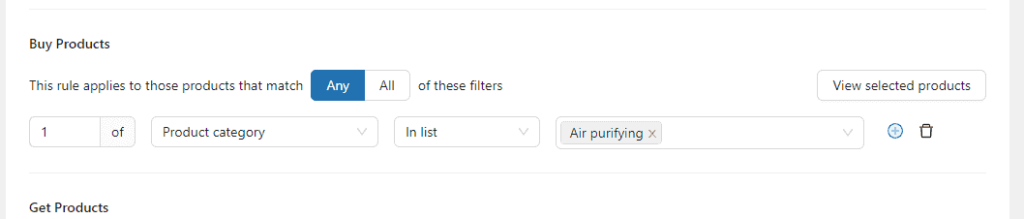
5. Create Buy X Get Y Discount for Specific Categories
Last time, we created a rule where the customers will get a free product while purchasing X amount of goods. This time, we will explain how to give them a discount on the fourth product. The idea is pretty simple. While configuring the rule, choose discount instead of free.
This way, you can offer the customer a whopping discount for the fourth purchase. We recommend keeping the discount rule if you need to boost your overall revenue.
6. Offer Total Cart Discounts on Specific Categories
While a customer purchases many items from the same category, giving them a discount would be helpful. Choose any campaigns in the Cart Discount section to set up cart discounts.
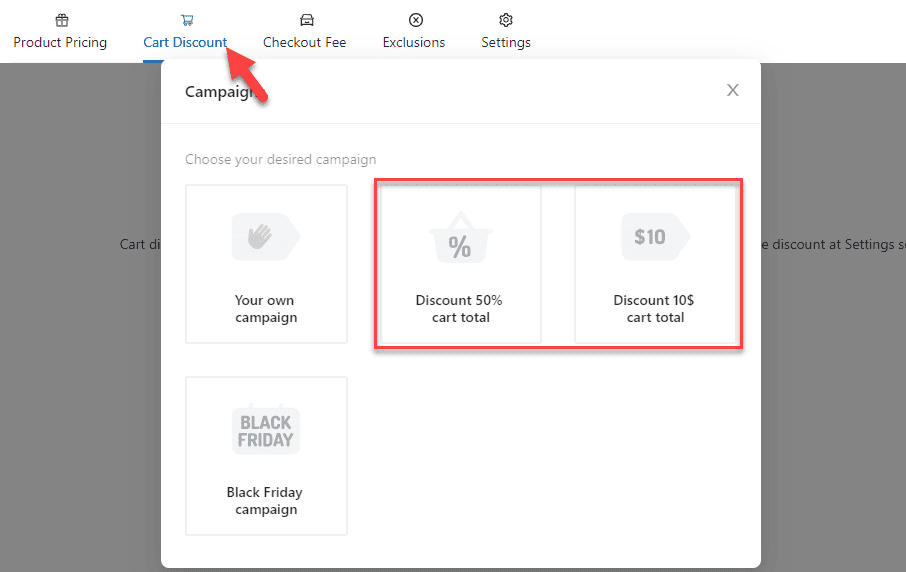
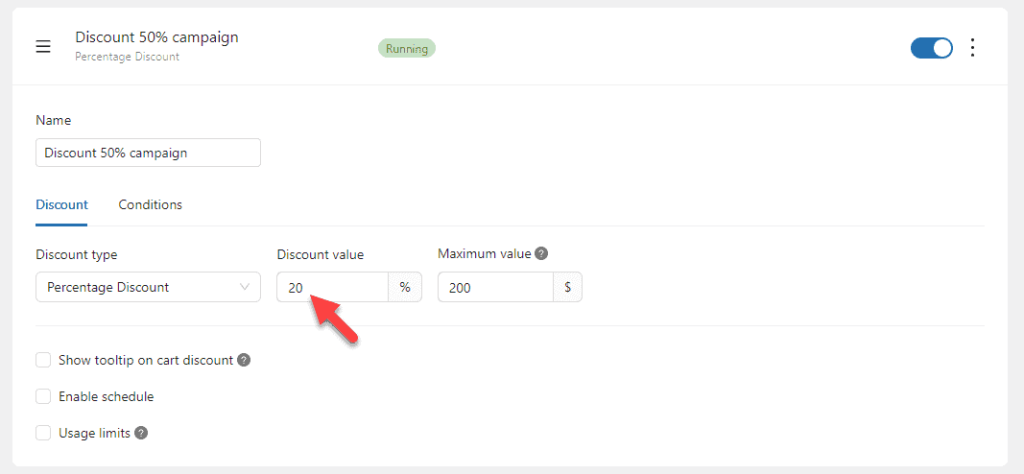
In this case, we will choose the %-based discount campaign. You can always change the discount type from the editor, so there are no issues if you need to switch things later.
On the next page, you can choose the discount type and amount. We will select a 20% discount.
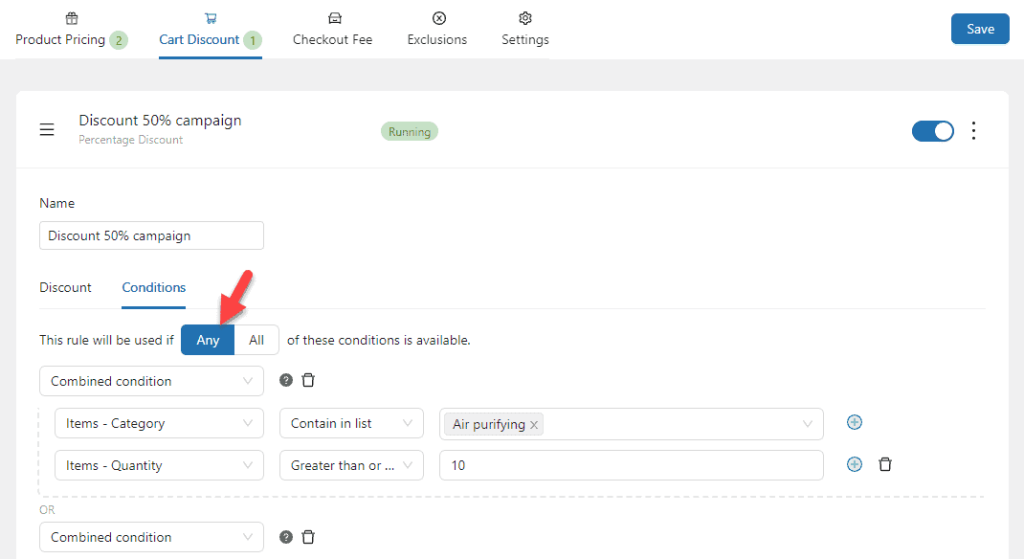
Now that part is clear. The next thing you need to do is set up the conditions. We will set up two conditions.
- Product category
- Product quantity
Also, choose the combined condition rule from the dropdown.
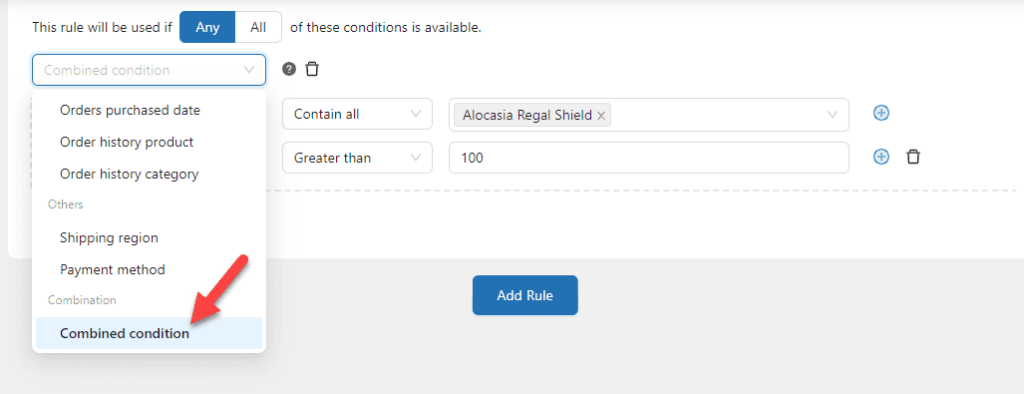
Here, we have configured the rules like this:
The first condition mentions the category where this dynamic pricing rule needs to be applied. The second condition helps us specify the minimum order quantity to get the discount. Similarly, you can list all the categories using the combined condition.
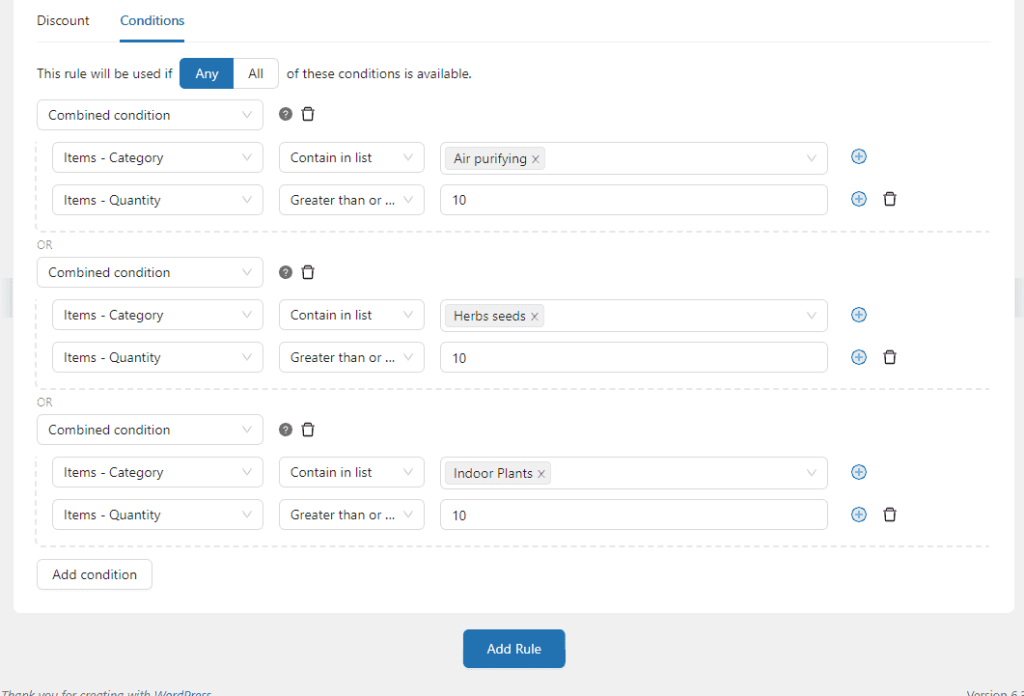
Here, the discount will be applied when someone purchases ten or more products. One last thing to note is the rule needs to be used when any of the conditions are met instead of all.
After configuring the discount conditions, save the rule.
This way, you could offer cart discounts on specific categories.
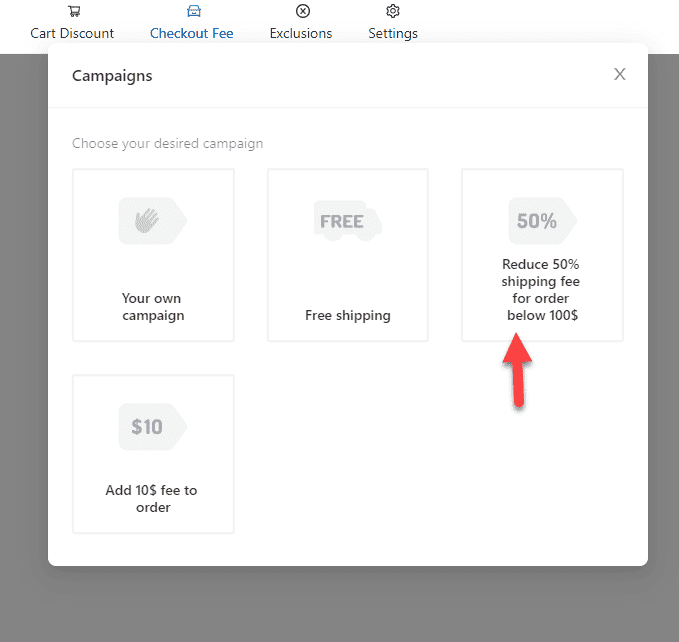
7. Offer Discounted Shipping on Specific Categories
Everyone loves free shipping. Implementing a free shipping or discounted shipping rate can increase sales. Here is how to offer discounted shipping on specific categories.
The first thing you need to do is go to the Checkout Fee section and add a new rule. The campaign should Reduce 50% shipping fees for orders below $100$.
Once you have done that, configure the shipping discount you need. In this case, we will provide a 20% discount on shipping.
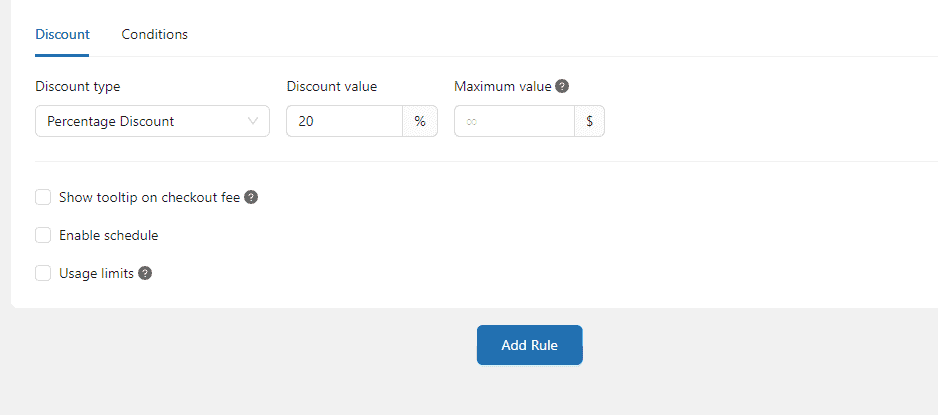
After modifying the discount type and value, move to the conditions section.
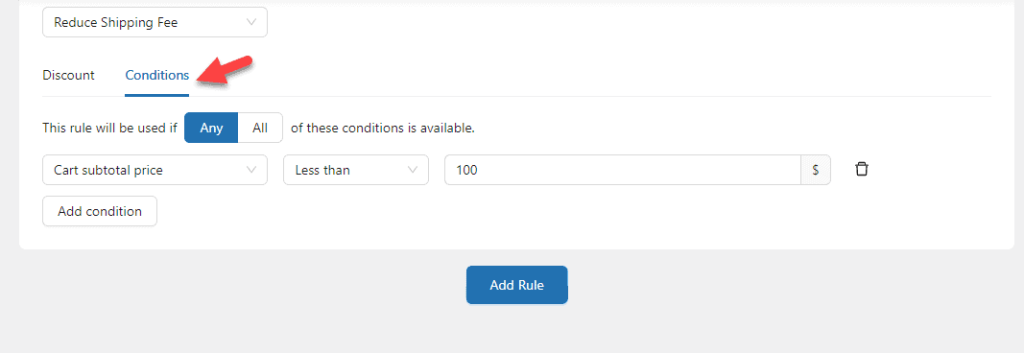
The condition type should be cart item – category.
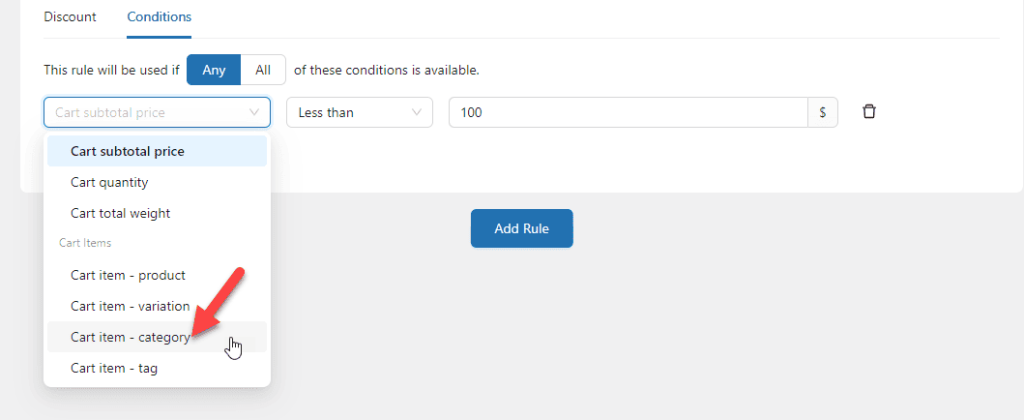
Next, add the categories to the box.
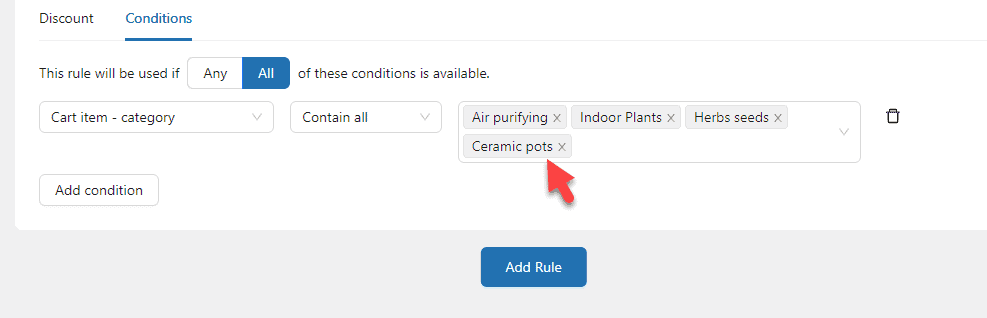
Once you are done, save the settings. When someone purchases products from your online store, they will get a 20% shipping discount when they have products in the cart from the mentioned categories.
That’s it!
This way, you can enable discounted shipping on specific categories and increase the conversion rate.
8. Buy 3 Items With Just $100 for Product Categories
To enable this pricing rule, YayPricing offers a potential feature for WordPress users. On the YayPricing dashboard, choose “Product Bundle” as a rule type. This feature will help boost upsell for your WooCommerce store.
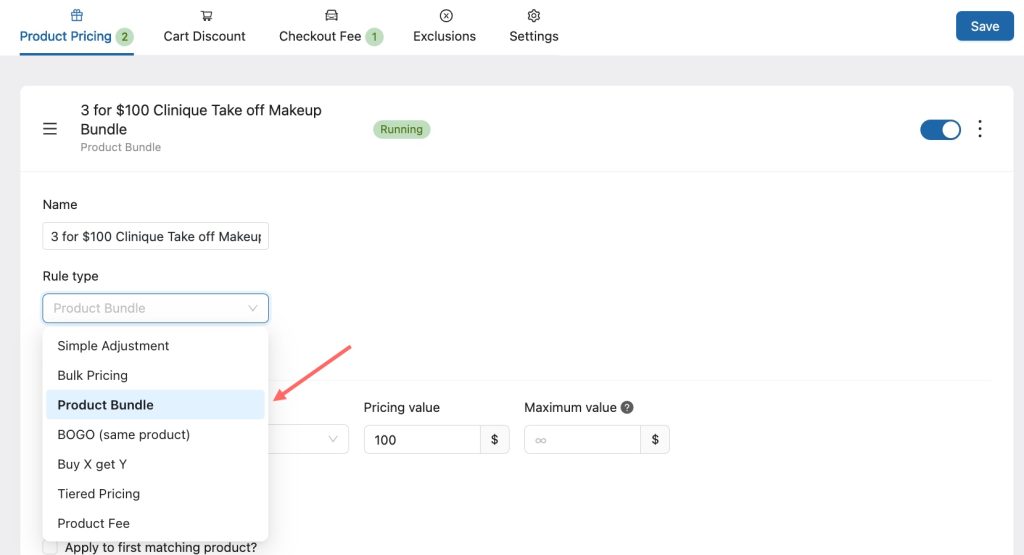
Next, set the quantity to 3, choose “Flat price” as the pricing type, and configure this rule with a specific price of $100 for this promotion’s discount value.
Don’t forget to click on “For group” box.
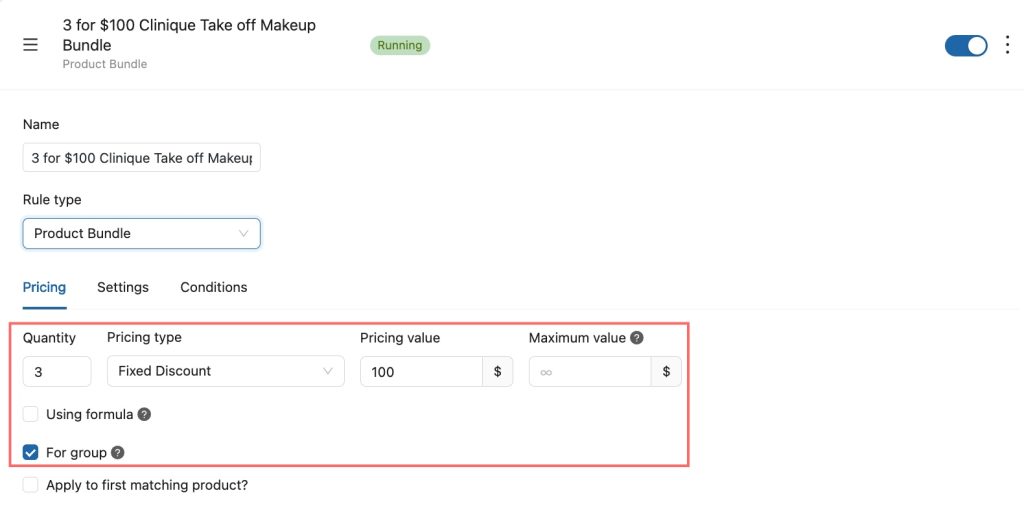
Once done, select product category as “Clinique Skincare”.
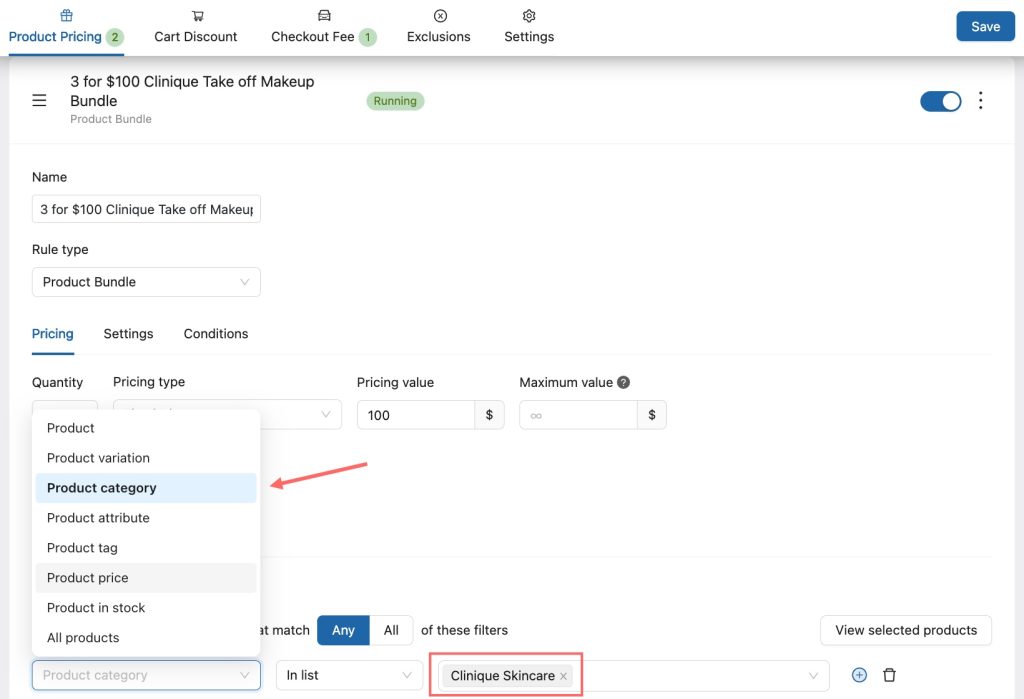
Then, save the setting, and you will have a wonderful promotion campaign!
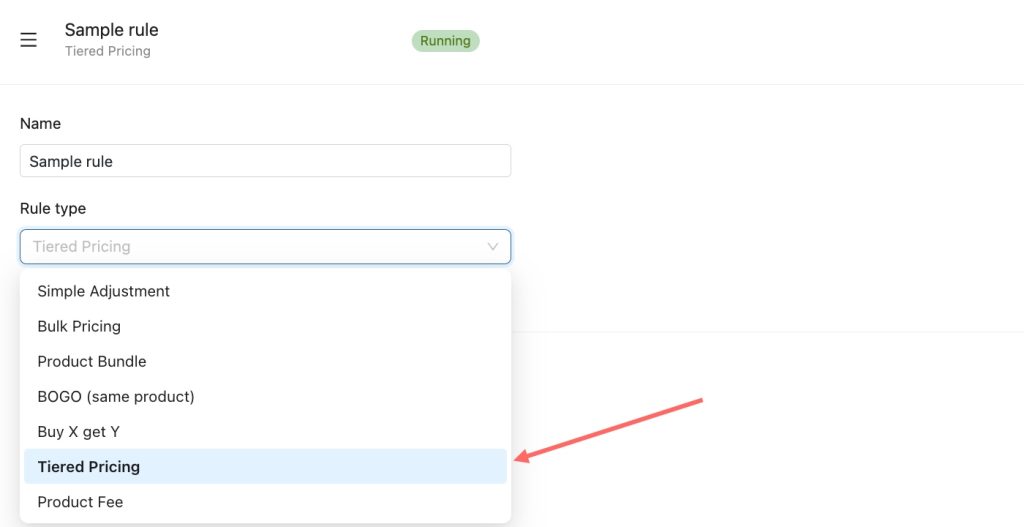
9. Apply Tiered Pricing for Product Category
This section explains how to add tiered pricing for a product category. This rule type will help your WooCommerce store boost sales and encourage your customers to buy more to accept a discount.
Choosing the rule type is “Tiered Pricing”
Scroll down to configure this rule’s pricing ranges. We will set a fixed discount for each tier product.
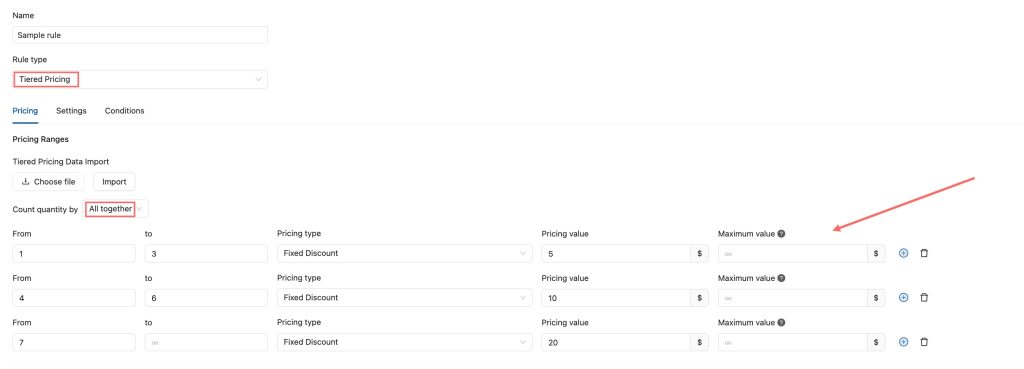
Once you’re done, you can select the product category in the dropdown list. For instance, we’ll choose the “Skincare” category.
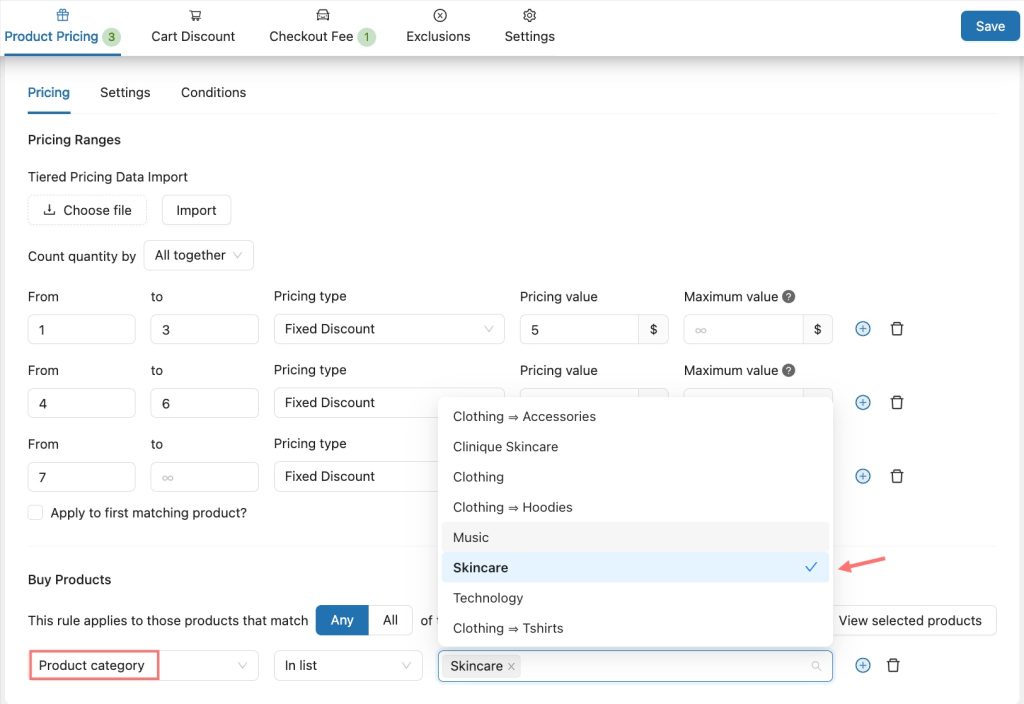
Now, enable this rule and hit the save button. Let’s check to see how it work for your WooCommerce store.
How to Use YayPricing for Further Optimization
Using the YayPricing plugin, you can optimize your online store further. The two main options we recommend are:
- Setting up an upselling notice
- Configuring product sale display
Let’s take a quick look at each option.
1. Upselling Notice
Upselling is a popular marketing strategy for selling more products. Once you have configured the rules, open the upselling settings.
You can enable upselling for
- Product pricing
- Cart discounts
- Checkout fee
In this case, we have configured a product pricing rule so that customers can add two products to their cart and get one for free.
Once you have modified the conditions, enable the upselling option.
You can also tweak the notice text to make it more professional. In this case, the default text is fine. Once you have made changes to the upselling notice, save the settings. Now, test the new modifications in the front end by adding two products to your cart.
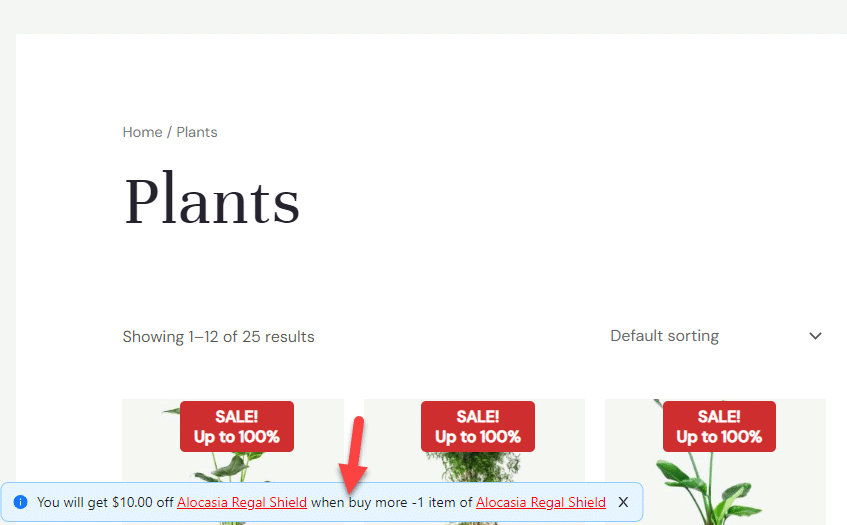
As you can see in the screenshot, the website will show a notice to the customer, which will help the website owner to sell more products.
This way, you can encourage people to get more products.
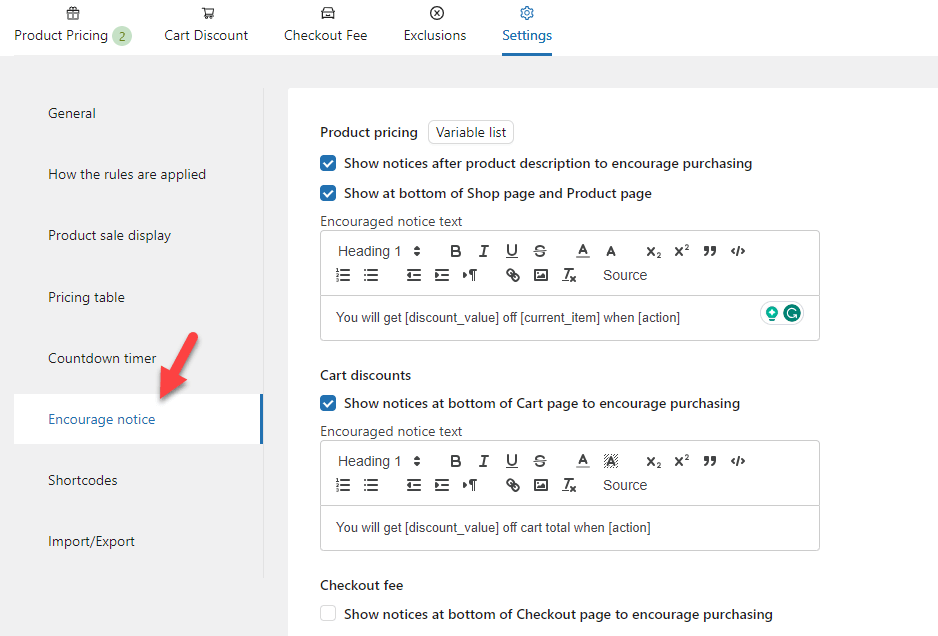
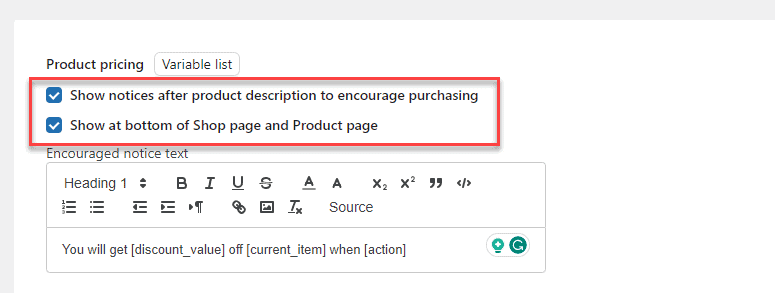
2. Product Sale Display
The product sale display can be found in the YayPricing settings section.
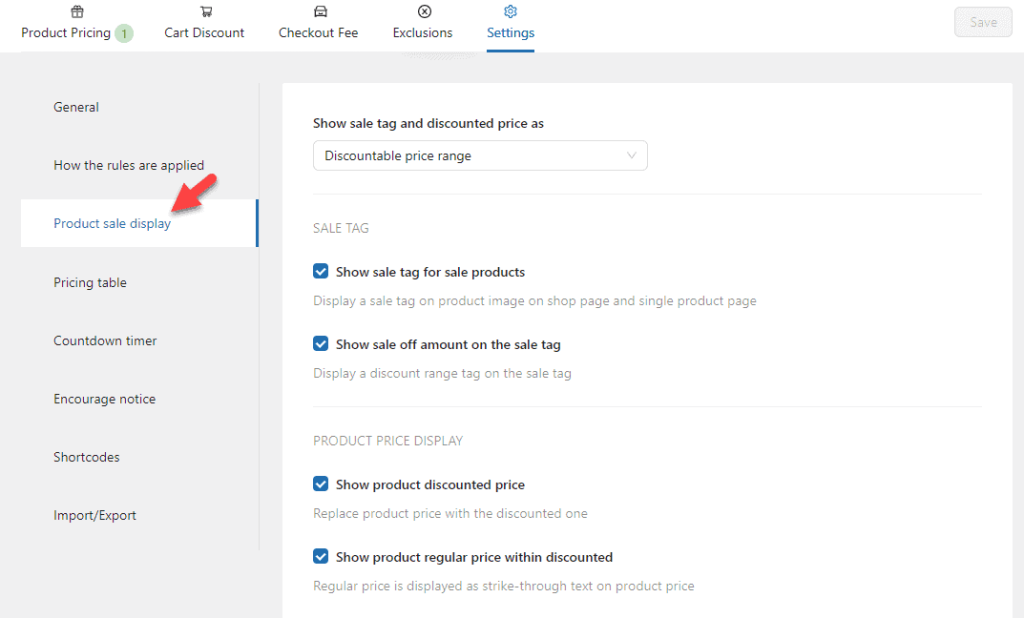
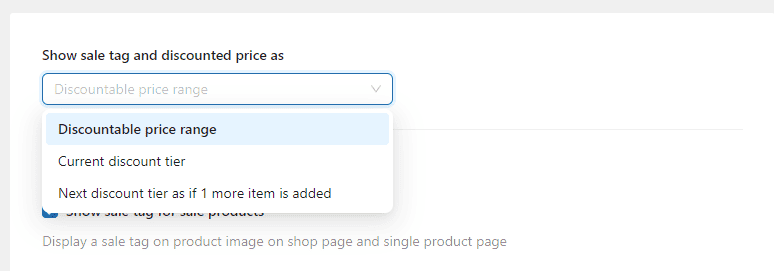
The main configurations available are:
- Sale tag display options
- Discountable price range
- Current discount tier
- Next discount tier as if one more item is added
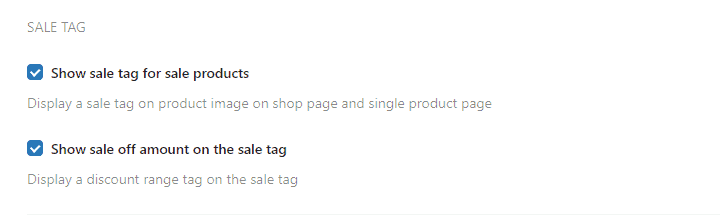
- Sale tag options
- Product price display
Let’s keep a closer look at each configuration.
The first option controls displaying the sale tags and discounted prices in the front end.
You can display a sale tag from the sale tag settings on the product image. You can also show the discount range on the label.
Under the product display price, you will get two options.

Using those, you can display the product’s discounted price instead of the actual price. This will help grab the customer’s attention quickly. The second configuration option is to show the actual price through a strikethrough.
You can choose a configuration option based on your preferences and save the YayPricing settings.
Conclusion
Since the WooCommerce plugin doesn’t have many dynamic pricing options, YayPricing could be one of the best tools to tweak the pricing, offer discounts, and sell more goods. As you can see in this article, you do not need to deal with codes or complex configurations to deal with dynamic product pricing.
In short, we have shown you multiple situations where you can offer WooCommerce category discount on your online store. Therefore, we highly recommend checking out the tool. Based on your requirements and preferences, start implementing the strategies and making more conversions.
How are you going to configure the WooCommerce category discount?
Let us know in the comments.